Platform user guide
Step-by-step instructions for everything the platform does: from registration and filing an entry to running a federation. Sections are labelled with the role they are written for — use the filter to keep only yours and the search to find a button by its name.
Role:
Getting started: sign-in, menu and cabinet
AthleteTeam captainRefereeOrganizerFederation administratorWhere things are on the federation site and what appears once you sign in.
- 1
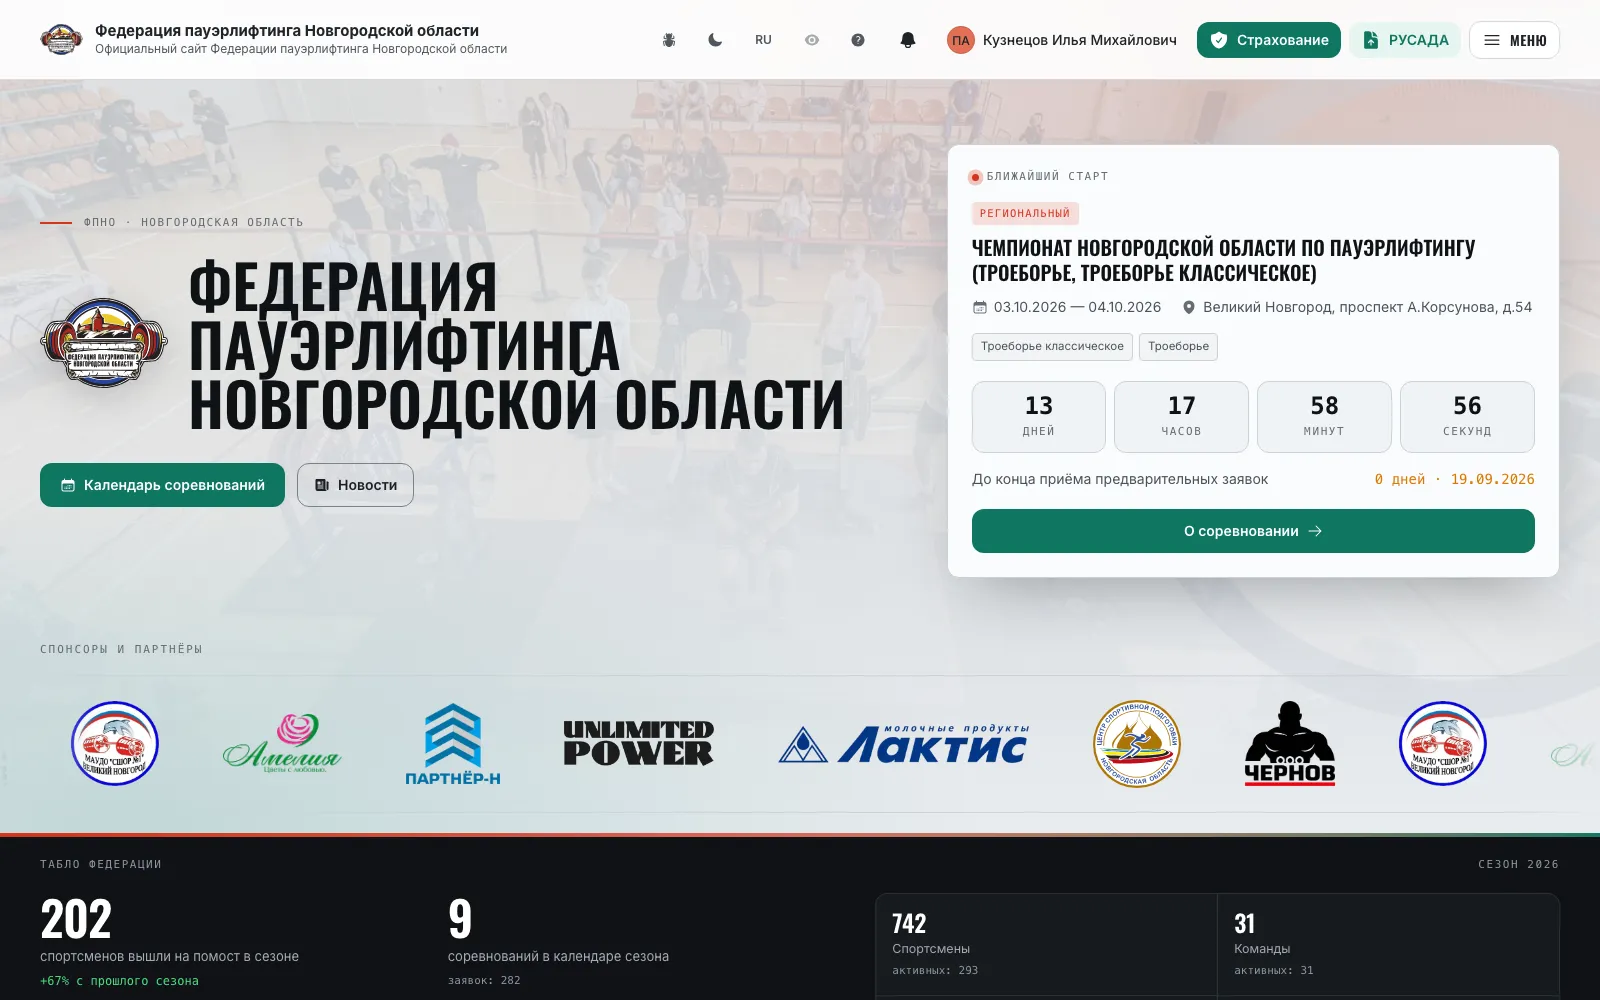
Click “Sign in” in the top right corner. No account yet — the sign-in page links to “Register” (see “Registering on the site”).
- 2
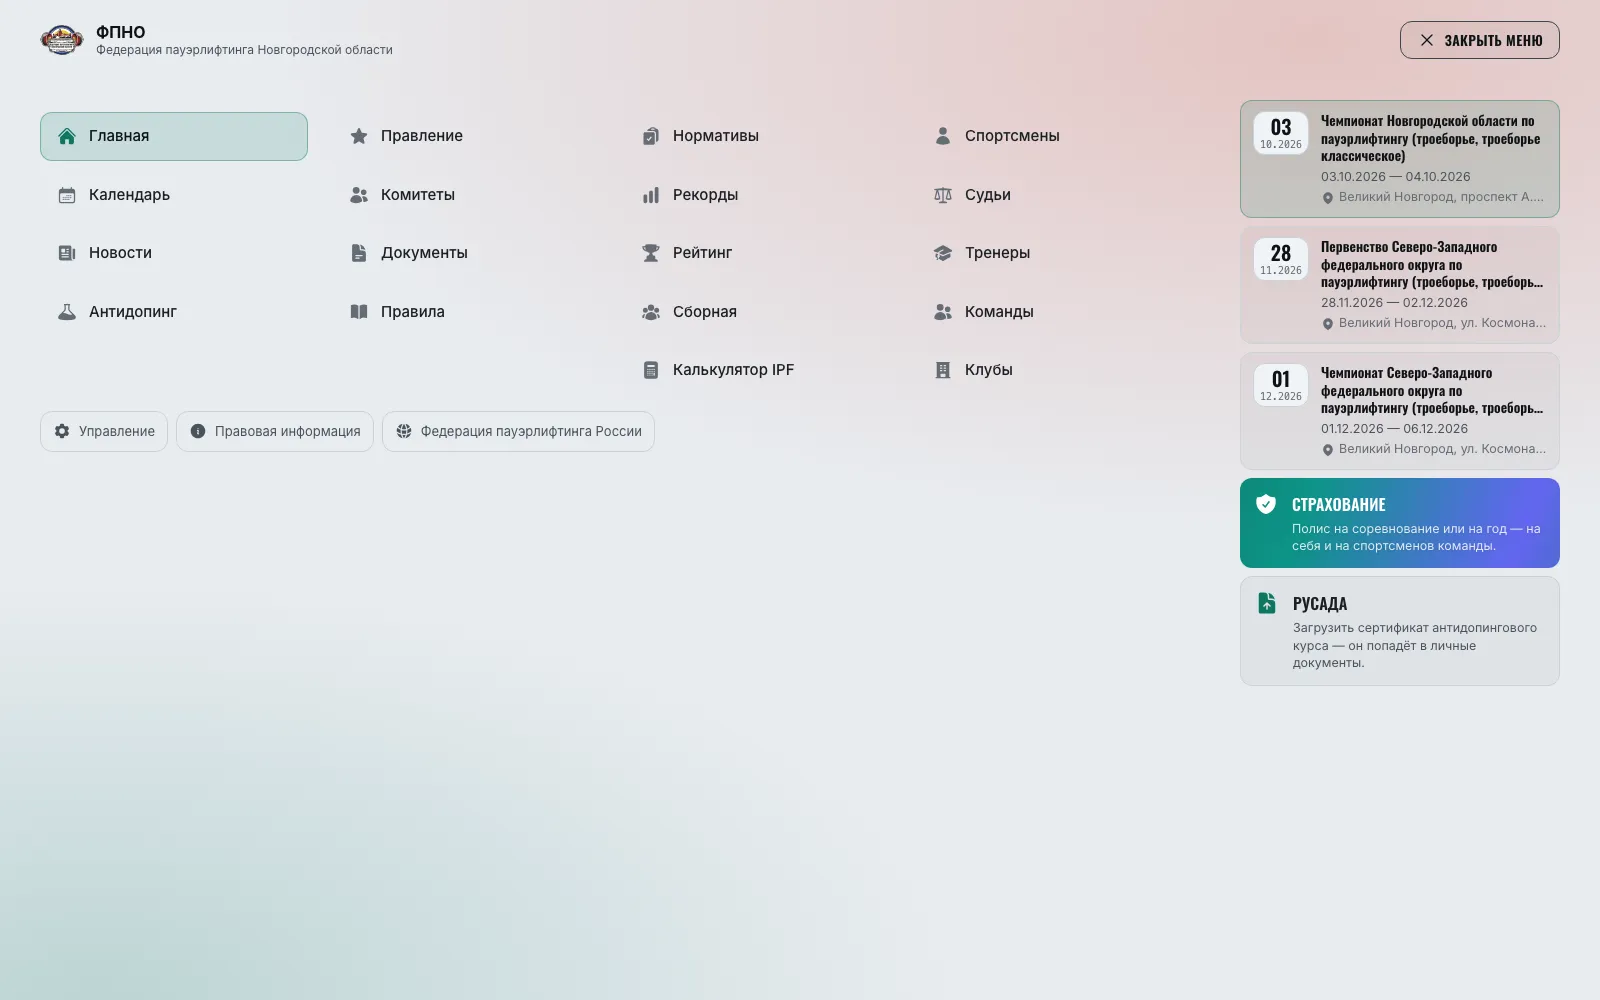
The “Menu” button opens the full-screen menu: the “Competitions”, “Federation”, “Results” and “Balance” columns, the “Services” block (Insurance, RUSADA), “Account” and “Upcoming competitions”. On a wide screen the same sections sit in the collapsible left menu.
- 3
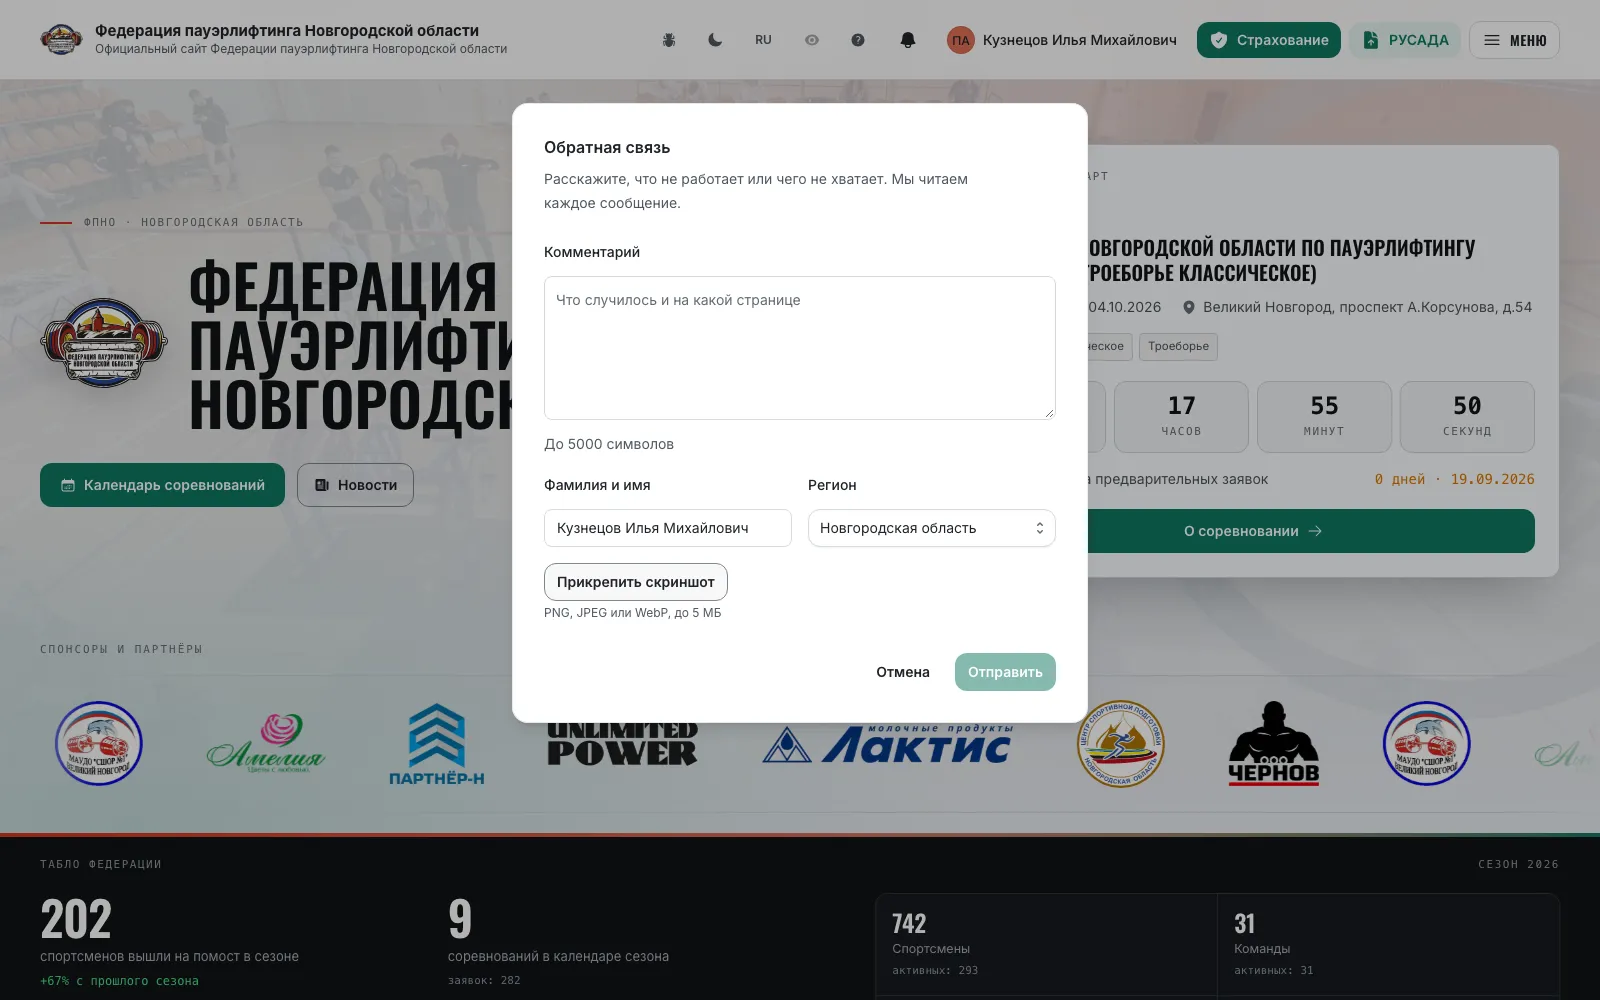
Next to the menu in the header: “Guide” (this page), the feedback button with the bug icon, the light/dark theme switch and the language picker.
- 4
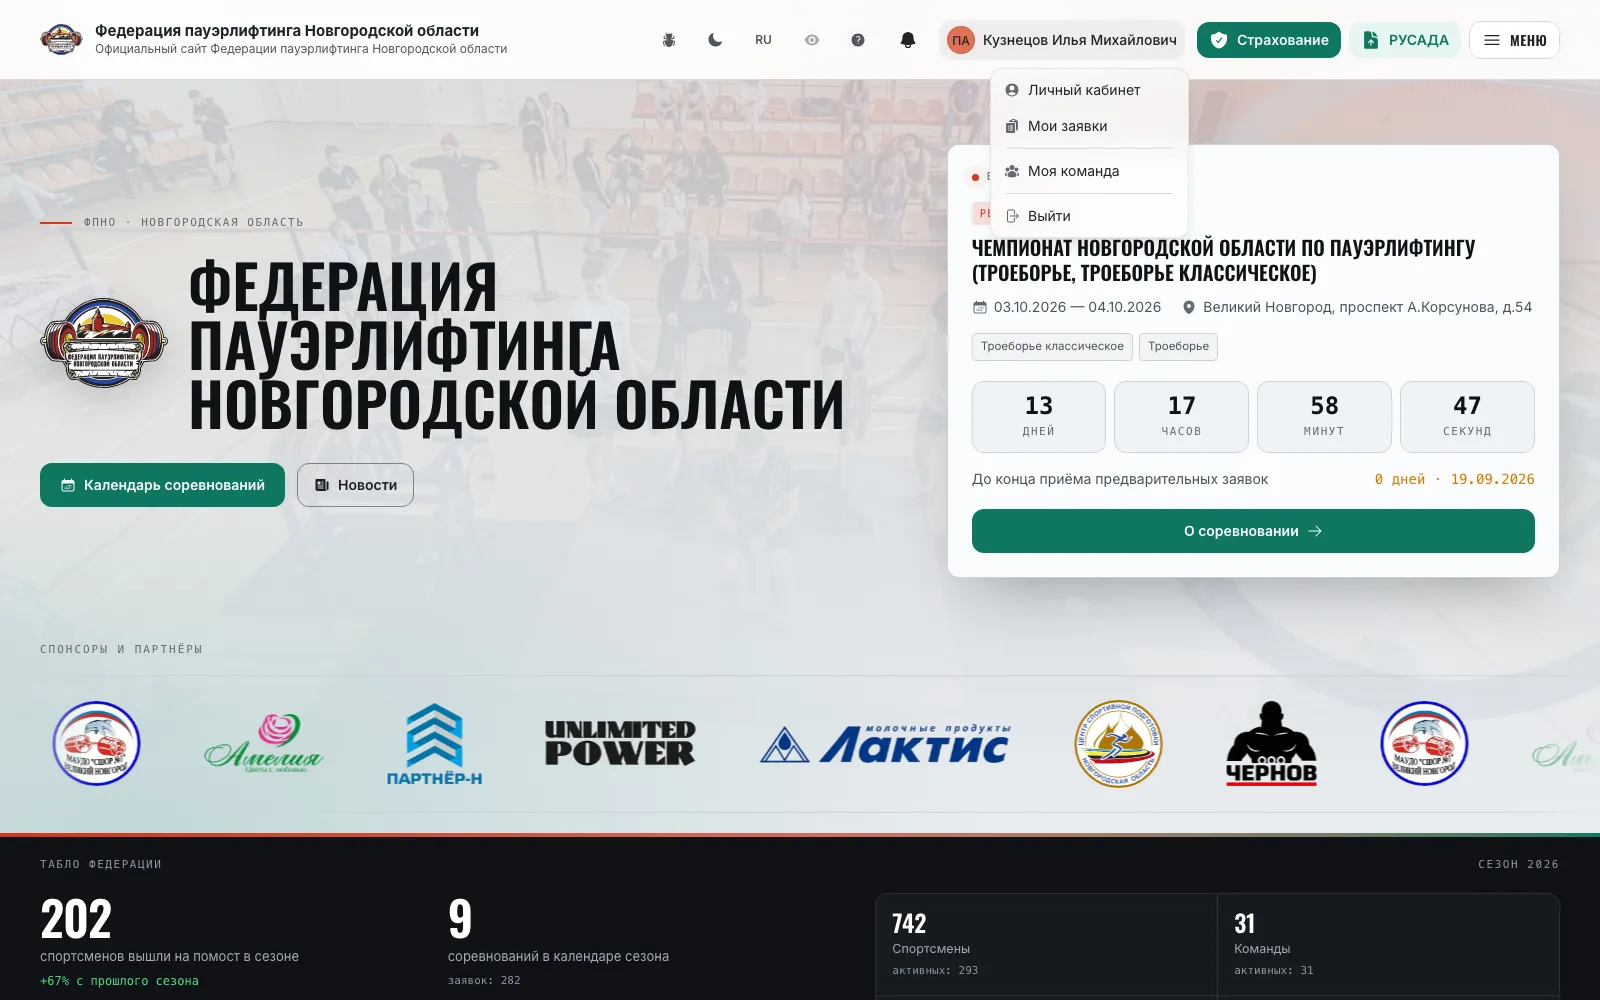
After signing in the header shows the notification bell and your name. The menu under the name holds “My profile”, “My applications”, “My team” (if you are in one) and “Sign out”.
- 5
The home page is the federation showcase: the next start with a countdown, “Platform live” with the scoreboard of a running competition, upcoming competitions, season leaders, latest records, news and “Where to train”.
- 6
If you hold management rights, the bottom of the menu gains “Federation management” and “Assignment orders”, and the people-and-teams registry opens from “Balance”.
Note: Create and edit buttons are visible only to users with the matching rights. If a button you need is missing, contact the secretary or administrator of your federation.
Registering on the site
AthleteTeam captainRefereeAn account request for an athlete, referee or coach: four steps and a check by the federation secretary.
- 1
Open “Register” on the sign-in page or in the “Account” menu block. The wizard has four steps: “Account”, “Personal details”, “Roles”, “Confirmation”.
- 2
“Account”: e-mail and a password of at least 8 characters — you will sign in with them.
- 3
“Personal details”: full name, phone, date of birth, sex, region of registration and city of residence. Registration is open from 18 years: a minor athlete is registered by the federation.
- 4
“Roles”: tick who you are — athlete, referee, coach. The site looks up your cards by name and date of birth; confirm the match is really you, or tick “I am not in the list”. On the national federation site you may state a “Position in the regional federation” — the secretary grants entry and order rights by it.
- 5
“Confirmation”: review the request, accept the user agreement and the two personal-data consents, optionally leave a comment for the secretary and click “Send request”.
- 6
Confirm your e-mail via the link in the letter. The account is created at once, but you can sign in only after the regional or national federation secretary has checked the request and linked the cards.
Note: If a card is marked “already has an account”, do not register twice — sign in or recover the password. The secretary handles the queue on the “Registrations” tab of federation management.
Personal cabinet
AthleteRefereeYour details, admission documents, competition history and password — in the menu under your name.
- 1
Open “My profile” in the menu under your name. Tabs: “Profile”, “My applications”, “Documents”, “Temporary registration”, “Competition history”, “Security”.
- 2
“Profile”: photo, date of birth, rank, region and city from the athlete card. Only the federation secretary can change the name, rank or region — write to them if the card is wrong. “Open card” leads to the public page.
- 3
The “Documents for competitions” tiles — “Personal-data consent”, “RUSADA”, “Insurance” — show what is uploaded and until when it is valid. Click a tile to go to the upload.
- 4
“Results timeline”: a chart built from final protocols — a point per start, the last and the best results are labelled; switch the discipline and the metric (total, lifts, IPF GL points, bodyweight).
- 5
“Documents”: personal documents — personal-data consent, RUSADA certificate, insurance policies, passport scan. Upload them in advance: the secretary checks them when accepting the entry.
- 6
“Competition history”: all your starts by protocols, with an Excel export.
- 7
“Security”: change the password — other devices are signed out after the change.
Note: Without an athlete card linked to the account the documents and history are not shown. The federation secretary links the card when approving the registration request.

My applications
AthleteTeam captainRefereeEvery athlete and referee entry in one table of the personal cabinet.
- 1
Open “My applications” in the menu under your name or the tab of the same name in the cabinet.
- 2
The table shows “Date”, “Competition”, “Role” (athlete or referee), “Status” and “Actions”. Kinds: personal entry, team entry, regional entry, refereeing application — including refereeing inside a team or regional entry.
- 3
Statuses: “Draft”, “Under review”, “Approved”, “Rejected”, “Revision requested”, “Not admitted”, “Withdrawn”. A rejection shows its reason.
- 4
“Open entry” leads to the entry wizard — until the competition is over. A refereeing application offers “To the competition entries”.
- 5
“Entry actions”: “Attempt cards”, “Personal card”, “Application” for print and “Application (.docx)”.
- 6
“Delete entry” is available while preliminary entries are accepted. Later only the competition secretary can withdraw an athlete. Past competitions are hidden — the “Past” button reveals them.
Note: Entries appear here only when an athlete or referee card is linked to the account.

Notifications
AthleteTeam captainRefereeOrganizerFederation administratorThe bell in the header: entry decisions, granted ranks, new orders.
- 1
The bell in the header shows the number of unread notifications; the list opens on click, “All notifications” leads to a separate page.
- 2
What arrives: “Entry to “…” approved / rejected / returned for revision” with the secretary's comment, “Athletes reviewed” with accepted and rejected counts, “You have been granted a sports rank” or “a referee category” with its validity.
- 3
A federation secretary receives notifications about uploaded assignment orders: number, date and federation.

Roles and access rights
OrganizerFederation administratorThere are no roles — there are rights: on the whole federation, on referee positions and on a single competition.
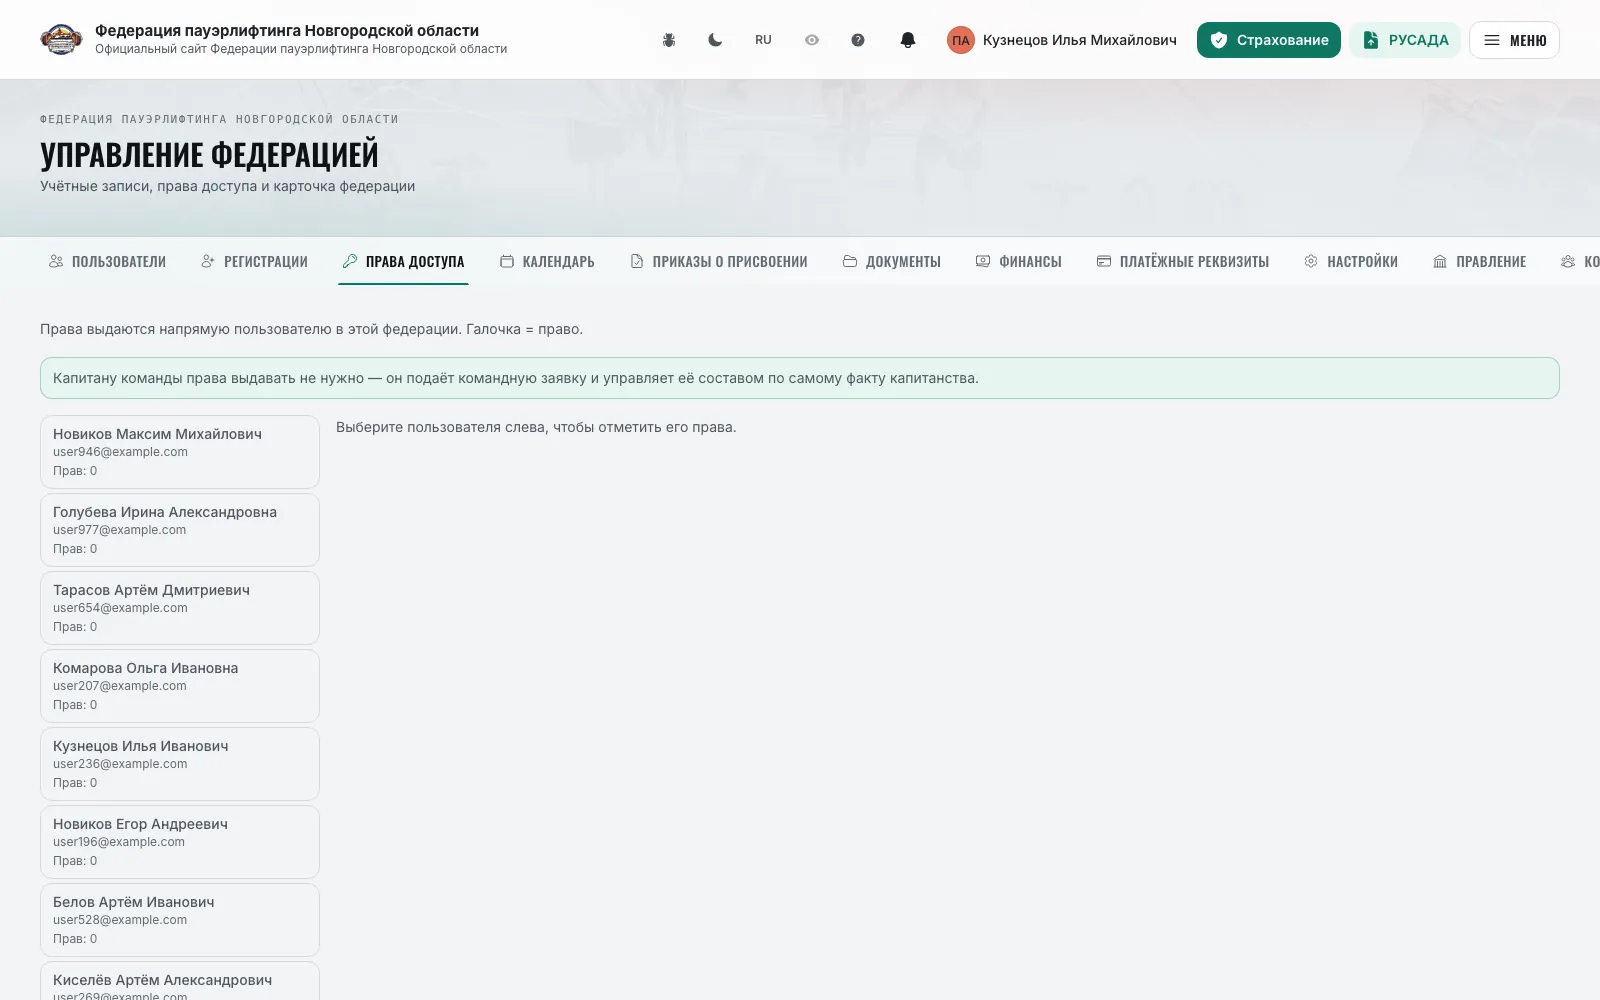
- 1
Federation rights are granted in “Federation management” → “Access rights”: a user × right matrix grouped into catalogues — “Competitions”, “Athletes”, “Referees and coaches”, “Teams, clubs and national team”, “Results and records”, “Documents and orders”, “Rules and regulations”, “News and organizations”.
- 2
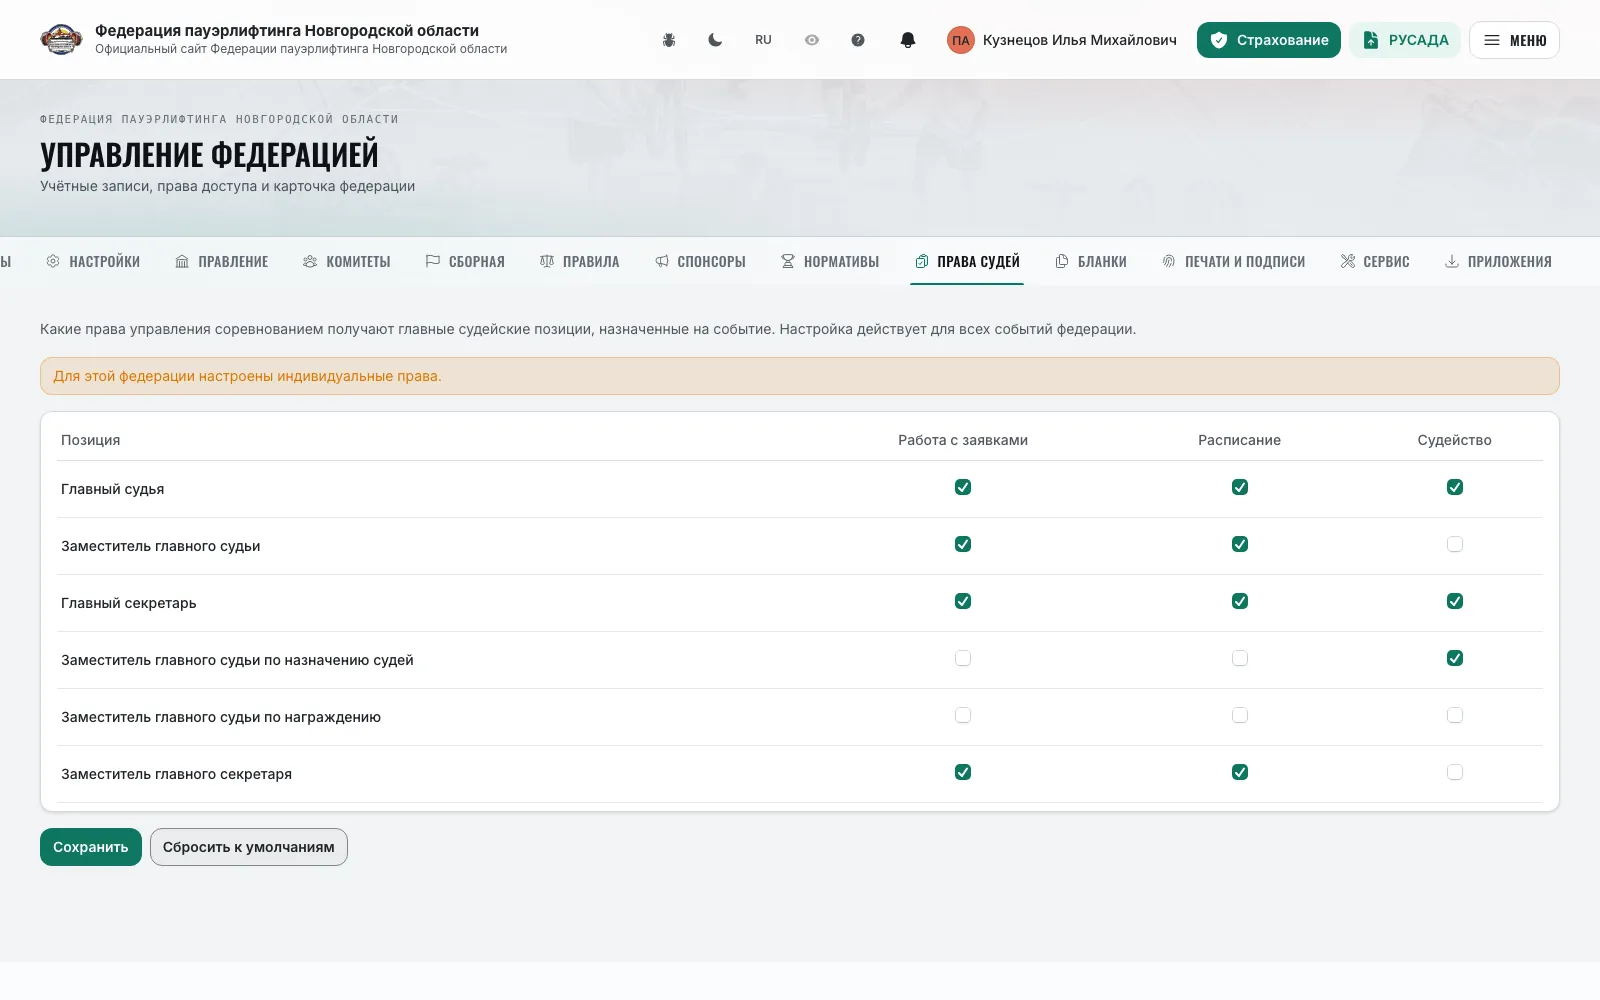
Rights on a single competition go to its head officials: a referee listed in the event's officials automatically gets the rights set for their position on the “Referee rights” tab — “Entries”, “Schedule”, “Judging”.
- 3
Rights map onto the tabs of the secretary workspace: a chief referee without the entries right sees only “Schedule” and “Judging”.
- 4
A team captain needs no rights: the team entry and roster are managed through the captain card.
- 5
The regional entry manager for competitions above the regional level gets the right from the regional federation — see “Regional entry”.
Note: A regional federation site manages only its own events; other regions' competitions open read-only. Above the regional level events are edited by the national secretary, the hosting region's secretary and the head officials.
Creating a competition
OrganizerA four-step wizard; the set of steps depends on the event type and on what is run on the platform.
- 1
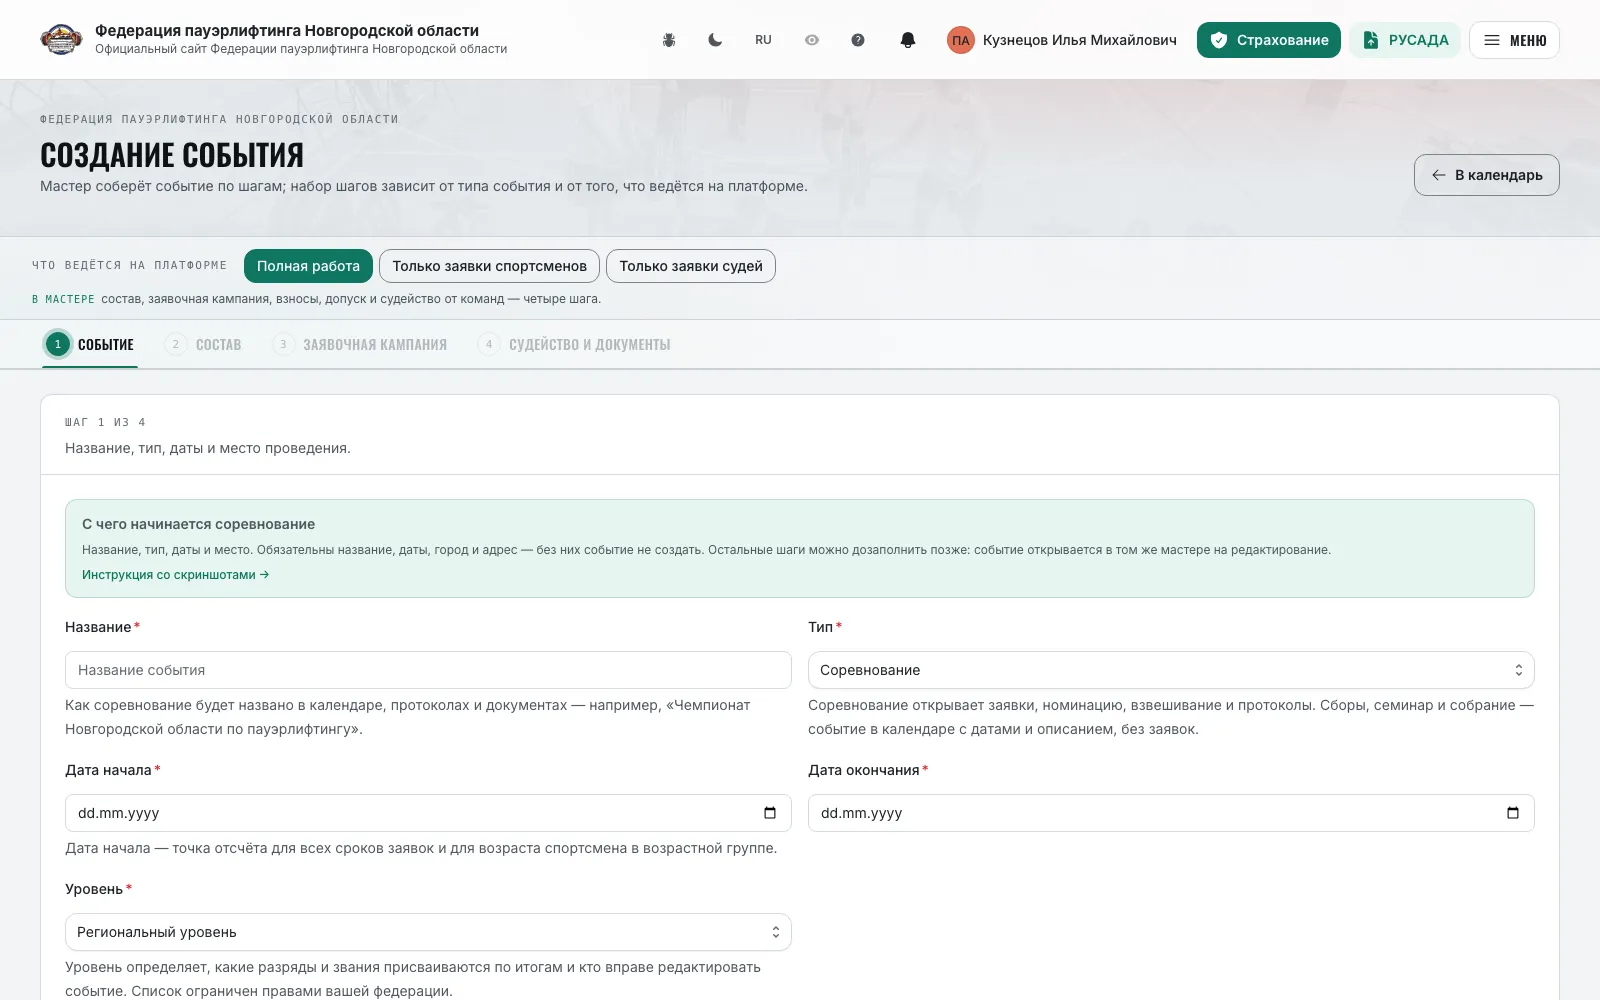
Open “Calendar” and click “Create event”. Above the step strip sits the “What is run on the platform” switch: “Full work”, “Athlete entries only”, “Referee applications only” — it rebuilds the steps, and the line below explains what each mode turns off.
- 2
For a competition in “Full work” the steps are “Event” → “Line-up” → “Entry campaign” → “Judging and documents”. In “Referee applications only” — “Event” → “Line-up” → “Referee applications” → “Officials and documents”. For camps, seminars and meetings — “Event” → “Details” → “Officials and documents”.
- 3
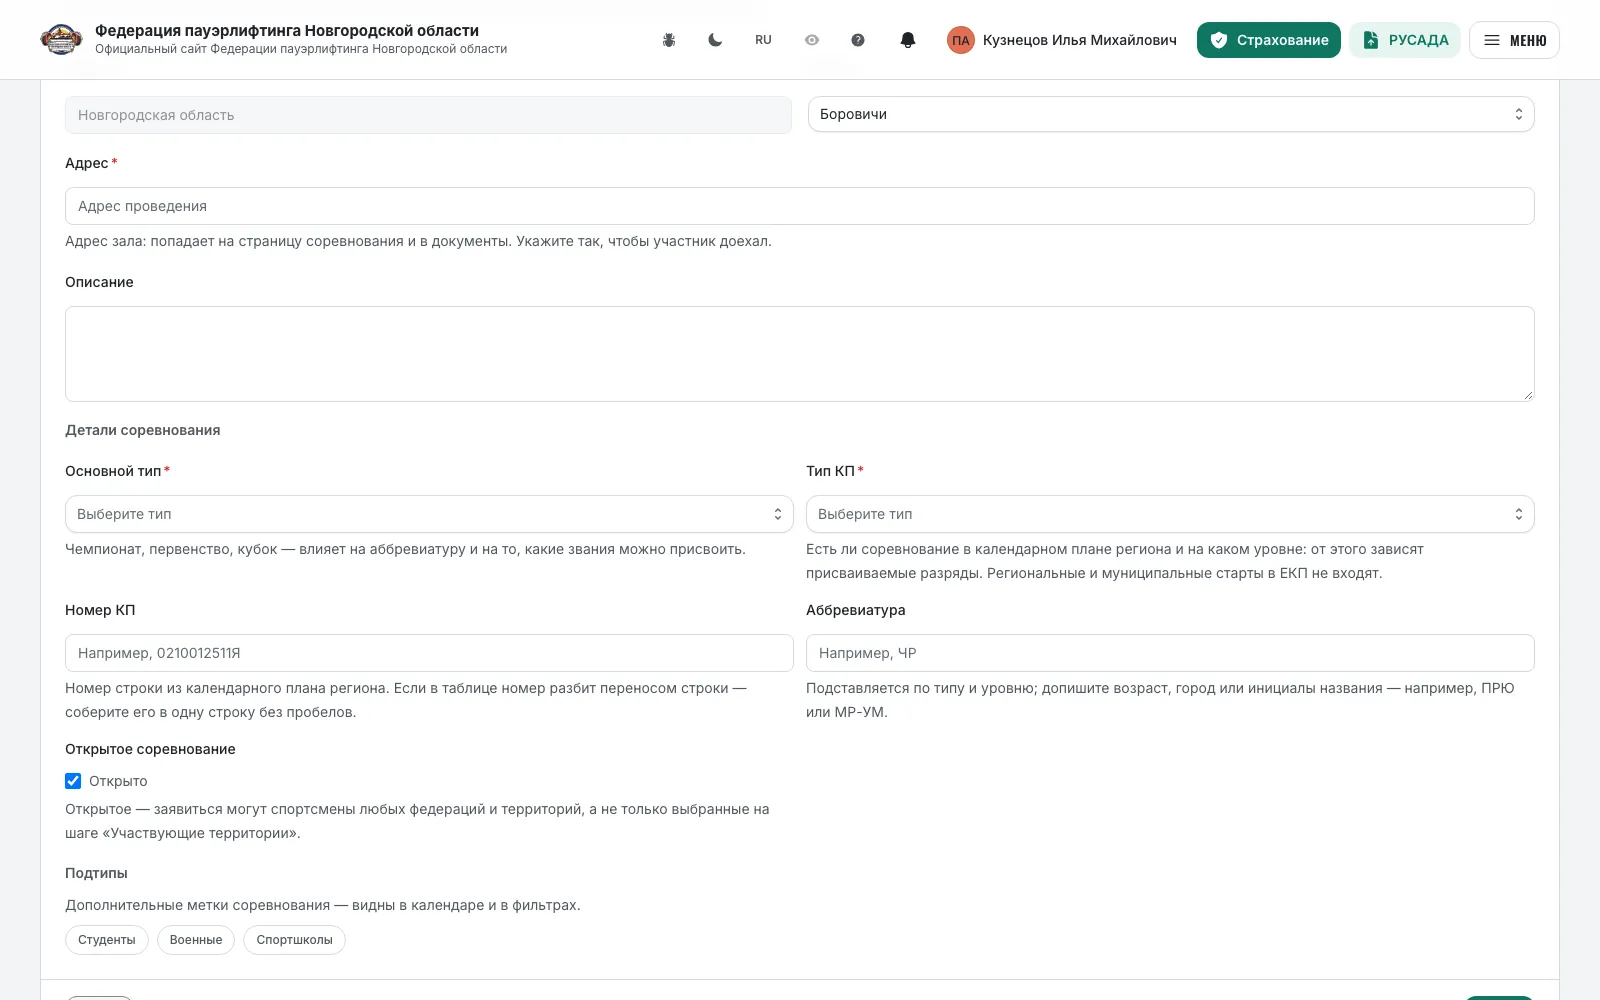
“Event”: name, type, start and end dates, level, region, city, address, description and cover. The “Classification” block: main type (championship, junior championship, cup), calendar plan type and number, abbreviation, the open-competition flag, subtypes.
- 4
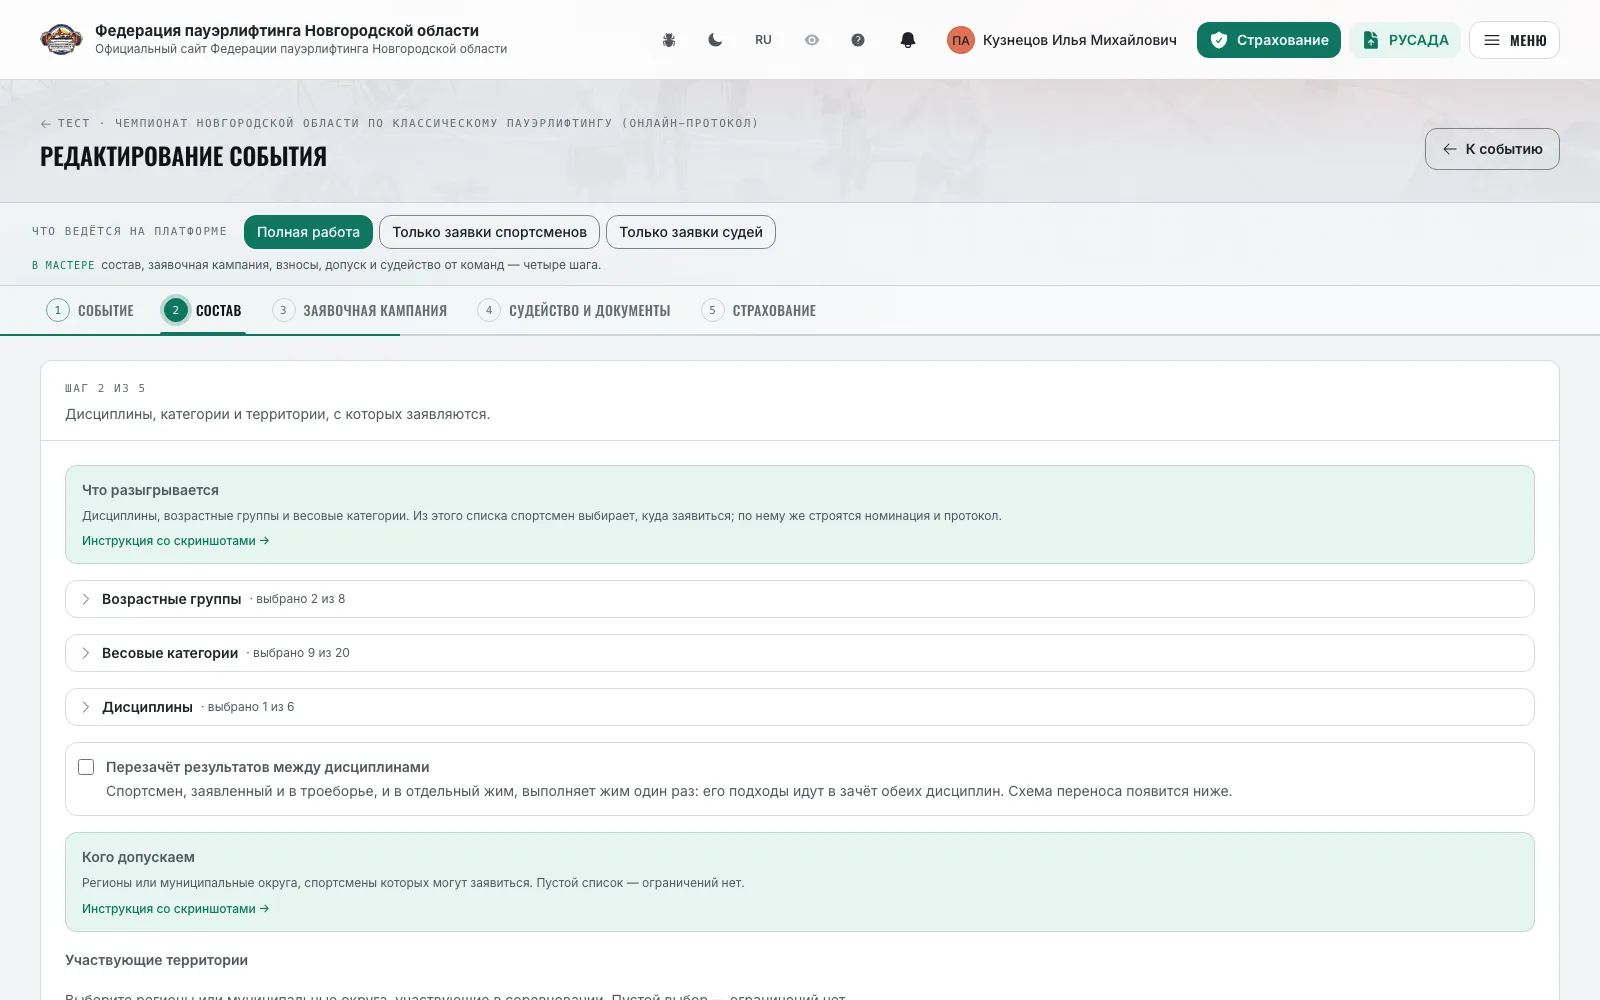
“Line-up”: disciplines, age groups and weight classes (see “Age groups and weight classes”), “Result carry-over between disciplines” and “Participating territories” — regions or municipal districts whose athletes are admitted; an empty list means no restriction.
- 5
“Entry campaign”: entry deadlines, late entries, fees and payment, rank admission, medical certificate and credentials commission — detailed in “Entry campaign: deadlines, fees, admission”.
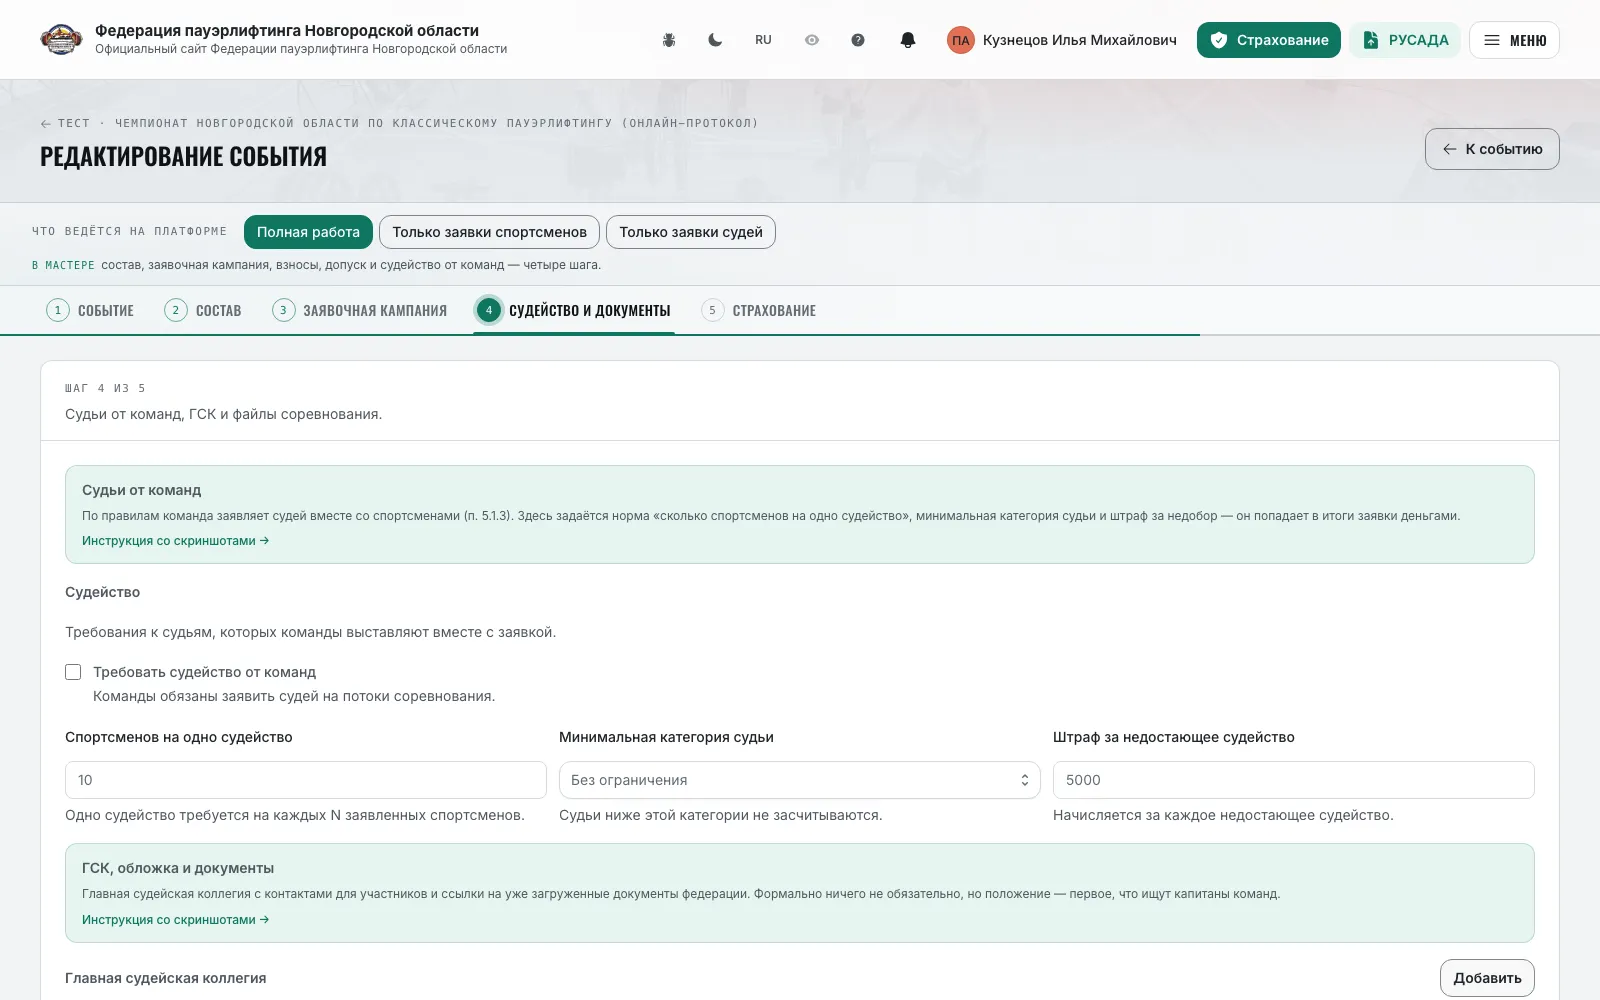
- 6
“Judging and documents”: the “Judging” block — whether teams must provide referees, “Athletes per refereeing”, minimum referee category and the penalty for a missing refereeing; “Head officials” — referees from the registry with a role, phone and e-mail; “Documents” — regulation, schedule, poster and other files already uploaded under “Documents”; “Competition forms” and “Medal image”.
- 7
Every step opens with a primer: what the settings are and how participants read them. Move between steps with “Back” and “Next” or by clicking a step; a step with empty required fields is highlighted.
- 8
Click “Create event” — the competition appears in the calendar at once, and entries open on the “Entries open” date.
Note: In “Athlete entries only” referees are recruited outside the platform: no quota, penalty or referee category in the wizard. In “Referee applications only” there are no fees or admission, but the line-up is still needed — the schedule pool is built from it.
Entry campaign: deadlines, fees, admission
OrganizerThe “Entry campaign” step of the event wizard: from opening entries to the credentials commission.
- 1
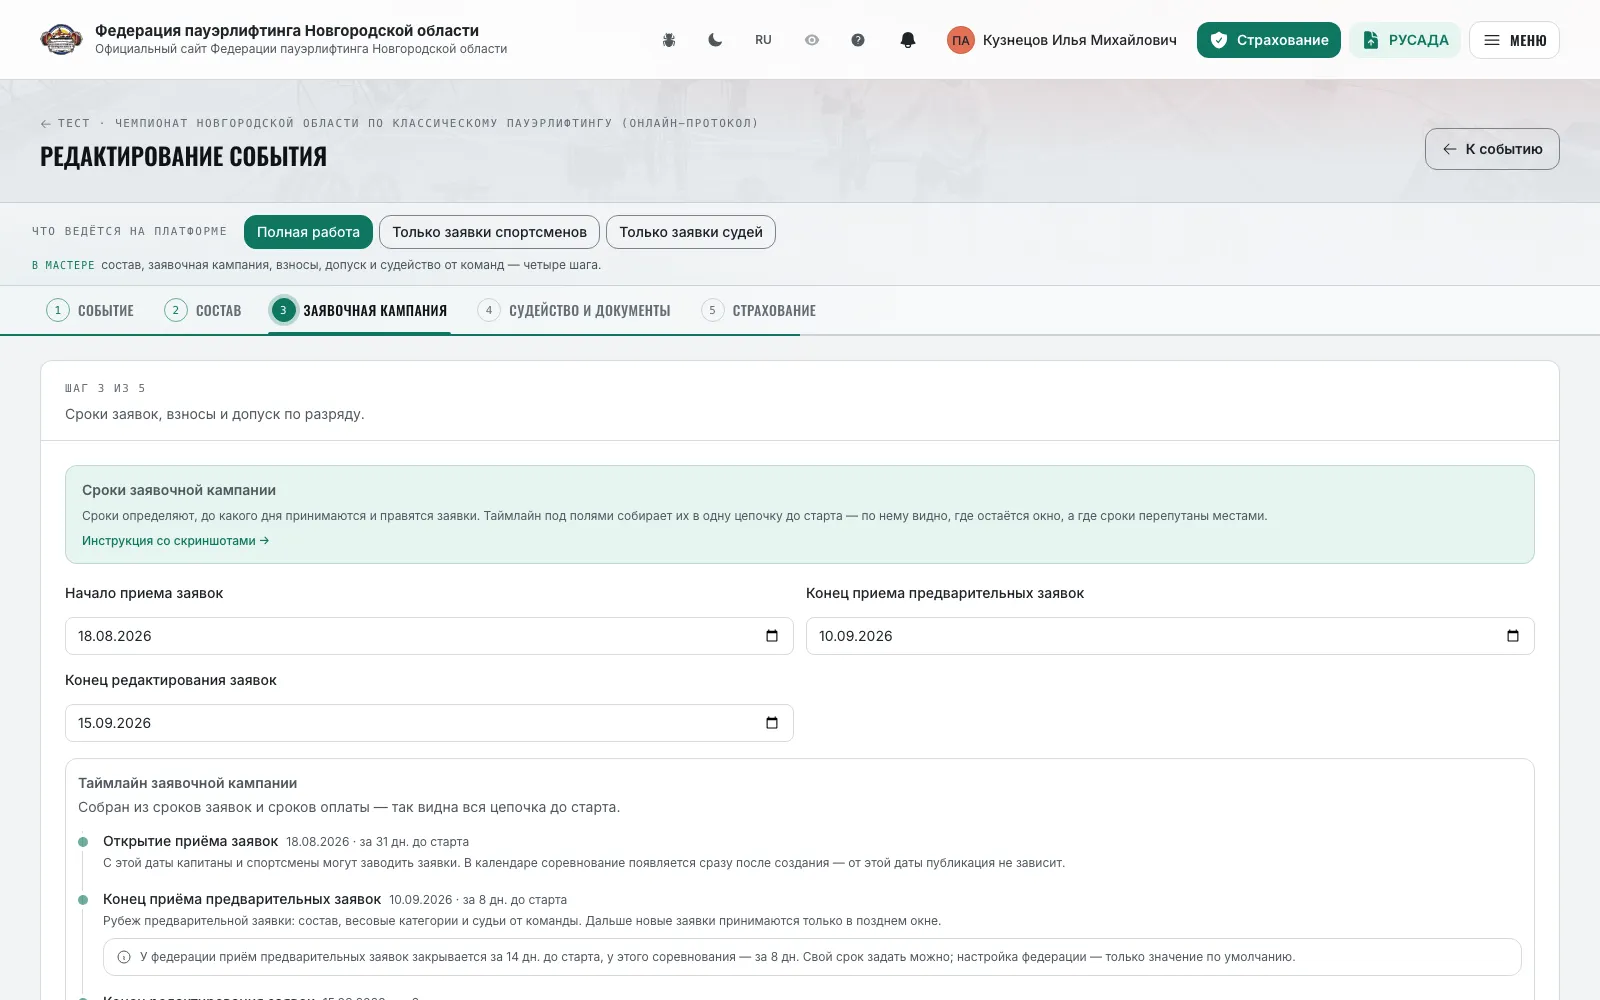
Deadlines: “Entries open”, “Preliminary entries close” and “Entry editing closes”. Defaults come from the federation settings (days before the start) and can be overridden.
- 2
“Late entries”: enable “Accept entries after preliminary entries close” — then between the preliminary deadline and the editing deadline a new entry can be filed and athletes added to a filed one, at a raised fee.
- 3
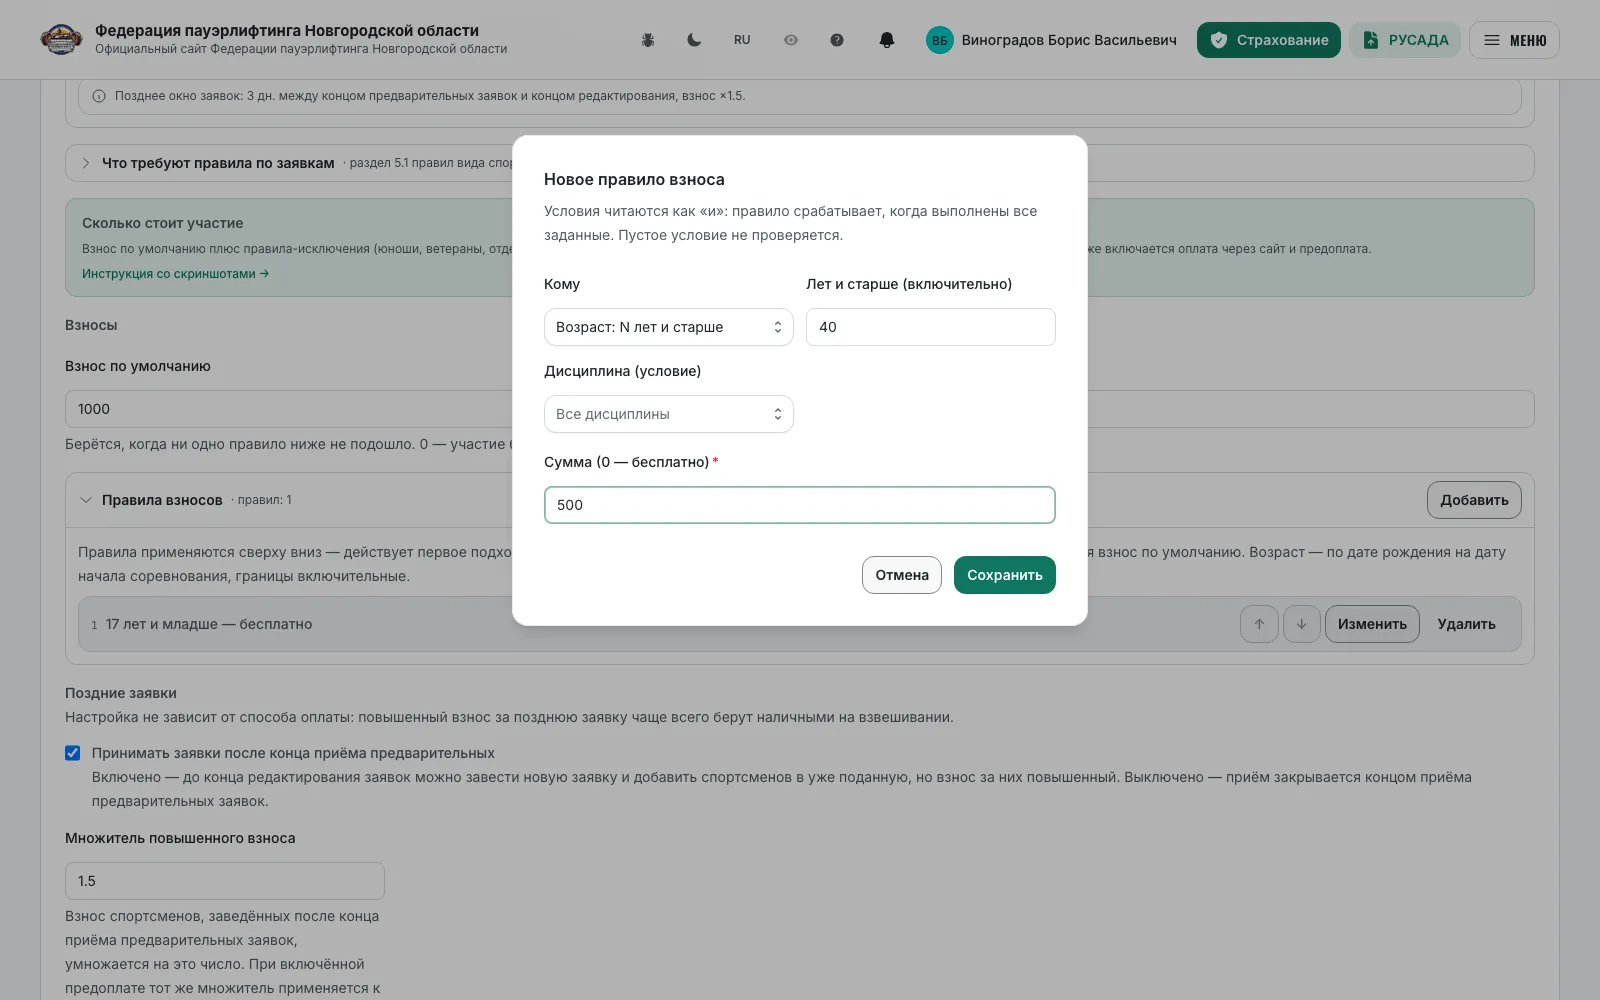
“Fees”: the default fee and “Fee rules”. A rule is created in a dialog: “Who” — everyone, age N and younger or older, an age group, a discipline — and “Amount (0 — free)”. Rules are read top-down, the first matching one applies; the order is changed with arrows.
- 4
“Fee collection” — “Where the fee is paid”: “At weigh-in”, “Online in the entry”, “Prepayment online, remainder at weigh-in” or “Prepayment online, then full payment online”. For online modes set the “Prepayment amount”, “Prepayment deadline”, “Raised fee multiplier” and “Online payment accepted until”.
- 5
Online payment cannot be enabled until the organizing federation has filled in “Payment details” in federation management — the wizard warns about it.
- 6
“Admission rules” by rank work like fee rules: the same “who” conditions and a corridor “Rank not lower than” / “Rank not higher than”. Without rules admission by rank is unrestricted.
- 7
“Require a medical certificate” adds the “Medical certificate” step to the entry and the “M” mark to the nomination and weigh-in.
- 8
“Credentials commission”: “In person” — the signed application is brought to the commission; “Remote” — the application is printed on the site, signed and its scan attached before “Send the signed application by”. The secretary gains the “Credentials commission” tab.
- 9
The “Entry campaign timeline” under the fields chains all deadlines up to the start and warns when they are out of order or later than the competition. Next to it — the “What the rules require of entries” primer with the items of section 5.1 of the rules.
Note: Whoever has not prepaid by the deadline is hidden from the public nomination and gets the raised fee. A receipt with the raised prepayment, confirmed by the secretary before online payment closes, returns them to the nomination.
Editing a competition
OrganizerThe same wizard as on creation: the same steps, all open at once, plus the “Insurance” step.
- 1
Open the competition page and click “Edit” in the header.
- 2
The steps repeat the creation wizard and are all open at once — jump to the one you need on the step strip. The “What is run on the platform” switch sits above the strip here too.
- 3
Settings switched off by the current mode stay in the form but are not sent to the server.
- 4
Only editing has the last, fifth step “Insurance”: enable “Insurance at the competition” so the entry wizard gains the policy-purchase step. It cannot be enabled while the federation does not insure participants; in “Referee applications only” the step is absent.
- 5
“Save” works on any step and saves all steps at once; “Back to event” returns without saving.
Note: Set the line-up, deadlines and fees before entries open: entries, the schedule and protocols refer to them. A competition is deleted from the event page by typing the word “DELETE” — together with entries and the schedule.
Age groups and weight classes
OrganizerThe “Line-up” step of the event wizard: what is contested at the competition — from the rules or your own.
- 1
Open the competition, click “Edit” and go to the “Line-up” step. The “Disciplines”, “Age groups” and “Weight classes” blocks exist only for the “Competition” type.
- 2
The default source is “From the rules”: tick the groups and classes you need from the sport's reference. “Select all” and “Clear” sit right of the block header; the header shows “selected N of M”.
- 3
Weight classes are filtered by the selected age groups: youth classes appear only after the matching group is ticked.
- 4
Custom groups: switch “Age group source” to “Custom” and click “Add” — set the name, minimum and maximum age in the dialog.
- 5
Custom weight classes: switch “Weight class source” to “Custom”; in the dialog set the name, minimum and maximum weight and sex. The upper bound is required, so “over 120 kg” is set explicitly — for example 120.01 to 999. Under the class tick the age groups it applies to; empty means all.
- 6
If weight classes are not contested, enable “No weight classes — absolute standings within age groups”: places are counted inside the age group separately by sex and discipline by IPF GL points.
- 7
“Result carry-over between disciplines”: when the competition has more than one discipline with a shared lift (three-lift and single bench), choose for each lift where its result comes from. The carry-over scheme is drawn under the setting.
- 8
Click “Save”. Category errors are shown under the corresponding block.
Note: As soon as at least one custom class appears, the whole event list switches to custom classes. Custom classes are not matched to the reference — ranks and records are not granted on them.
Filing a personal entry
AthleteAn athlete's own entry — the set of steps depends on the competition settings.
- 1
Open the competition in the calendar and click “Submit entry”. If you are in a team and the federation allows personal entries for team athletes, the button reads “Submit personal entry”.
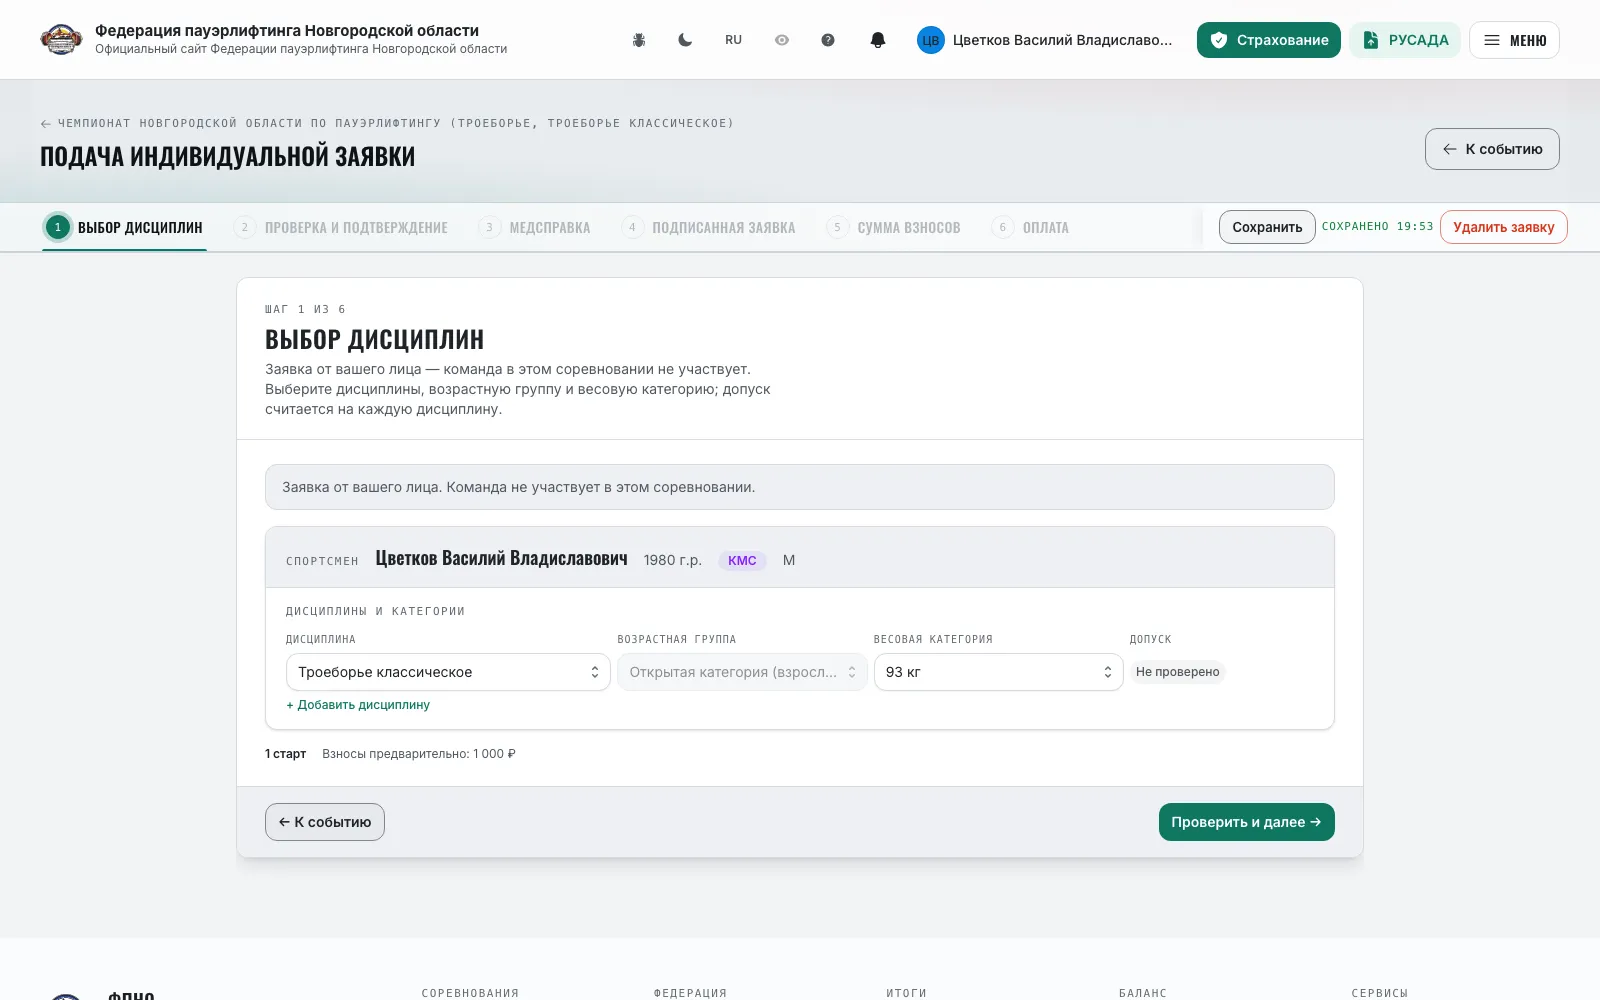
- 2
The “Disciplines” step: tick the disciplines, the age group and the weight class for each. Click “Check and next” — the site checks admission by age, territory and rank.
- 3
“Review and confirm”: the entry as the secretary will see it — a row per start. Here are the document marks and “Worth fixing before the start” with a link to the cabinet.
- 4
Next come the steps enabled by the organizer: “Insurance”, “Medical certificate”, “Signed application” — see “Insurance in the entry” and “Admission documents in the entry”.
- 5
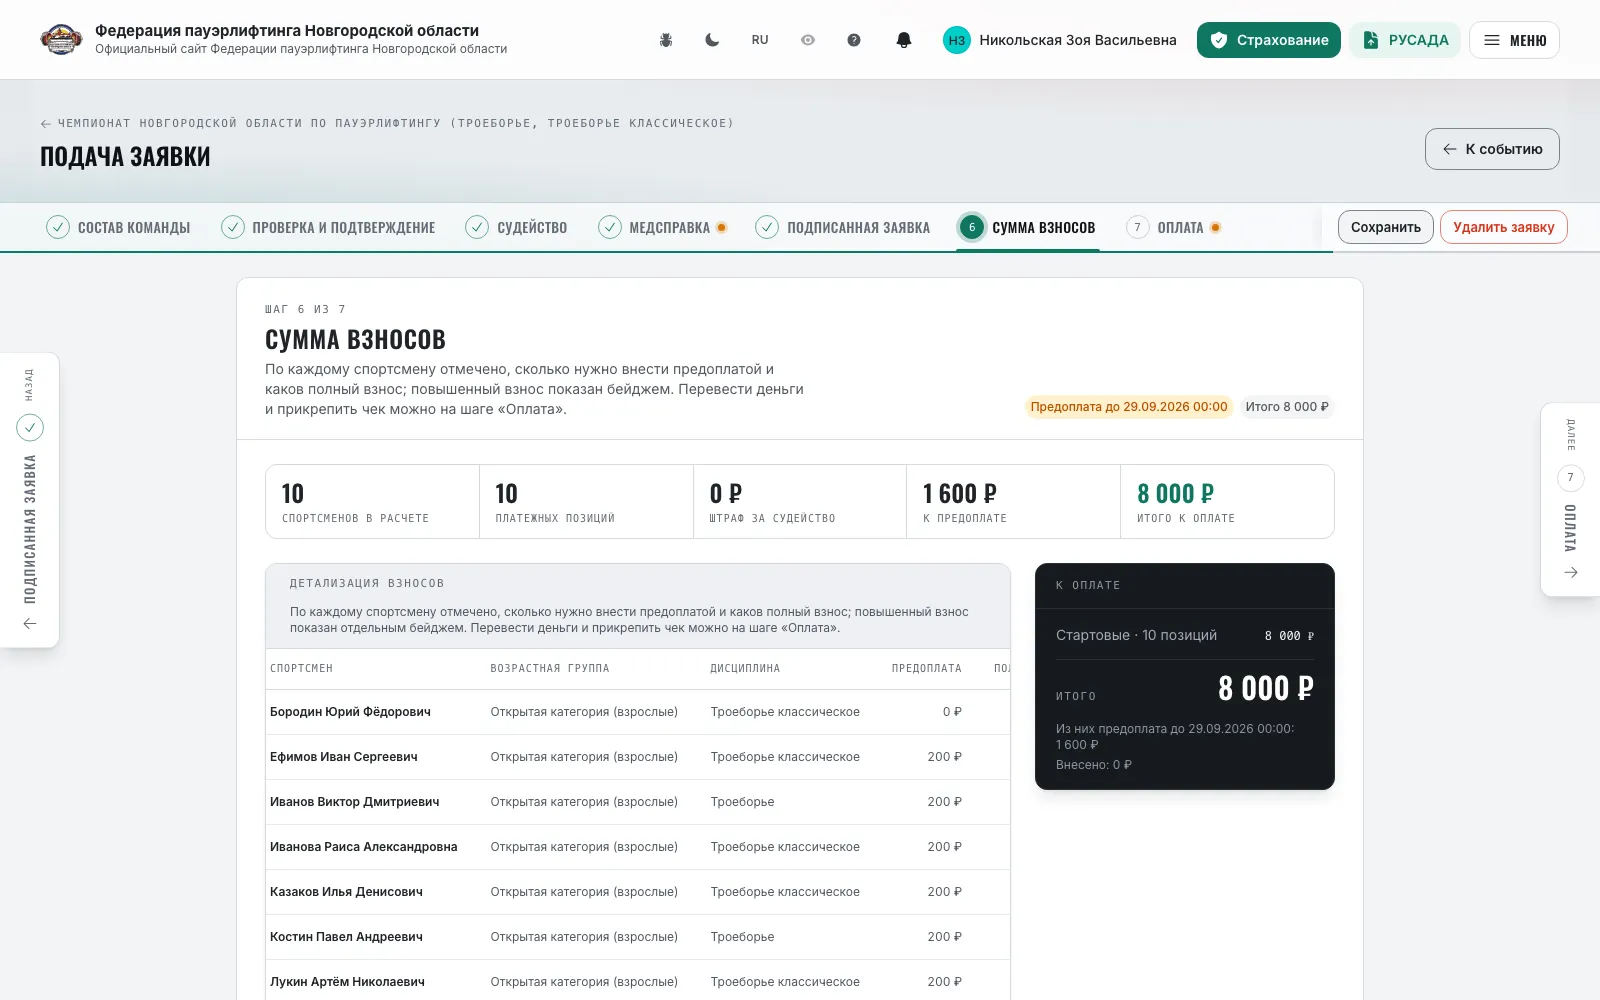
“Fee total”: the fee per discipline, the raised fee and the prepayment where assigned. With online payment the “Payment” step follows — see “Paying fees and receipts”.
- 6
Click “Submit entry” — it goes to the competition secretary for review. The status is visible on the competition page, in “My applications” and in notifications; the wizard has an “Entry history”.
- 7
After preliminary entries close an athlete is not removed from the entry but marked “Not coming” — the protocol keeps them as a no-show.
Note: The draft saves automatically. In the late window (after preliminary entries close and before editing closes) the entry is accepted at the raised fee. If a team enters you, the wizard is replaced by “Your team enters you” with your status in the team entry.
Filing a team entry
Team captainThe captain files one entry for all athletes and referees of the team at once.
- 1
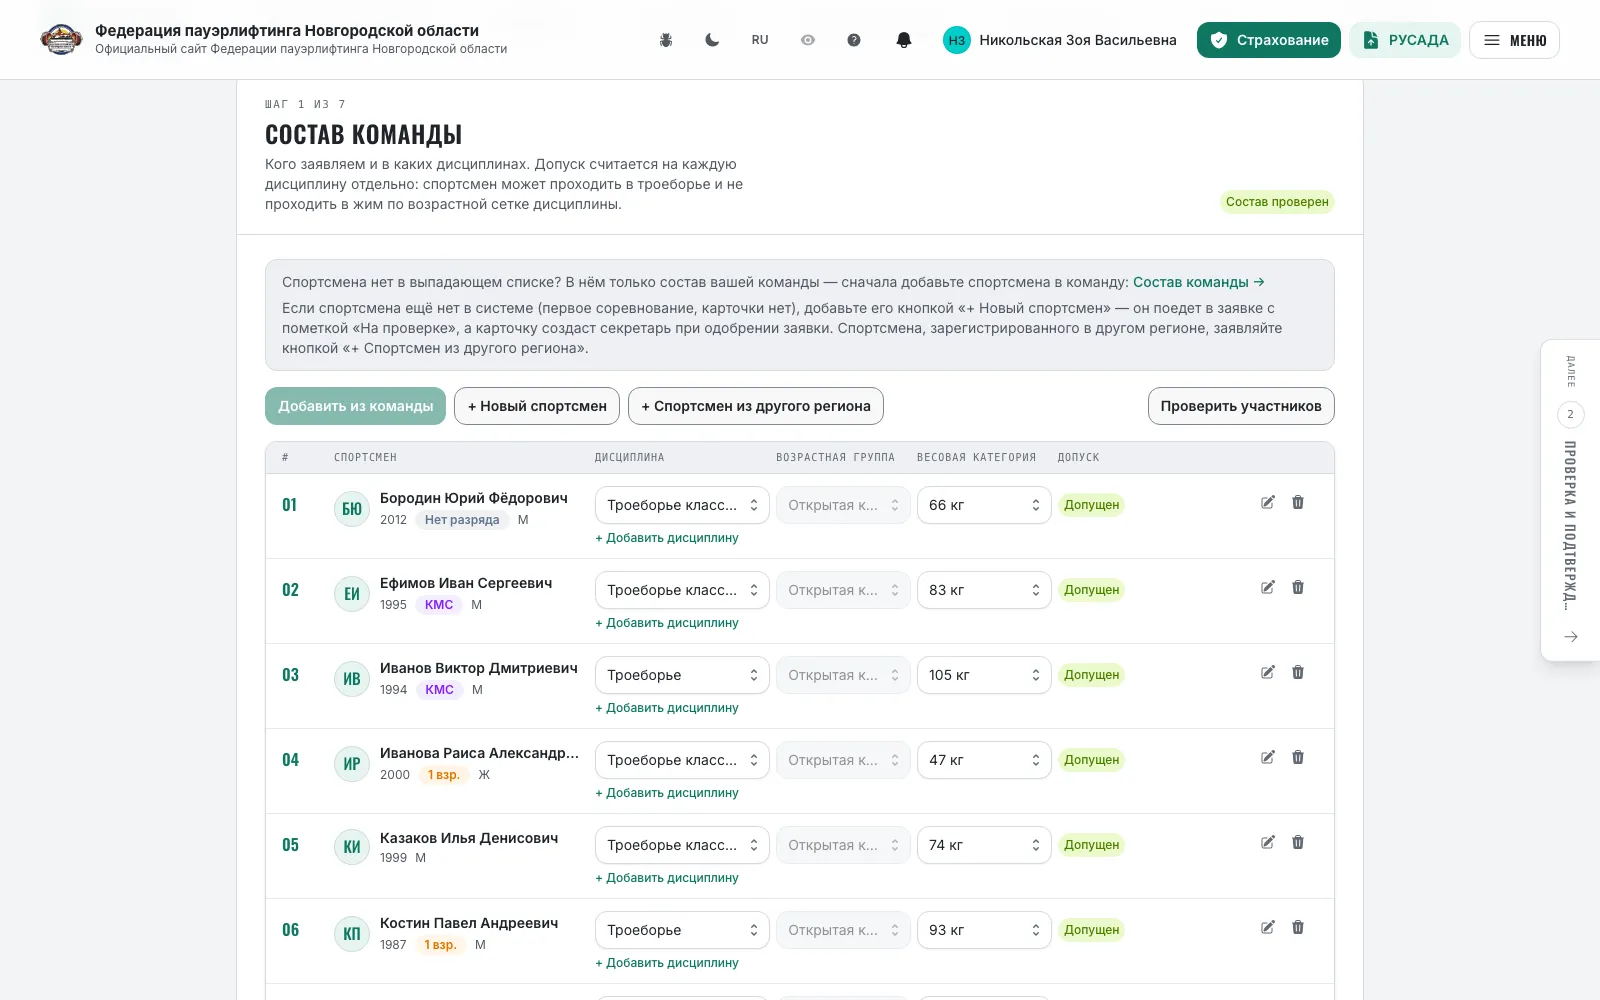
Open the competition and click “Submit entry” — a captain lands in the team form. Steps: “Team roster” → “Review and confirm” → “Judging” → “Insurance” → “Medical certificate” → “Signed application” → “Fee total” → “Payment”; the middle steps appear per competition settings.
- 2
“Team roster”: “Add from team” opens the roster with sex and age filters; for each athlete set the disciplines, age group and weight class, “+ Add discipline” for several starts.
- 3
An athlete not yet in the system is added with “+ New athlete” — the secretary creates them on approval. “+ Athlete from another region” enters a guest by temporary registration: find them nationwide, set the city of residence in your region and attach a document valid on the competition date.
- 4
“Edit” in an athlete's row changes the name, date of birth, city and coaches. An edit of an existing card is not written at once — the secretary reviews it on the “New and updated athletes” tab.
- 5
Click “Check and next”: every row gets an admission — “Admitted”, “Fails”, “Awaiting secretary” — with a reason.
- 6
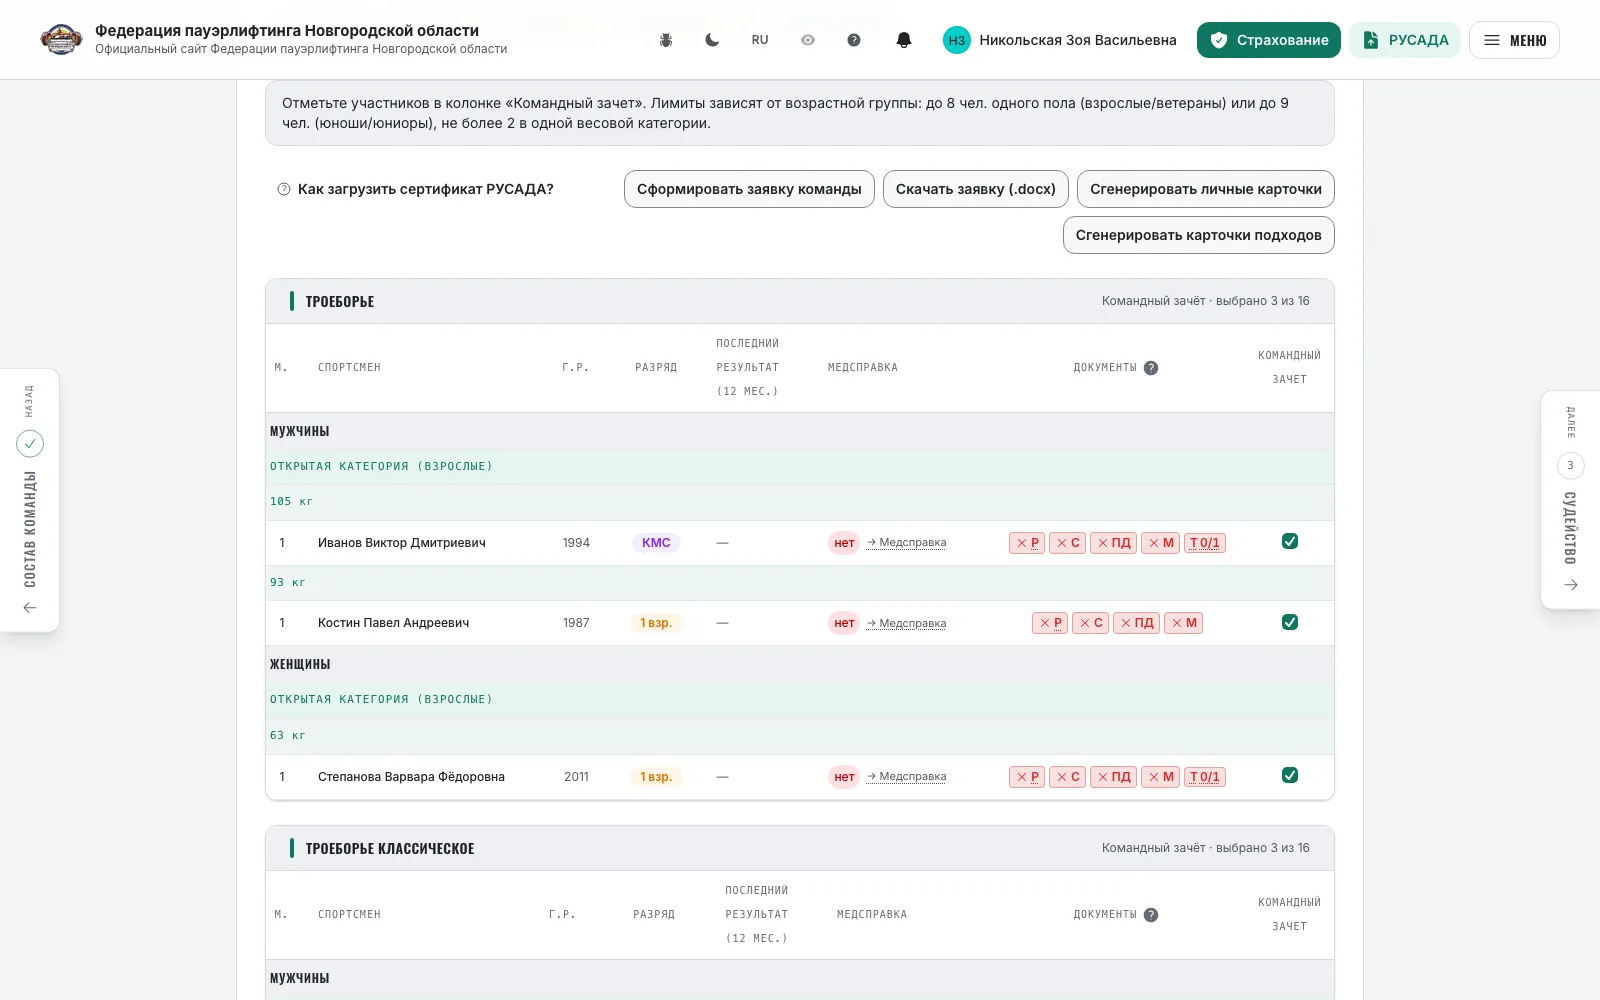
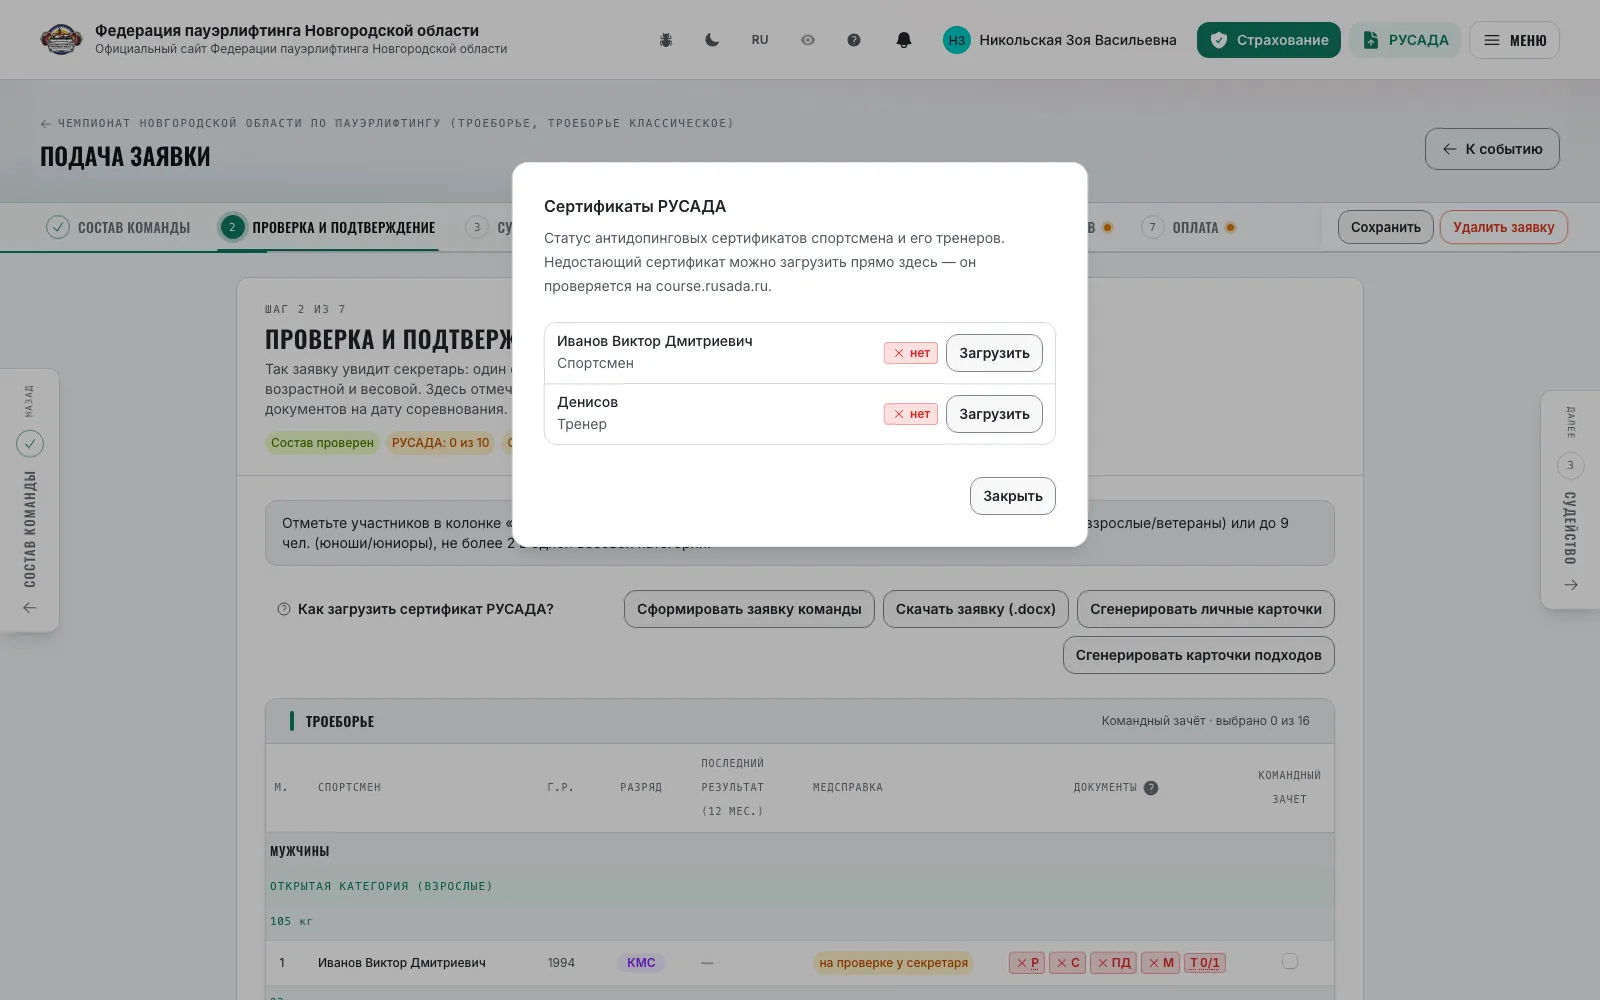
“Review and confirm”: the preview by discipline, the “Team scoring” column — tick who scores for the team, the rest compete individually (per-group limits are hinted). Document marks per athlete: “R” — RUSADA, “I” — insurance, “PD” — consent, “M” — medical certificate, “Registration”; a red mark means the document is missing, and the “R” mark lets you upload the certificate right here.
- 7
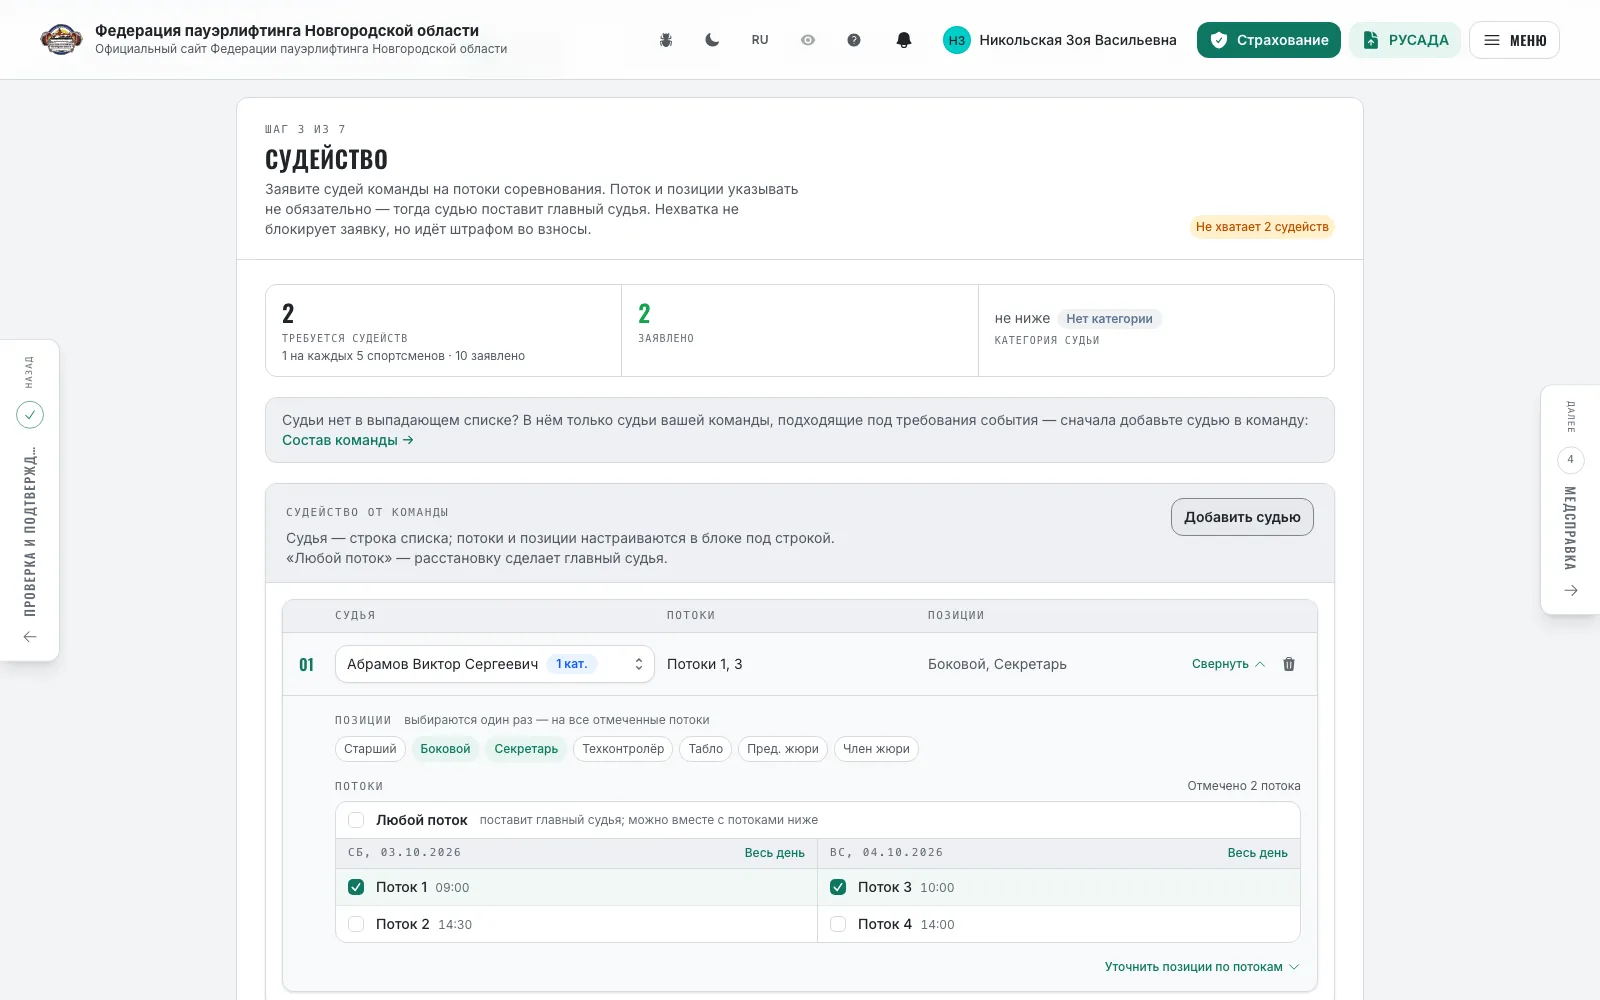
“Judging” appears when the organizer requires referees from teams: “Add referee”, tick flows and positions for each, or “Any flow”. The tiles show “Refereeings required”, “Provided” and “Penalty for shortfall” — a shortfall may be left, the penalty goes into the fees.
- 8
“Fee total”: the “To pay” board — entry fees, raised fee, judging penalty, prepayment and total. Then “Payment”, if the organizer accepts fees online.
- 9
Click “Submit entry”. Printed documents — “Team application (PDF)”, “Team application (DOCX)”, “Personal cards (PDF)” and “Attempt cards (PDF)” — are available from the wizard and from “My applications”.
Note: The draft saves automatically; the entry can be edited until entry editing closes. The secretary can create the entry for a team themselves — then the captain files nothing.
Paying fees and receipts
AthleteTeam captainThe “Payment” step of the entry: a transfer to the federation's details and a receipt for the secretary.
- 1
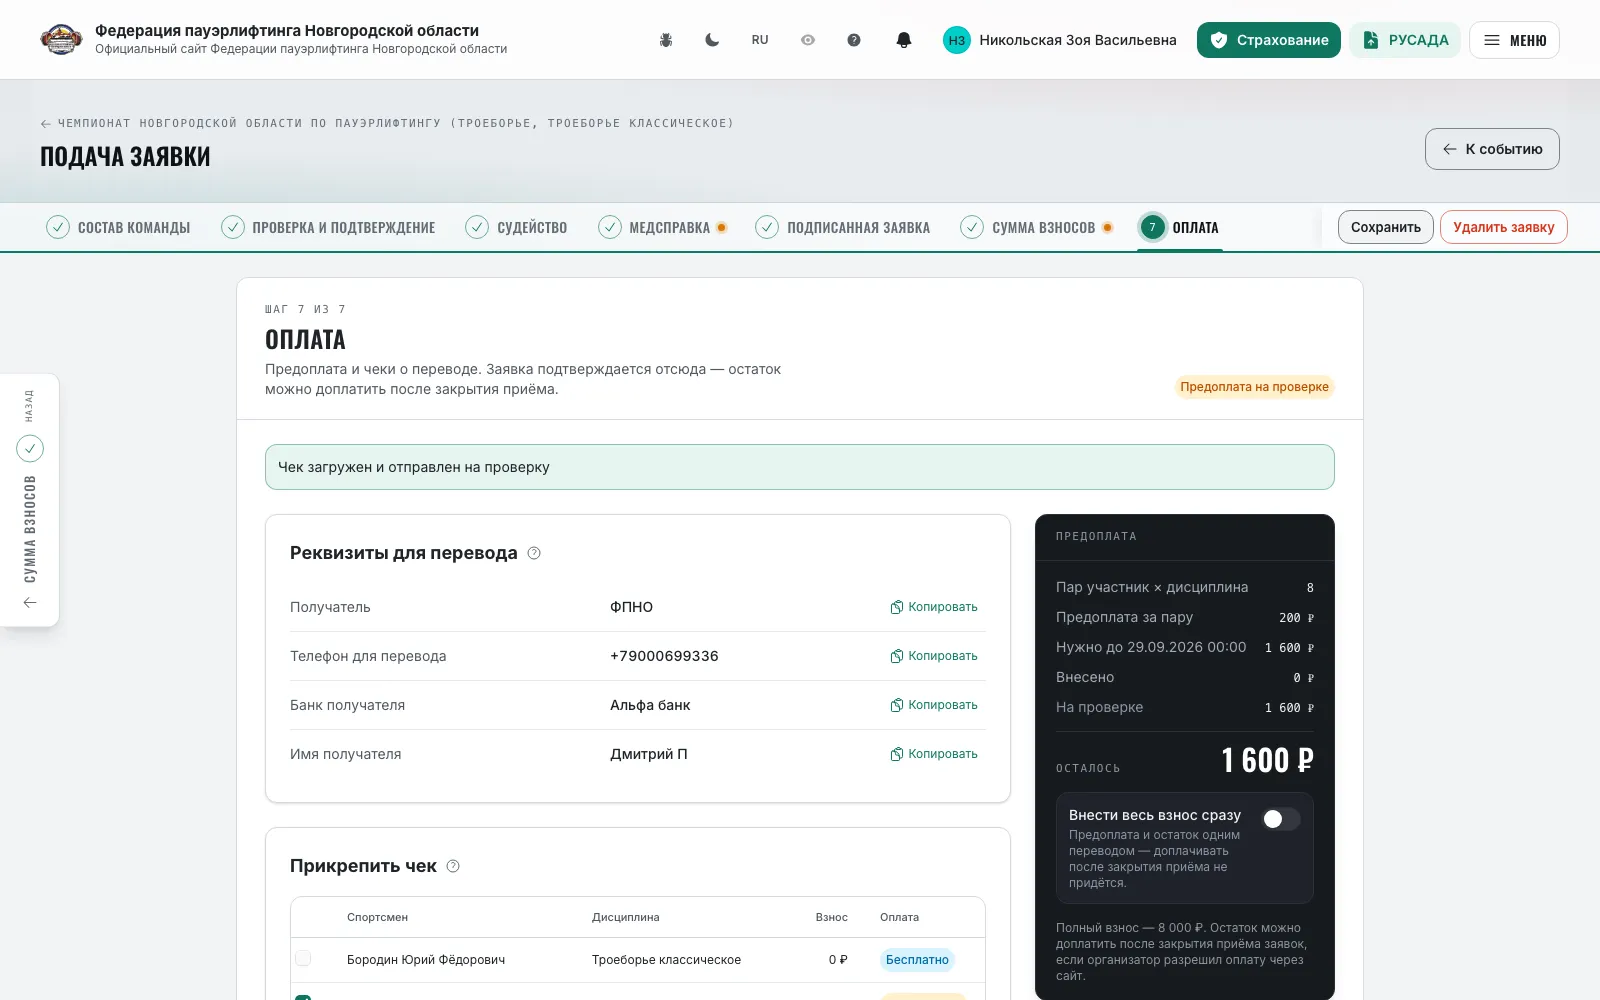
The “Payment” step exists when the organizer chose online payment or prepayment. At the top — “How to pay the fees”: the prepayment amount, its deadline and what happens after it.
- 2
“Transfer details” — payee, tax id, bank, account and payment purpose, or a phone for transfers; every field has a “Copy” button.
- 3
The “Needed / Paid / Under review / Remaining” board shows the entry's payment state.
- 4
“Attach receipt”: pick the mode — “Prepayment”, “Fee remainder” or “Full fee” (the “Pay the whole fee at once” toggle), tick the athlete × discipline pairs, check the amount and transfer date, attach a PDF, JPG or PNG up to 10 MB and click “Send receipt for review”.
- 5
“Uploaded receipts”: statuses “Under review”, “Confirmed”, “Rejected” with a reason. A rejected receipt is replaced by a new one for the same pairs.
- 6
The remainder is paid the same way after entries close, or at weigh-in — as the organizer decided. Online payment closes at “Online payment accepted until”.
- 7
Athletes exempt from fees in their card or by the secretary's mark are left out — they carry the “Exempt” badge.
Note: The entry can be submitted straight from the payment step: the attached receipt goes for review together with it. While a receipt is “under review” the athlete stays in the nomination and no penalty is charged.
Admission documents in the entry
AthleteTeam captainDocument marks, medical certificate, signed application, temporary registration and the RUSADA certificate.
- 1
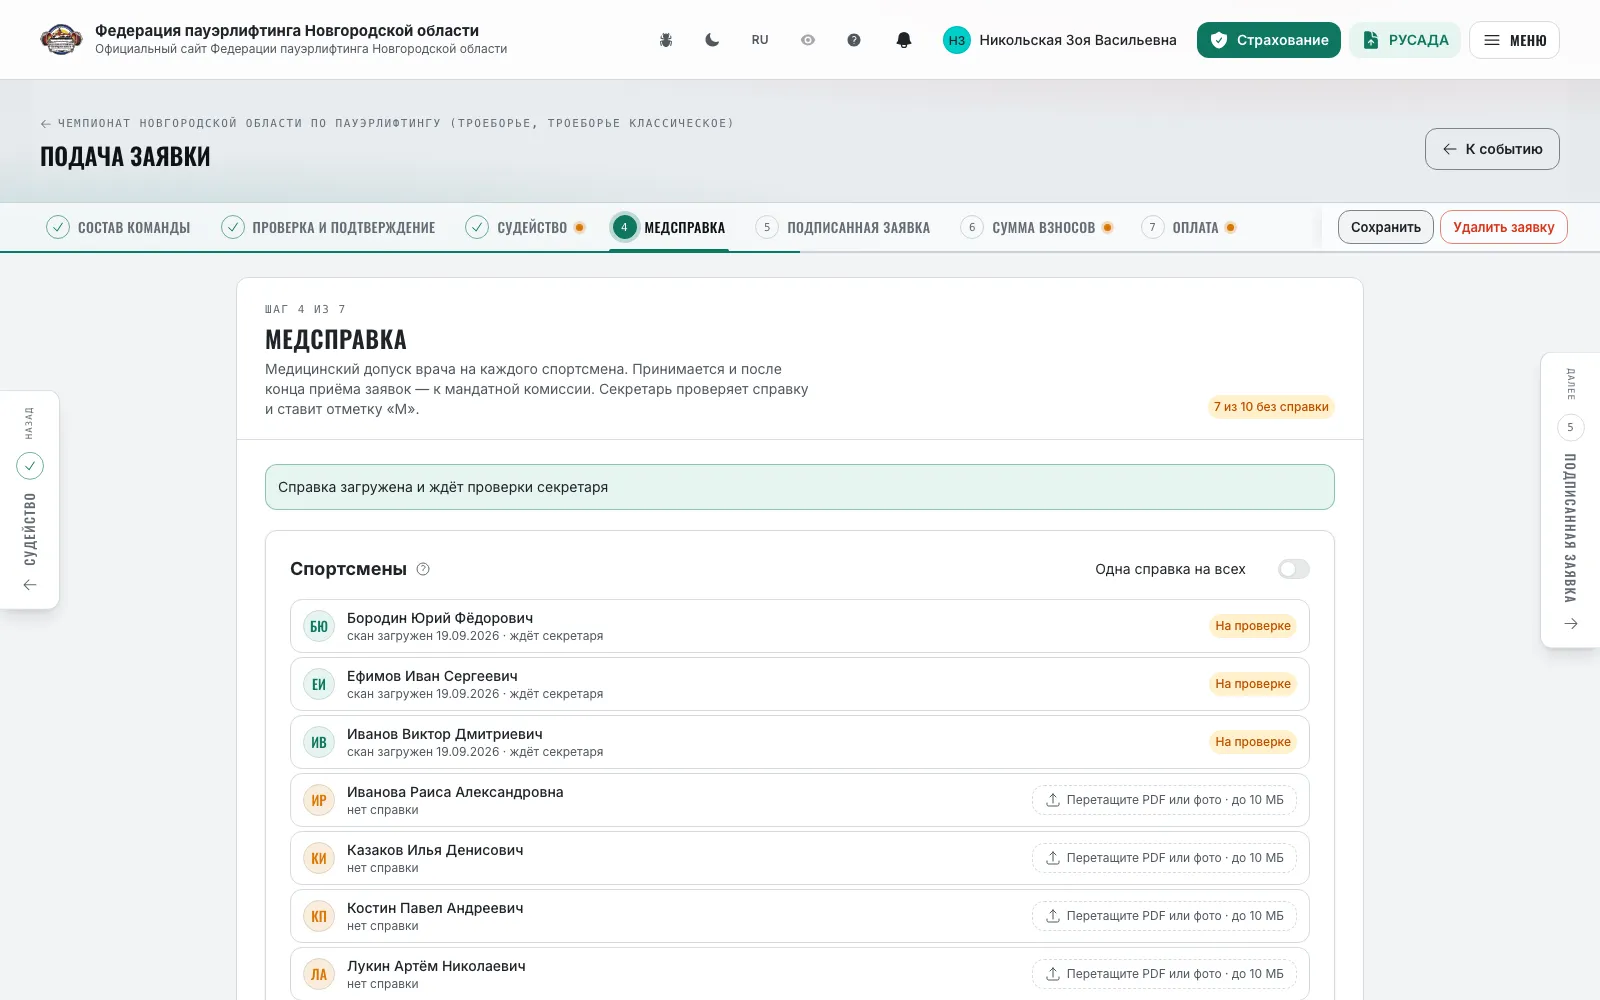
Every athlete in the entry and nomination carries marks: “R” — RUSADA certificate, “I” — insurance, “PD” — personal-data consent, “M” — medical certificate, “Registration” — a guest's temporary registration. Green — the document exists, red — it is missing; a mark with a document can be clicked to download it.
- 2
The “R” mark opens the “RUSADA certificates” window of the athlete and their coaches: a missing certificate is uploaded right from the entry, the QR check takes up to a minute. On the first visit the “How to upload a RUSADA certificate?” primer is shown.
- 3
The “Medical certificate” step (if required): tick the athletes, attach a PDF, JPG or PNG scan up to 10 MB, optionally set “Valid until” and click “Upload certificate”. One file may cover several athletes — a team clearance as one list with the doctor's visa.
- 4
The secretary reviews the certificate: until then it is “Under review”, a rejected one is replaced by a new scan. A missing certificate does not block the entry — it stays as a red “M” mark.
- 5
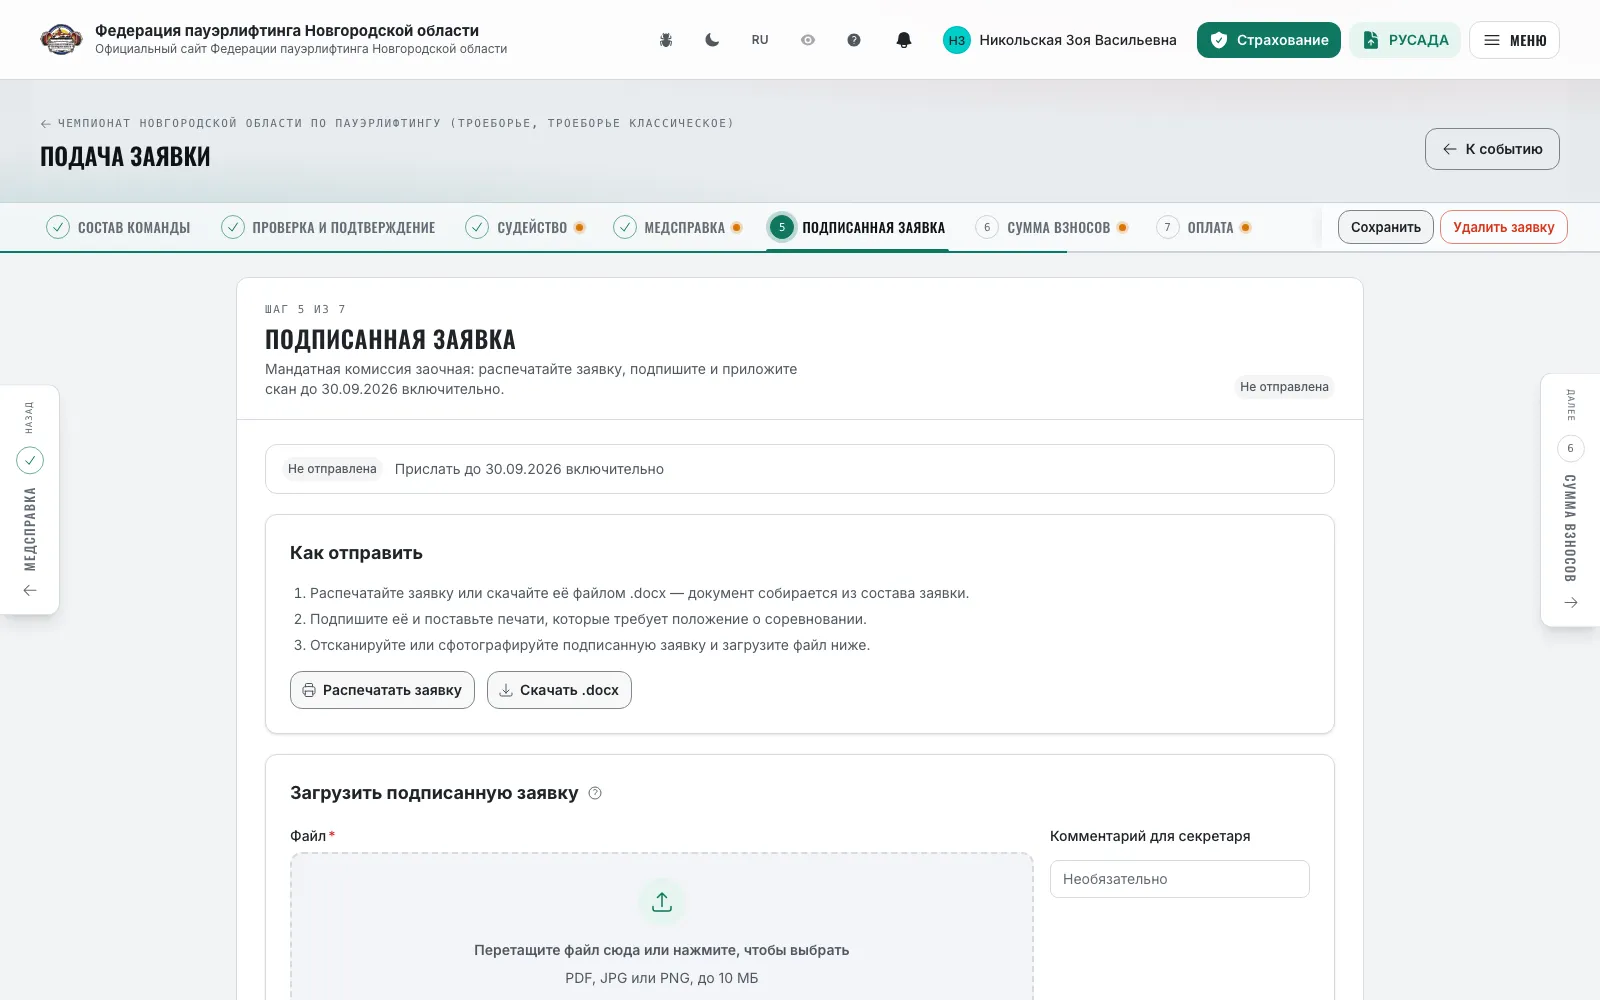
The “Signed application” step (remote credentials commission): “Print application” or “Download .docx”, sign, stamp and upload the scan by the stated date inclusive. After the deadline the scan is accepted with the “late” badge.
- 6
Temporary registration: a guest from another region is added with “+ Athlete from another region” and a document of registration at the place of stay; the secretary's decision on the scan is shown by the “Registration” mark.
- 7
The personal-data consent, passport and policy are uploaded by the athlete in the cabinet on the “Documents” tab — the marks are read from there.
Note: The secretary checks medical certificates, signed applications and temporary registrations on their workspace tabs. A rejection arrives with a reason — in notifications and in the entry itself.
Insurance in the entry
AthleteTeam captainBuying policies for athletes right in the entry wizard — when the organizer enabled insurance.
- 1
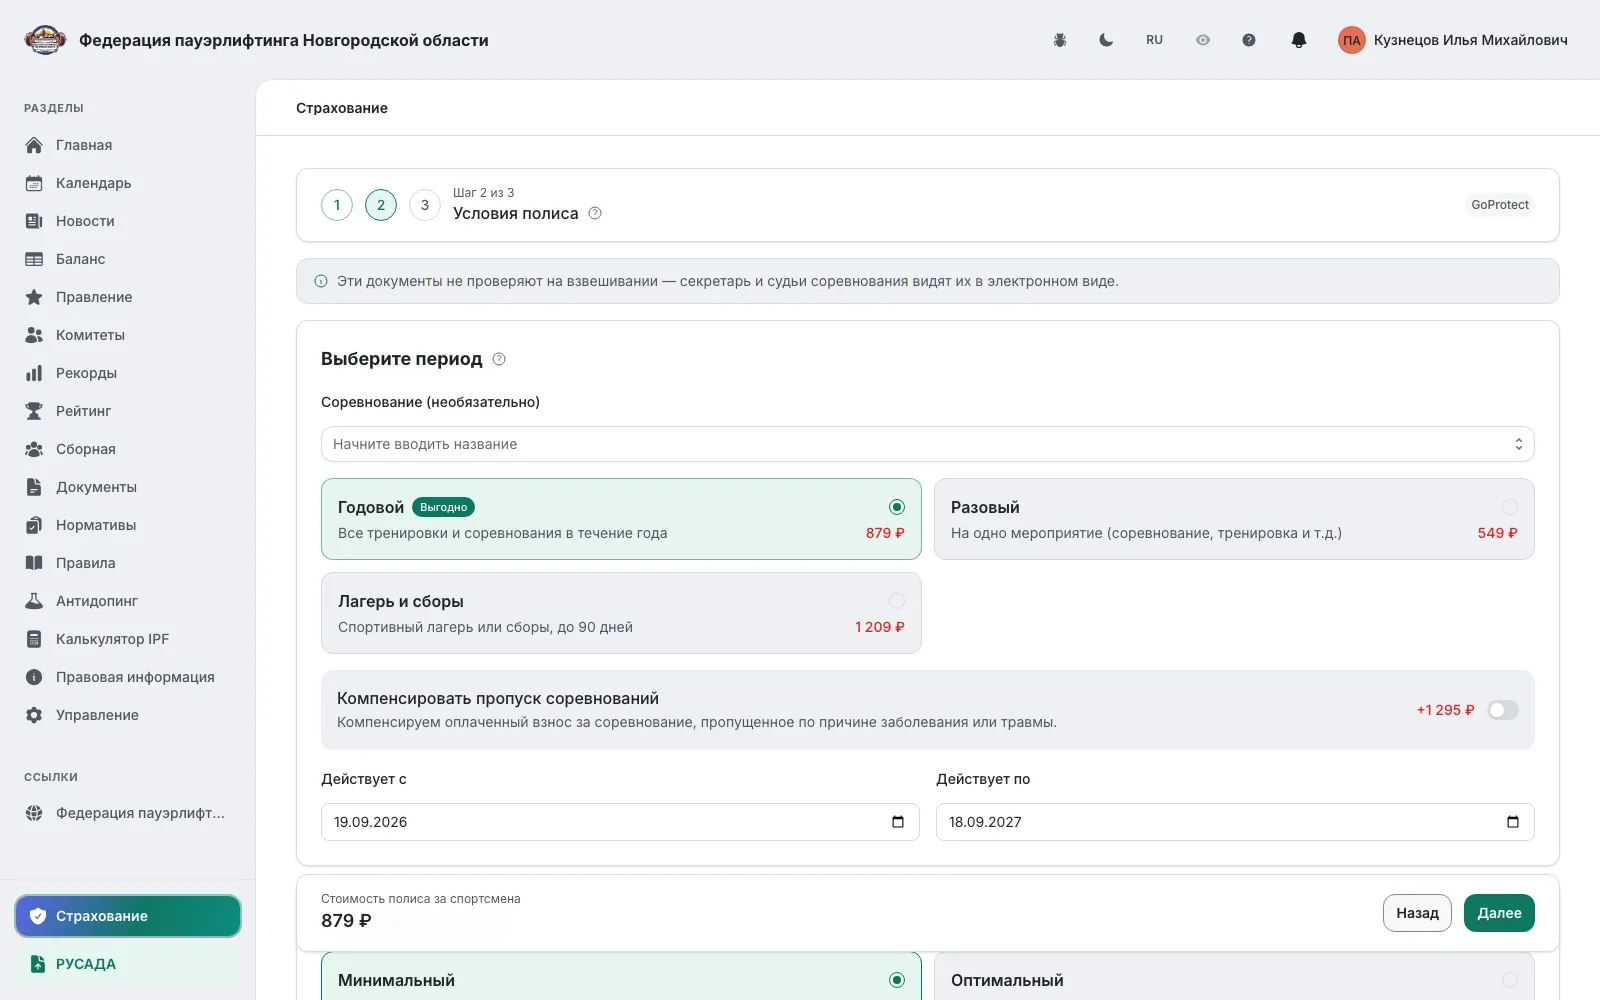
The “Insurance” step sits in the entry wizard before the fees when the organizer enabled insurance at the competition. At the top — the federation's insurer, policy terms and validity period.
- 2
Tick the athletes to insure; those already covered carry the “Insured” badge. Check the surname, name and date of birth: they go into the policy.
- 3
Choose where to send the policies: “To my e-mail” — all policies to one address, one payment link; “To each athlete's own e-mail” — each has their own order and link, and the e-mail and phone of every athlete are required.
- 4
Fill in the “Policyholder” — an adult who buys and pays for the policies — and the contact e-mail and phone.
- 5
Click “Calculate price” — the site shows the total split into adults and children, then “Order and pay” and pay via the link. Order statuses are shown in the “Orders” block; an unpaid order can be cancelled.
- 6
After payment the policies are issued automatically and appear in the athletes' personal documents; a policy can be downloaded from the order.
Note: The step is optional — the entry can be sent without policies. The organizer enables insurance on the last step of editing the competition; the terms are set by the federation in the admin panel. A policy outside an entry is bought on the “Insurance” page.
Insurance outside an entry
AthleteTeam captainOrganizerThe “Insurance” page: an accident policy for a year, a competition or a training camp.
- 1
Open “Insurance” in the “Services” block of the menu. A three-step wizard: “Insurer” → “Policy terms” → “Athletes and policy delivery”.
- 2
“Policy terms”: the period — “Annual”, “Single” (one event) or “Camp and training” (up to 90 days), or a specific “Competition” — then the dates come from the calendar; the insured amount — “Minimum”, “Optimal”, “Extended” or your own; sports and “Round-the-clock cover”.
- 3
“Athletes”: “Add athlete” — a row with a registry search (surname from 5 characters); the policy data is matched to the card, mismatches are highlighted.
- 4
“Where to send the policies” — “To my e-mail” or “To each athlete's own e-mail”; “Policyholder” — the adult who buys and pays.
- 5
“Calculate price” shows the price per athlete and the total; “Order and pay” — payment links and the policies arrive by e-mail.
- 6
A policy can be bought without signing in — the athlete's data is checked against the registry. To keep the policies in the cabinet, sign in before ordering.
Note: If no insurer is connected, a policy cannot be bought — contact your federation.
A referee's application to a competition
RefereeA referee's personal application — outside a team: which flows and positions they can take.
- 1
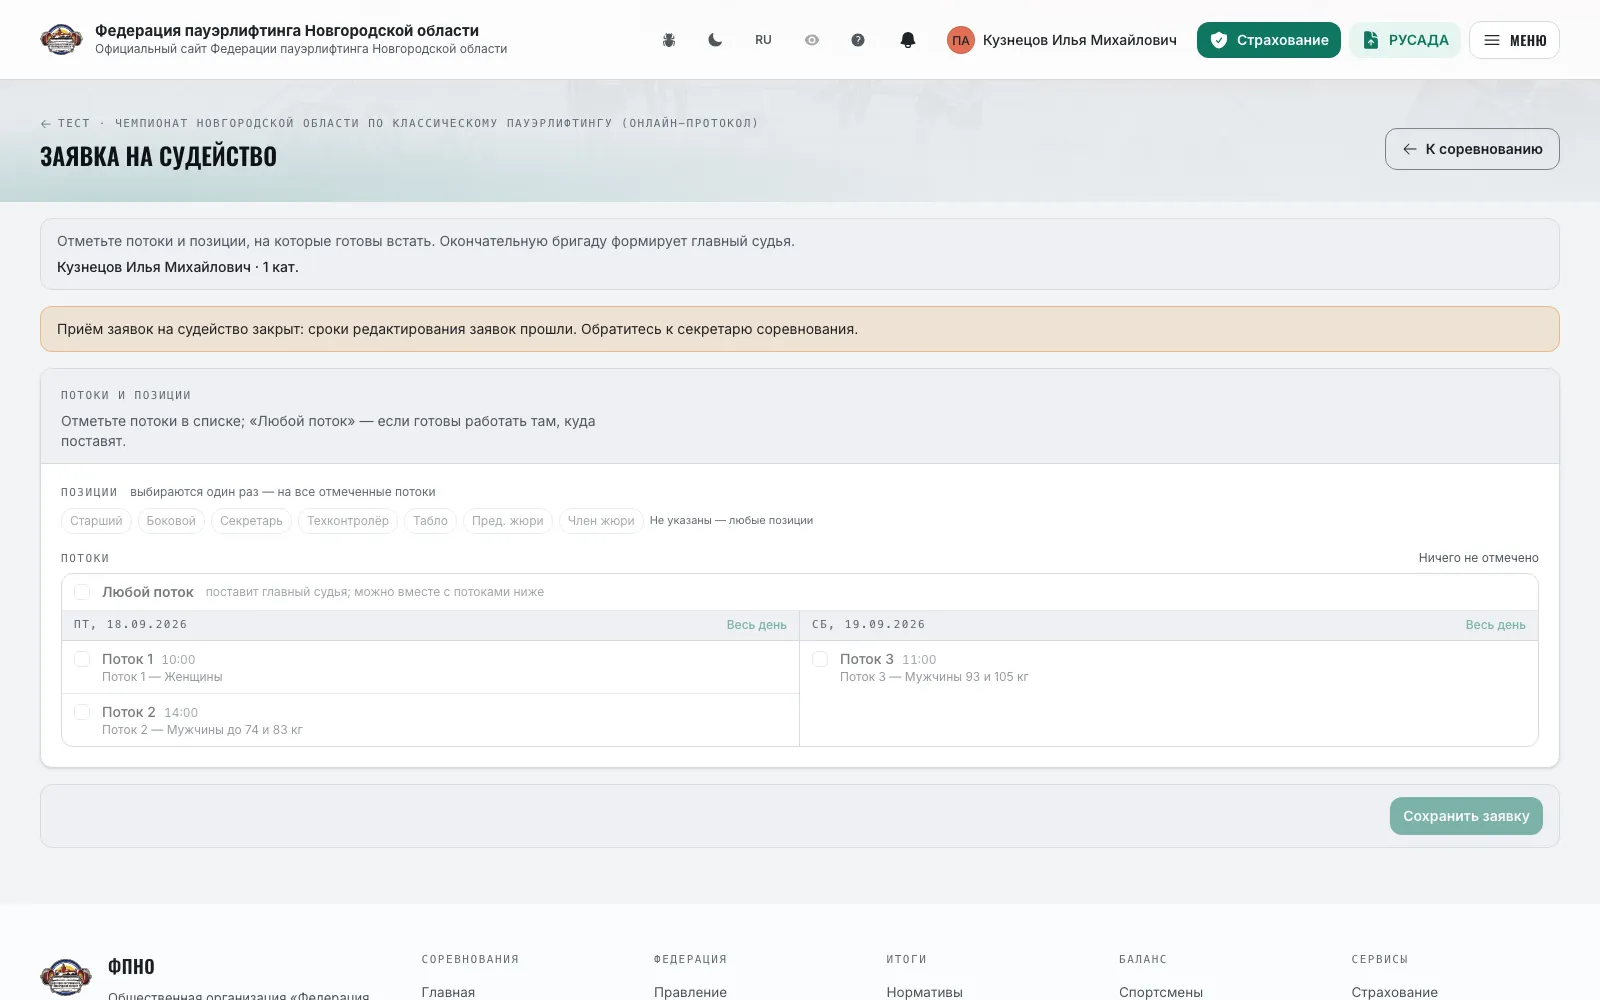
Open the competition and click “Refereeing application” (for a referee with a registry card). If it already exists — “My referee application”.
- 2
Tick the flows in the list and the positions you are ready to take; “Any flow” — if you will work wherever placed. Until the schedule is published the application is filed without a flow.
- 3
Click “Save application”. The chief referee forms the final panel — the assignment shows in “My applications” with the “Referee” role.
- 4
The application is open while the competition accepts entries and closes together with entry editing; after that — only through the secretary.
- 5
Team referees are entered by the captain on the “Judging” step of the team entry, regional referees by the regional manager; a personal application does not count towards a team quota.
Note: In “Athlete entries only” referees are recruited outside the site — there is no application button. In “Referee applications only” the site accepts referee applications only.
Regional entry
OrganizerTeam captainFor competitions above the regional level the entry is filed by a regional representative — one per region.
- 1
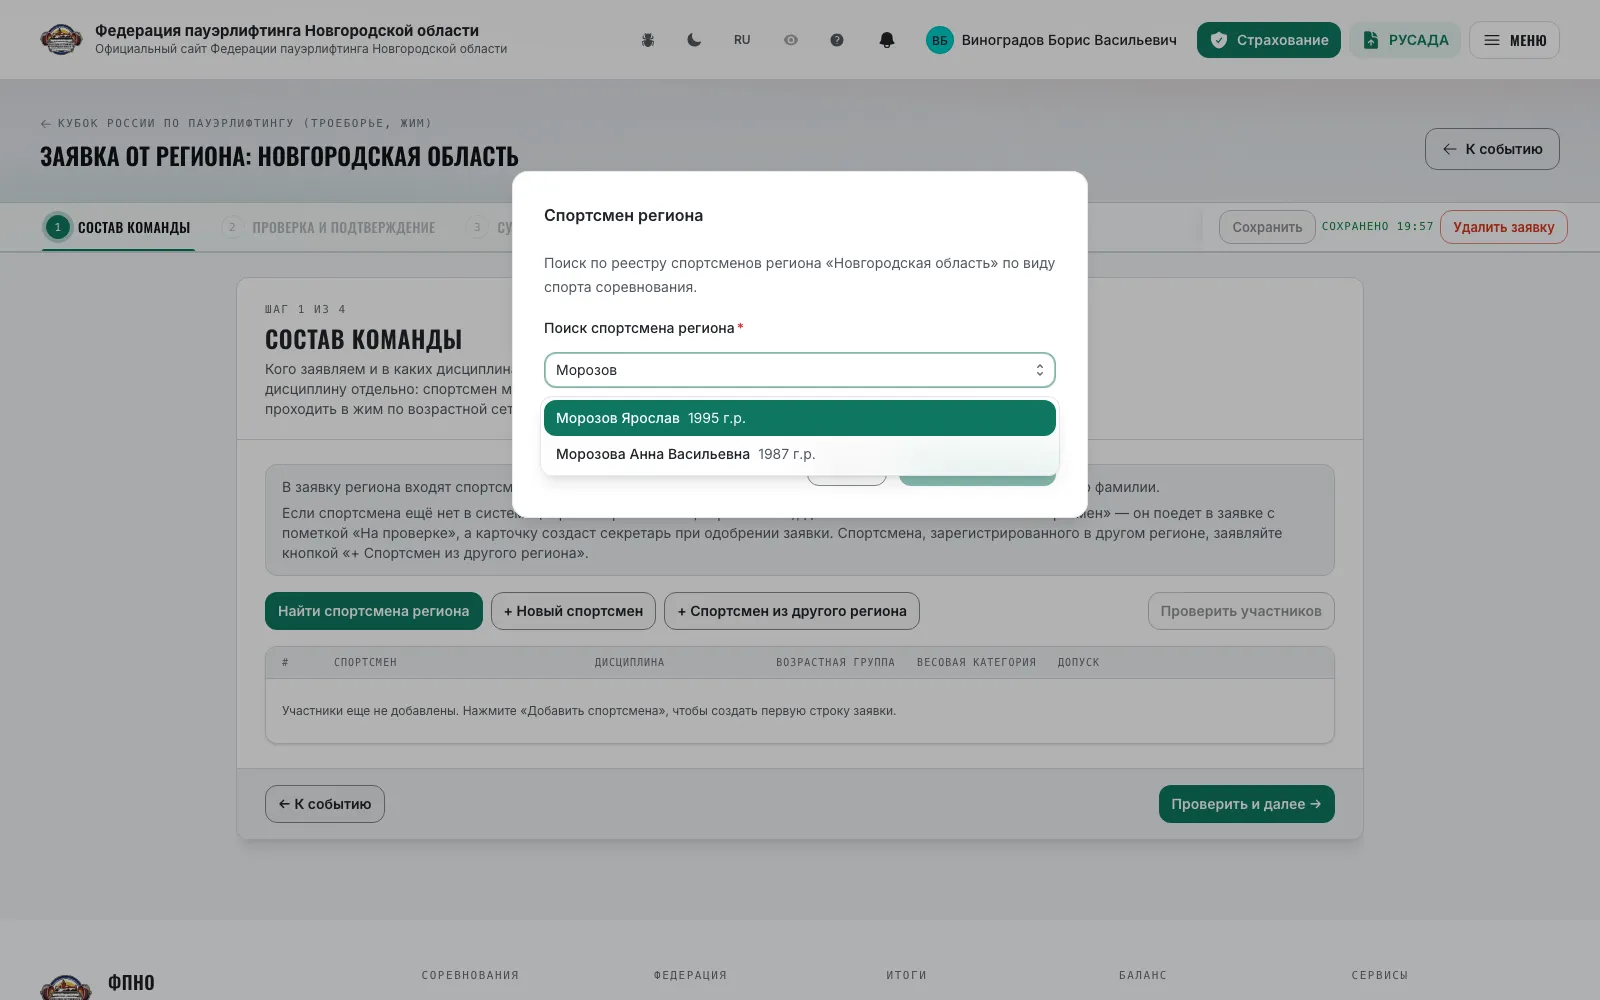
At championships above the regional level personal and team entries are not accepted: the competition page offers “Submit regional entry” and “Enter regional referees”.
- 2
The right to file a regional entry is granted by the regional federation; the manager is listed on the “Regions” page in the “Entry manager” column.
- 3
The wizard is the same as the team entry, but the line-up is picked from the regional registry: “Find a regional athlete” — from any team, and individuals registered in the region.
- 4
Regional referees are entered like team referees: tick flows and positions for each, or “Any flow”.
- 5
One entry per region: reopening returns the same one; the status is visible on the competition page and in “My applications” as “Regional entry”.
- 6
The competition secretary can create the entry for a region themselves — “Create entry” → “From region”.
Note: On such a competition an athlete sees “You are not in the regional entry” until the manager adds them.
Secretary workspace: entries and nomination
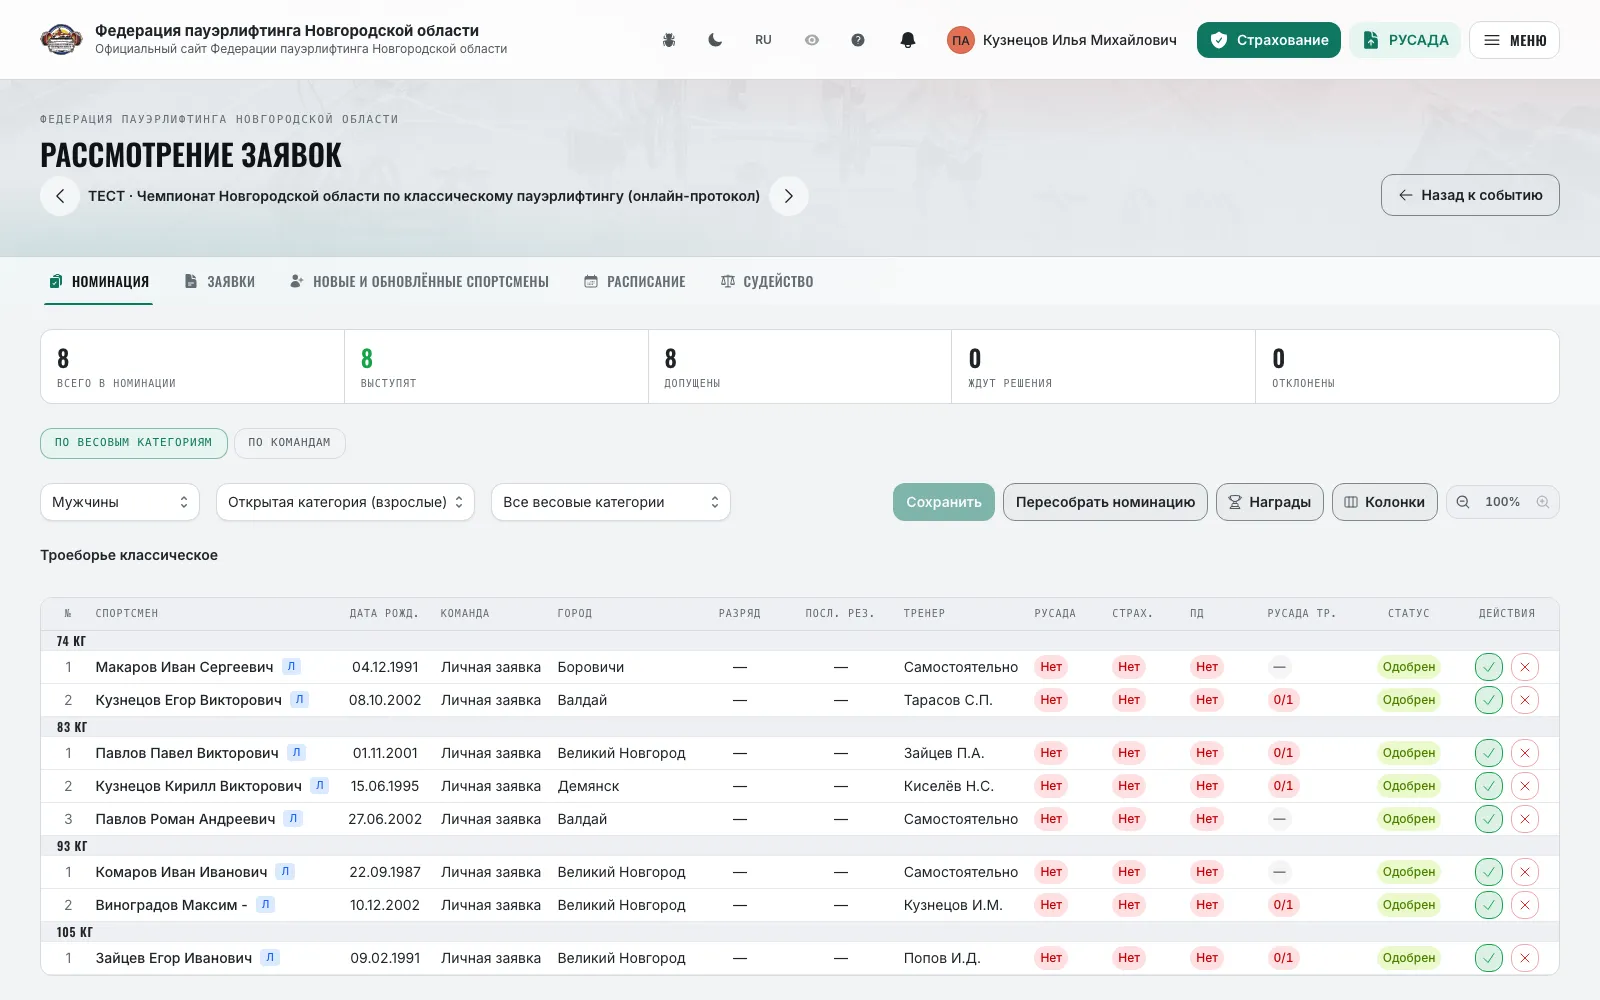
OrganizerThe “Entries” button on the competition page opens the tabs for reviewing entries, payments and admission.
- 1
Open the competition and click “Entries”. Tabs: “Nomination”, “Entries”, “New and updated athletes”, “Receipt review”, “Payment”, “Medical certificates”, “Temporary registration”, “Credentials commission”, “Schedule”, “Judging”. The middle tabs appear per event settings, the last two per your rights.
- 2
“Nomination”: the tiles “Total in nomination”, “Will start”, “Admitted”, “Awaiting decision”, “Rejected”, “Refusals”, “No-shows”, “Hidden from board”; filters by discipline, sex, age group and weight class; the “By weight classes” and “By teams” views. The “Columns” button sets the visible columns and their order.
- 3
Rely on the document marks: “R”, “I”, “PD”, “M”, “Registration” and “Coach RUSADA” — the coaches' certificates. The “Fee” column is visible to entry managers only; a paid prepayment shows there as a “Prepayment” badge.
- 4
The decision per athlete — “Approve” or “Reject” with a mandatory reason; send everything with one “Save (N)” button. A decision can be lifted. After changes click “Rebuild nomination”.
- 5
If entries contain new or edited cards, decisions are blocked until the “New and updated athletes” tab is reviewed: confirm or reject every edit.
- 6
“Entries”: the list of entries with statuses “Draft”, “Under review”, “Approved”, “Rejected”, “Revision requested”, the “Prepayment”, “Payment” and “Judging” columns and the tiles “Entries total / Under review / Approved / Rejected”. “Approve entry”, “Reject entry”, “Lift entry decision”.
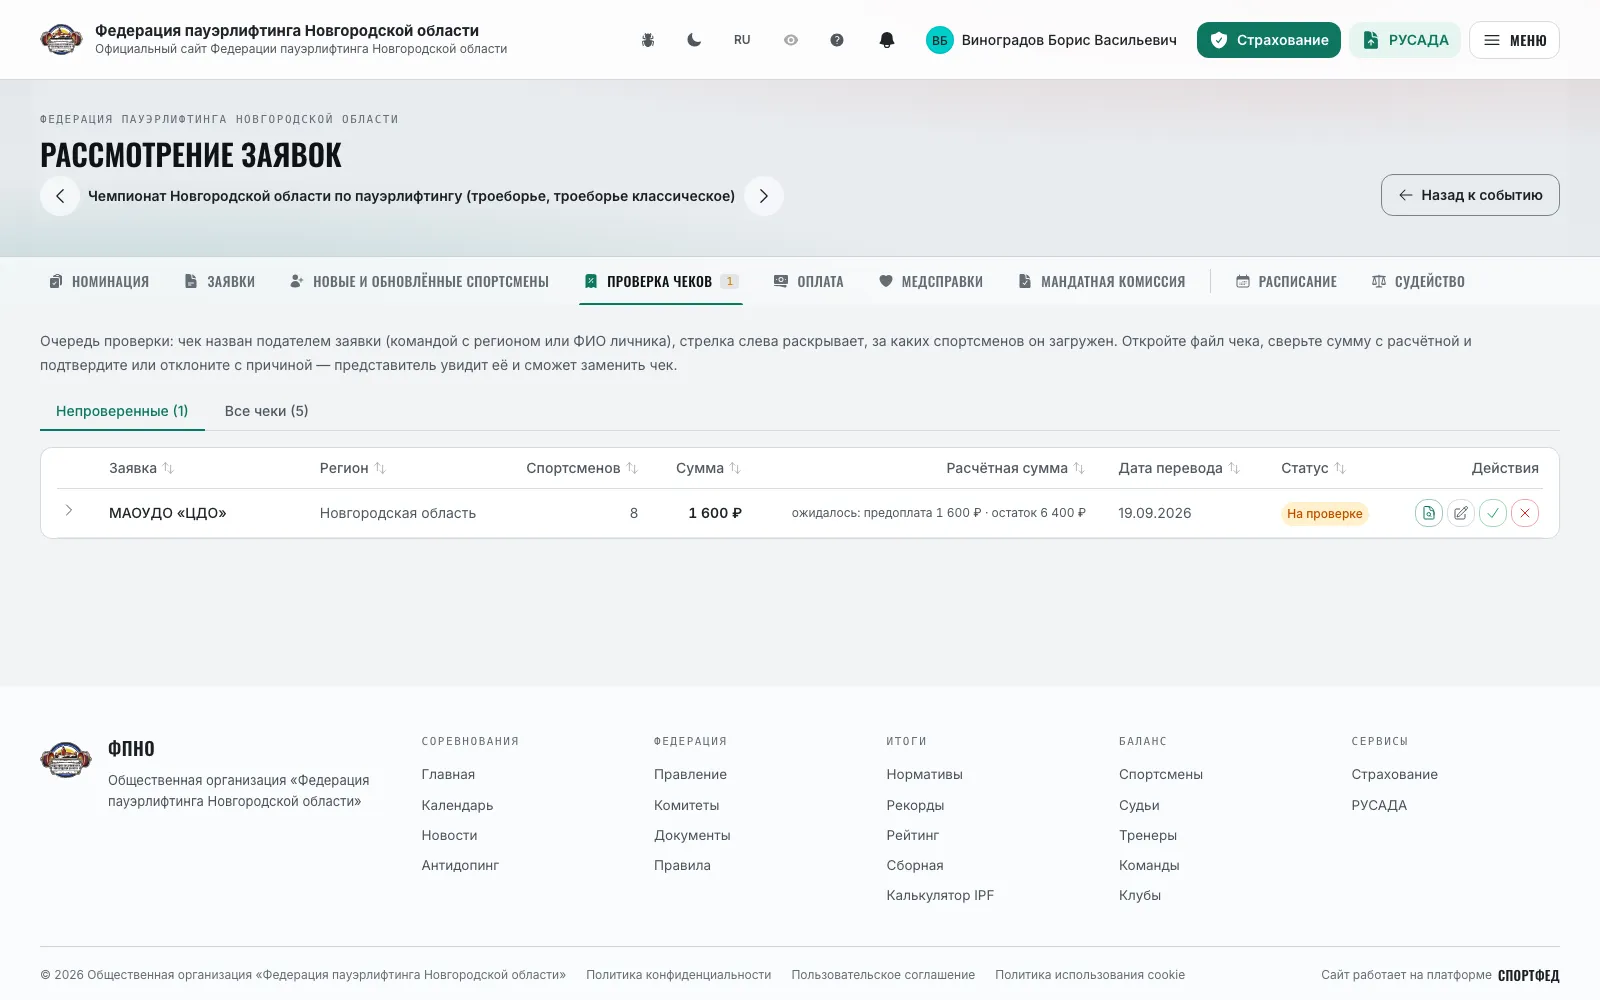
- 7
“Receipt review”: confirm or reject each receipt with a reason. “Payment”: how many athlete × discipline pairs are paid, “Mark as paid” — without a receipt when receipts could not be checked in time; the entry's debt.
- 8
“Medical certificates”, “Temporary registration”, “Credentials commission”: scans for review — confirm or reject with a reason; the decision goes into the nomination marks and the applicant's notifications.
- 9
“Awards” on the nomination tab: how many places are awarded in categories, absolute and team standings — it counts medal and cup sets.
- 10
The header arrows page to the neighbouring competition keeping the open tab; “Print” outputs the nomination by weight classes or by teams.
Note: A rejection reason is mandatory — the captain or athlete will see it. Whoever has not prepaid by the deadline is marked “Hidden” and is absent from the public nomination.
Secretary actions on entries
OrganizerAn entry on behalf of a team or individual, line-up edits, participation statuses, double entries.
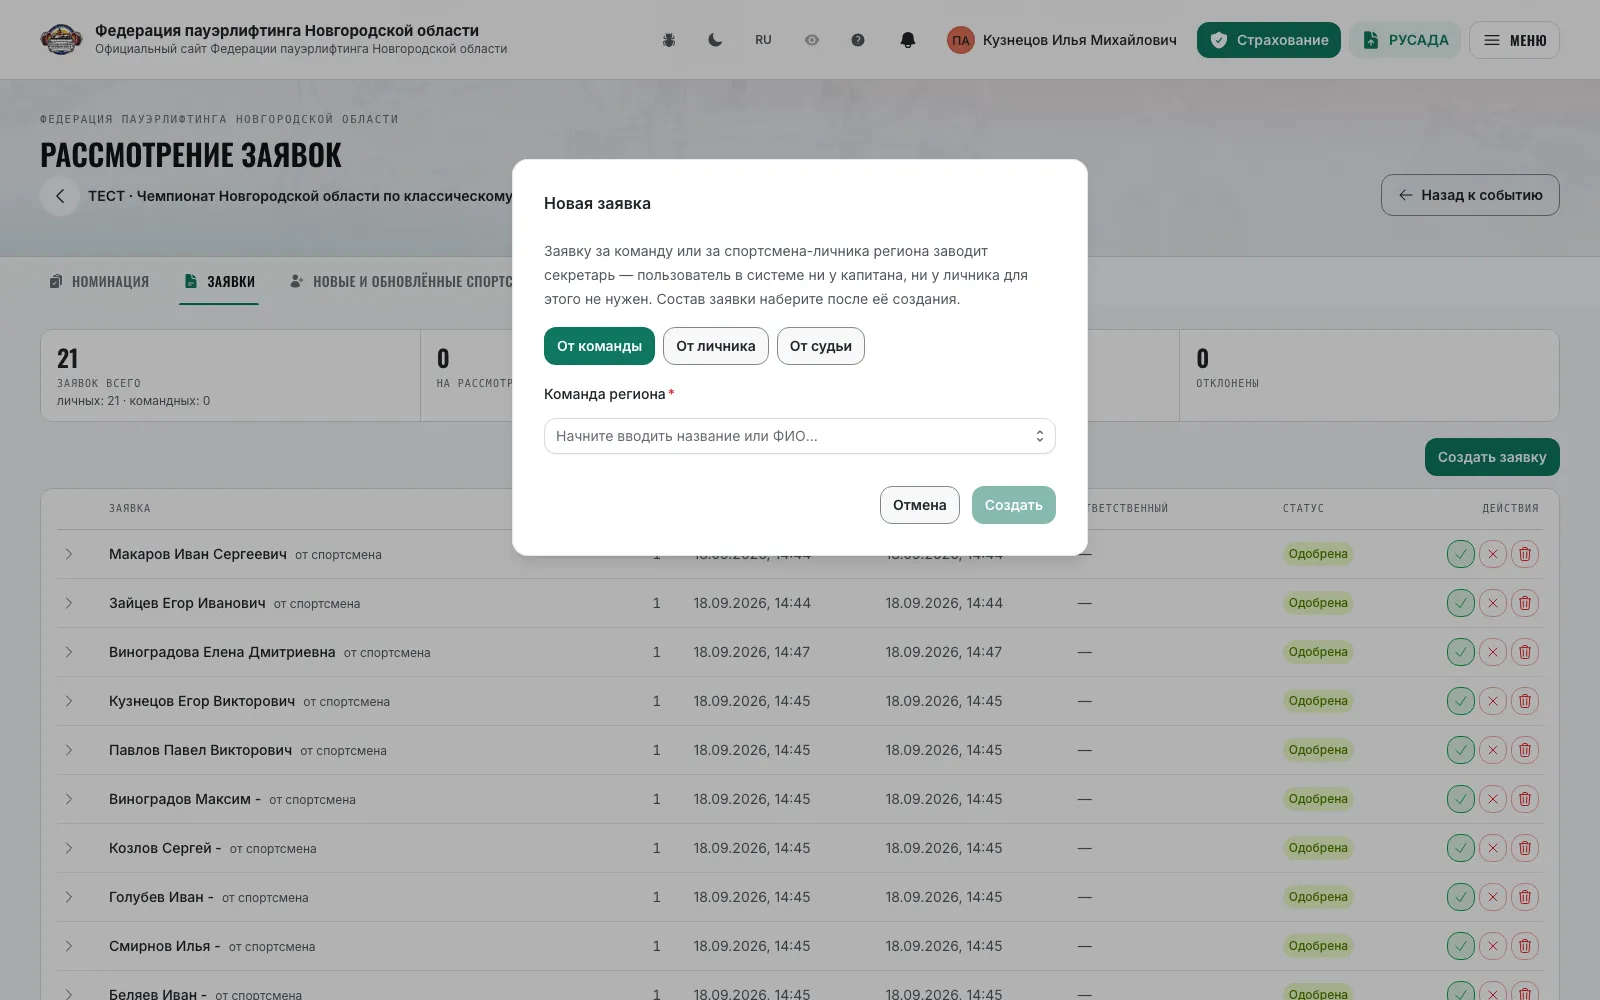
- 1
“Create entry” → “From team”, “From individual”, “From referee” or “From region”: the secretary creates the entry themselves; the captain or athlete needs no user account. Teams and athletes are searched by the competition's region and sport.
- 2
“Add athlete” to an entry: to a team entry — only athletes of that team, to a personal one — only its owner, to a regional one — from the regional registry.
- 3
“Edit” on a participant: a row per discipline with its own age group and weight class; “Remove” deletes the participant with their disciplines.
- 4
“Participation status”: “Refusal to compete”, “No-show”, “Return to declared” — the participant stays in the nomination and protocol but marked as withdrawn; the schedule stops waiting for them.
- 5
“Move to a personal entry” transfers an athlete out of the team entry with all disciplines, decisions and fees. The “Athletes in two entries” block lists duplicates — “Resolve” offers to delete the personal entry or exclude from the team one.
- 6
“Team scoring” on a team entry: “For team” / “Individually” with the same limits as the captain's. “Entry referees” — the team's referees with flows and positions.
- 7
Payment: “Exempt from fee or change the amount” by clicking the payment cell; the raised-fee “Penalty” is lifted or assigned manually; “Mark as paid” — for the whole entry.
- 8
“Delete entry” after entries close removes it with participants, receipts and marks; after the competition ends deletion is unavailable.
Note: The secretary's entry passes the same admission check as the captain's: age, territory, rank, documents.
Schedule and flows
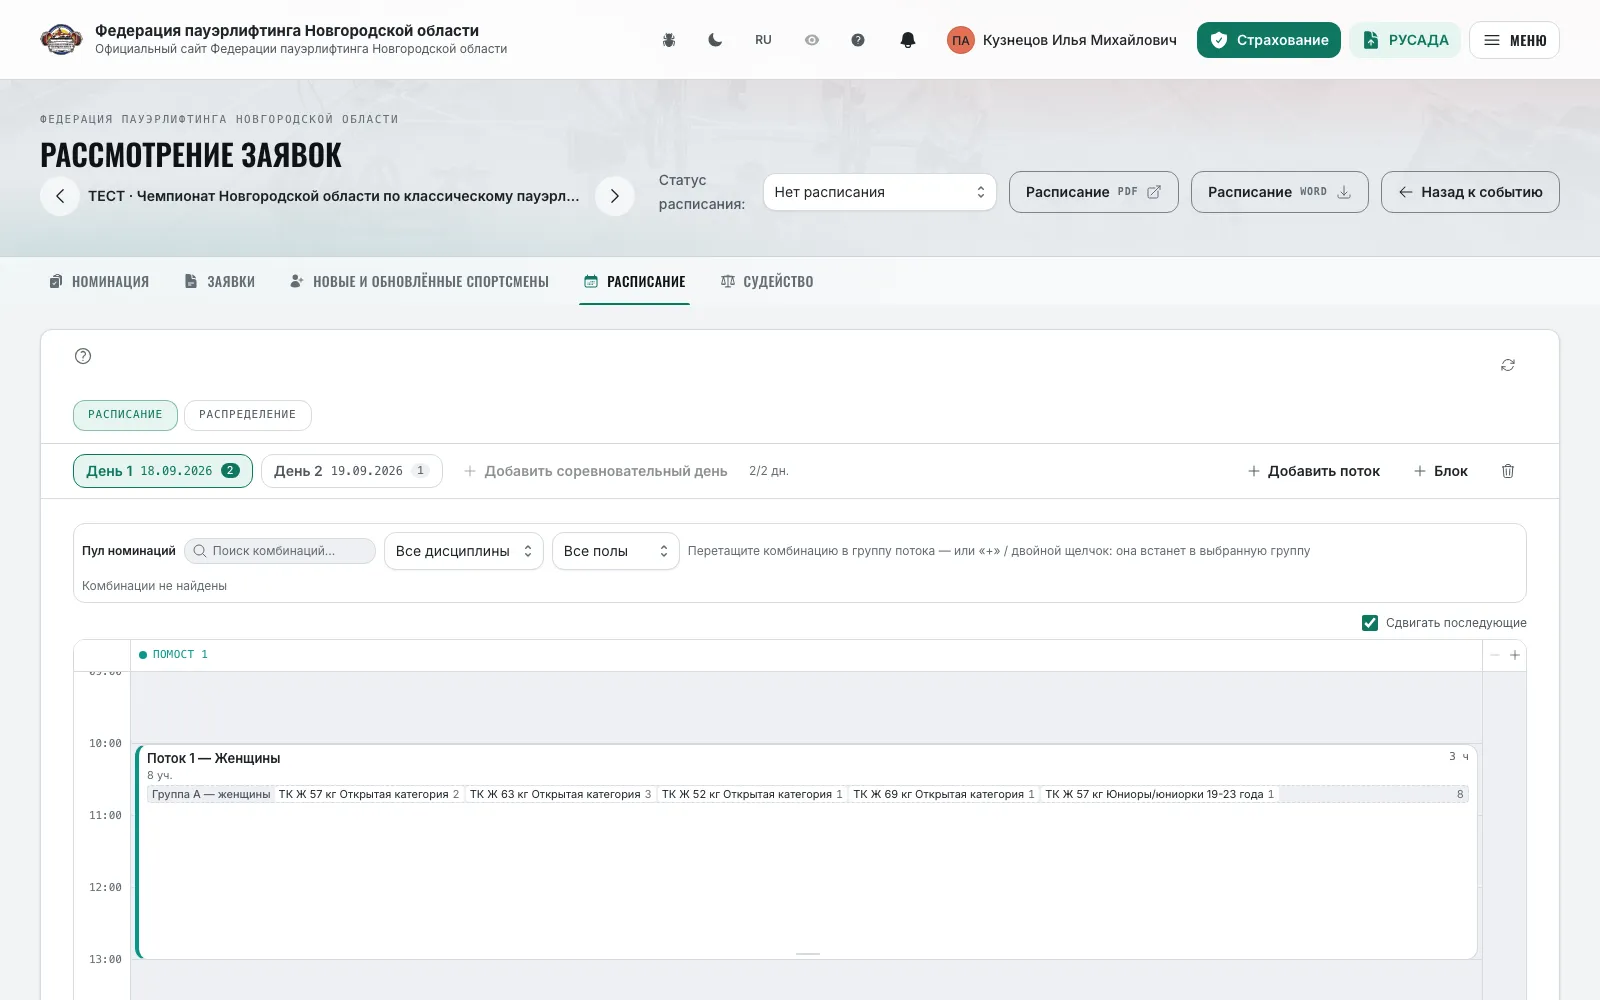
OrganizerThe “Schedule” tab of the secretary workspace: days, flows, groups and the distribution of nominations.
- 1
Open “Entries” → the “Schedule” tab (the same page opens from the “Schedule” link on the event card for organizers).
- 2
“Schedule status”: “No schedule”, “Draft”, “Final”. Until a status is set, the schedule is not shown on the competition page.
- 3
Click “Add competition day” for every day, then “Add flow”: number, weigh-in start and competition start. Inside a flow — “Add group”; platforms are added in the grid header.
- 4
Views: “Grid” — time top-down, columns are platforms, a flow is dragged by its card in 15-minute steps, a double click on a free spot creates a flow; “List” — flow cards; “Calendar” — days as columns with zoom.
- 5
Programme blocks — “Awards”, “Break”, “Ceremony” — are added to the day as rows; an awards block picks its “Awarded nominations”.
- 6
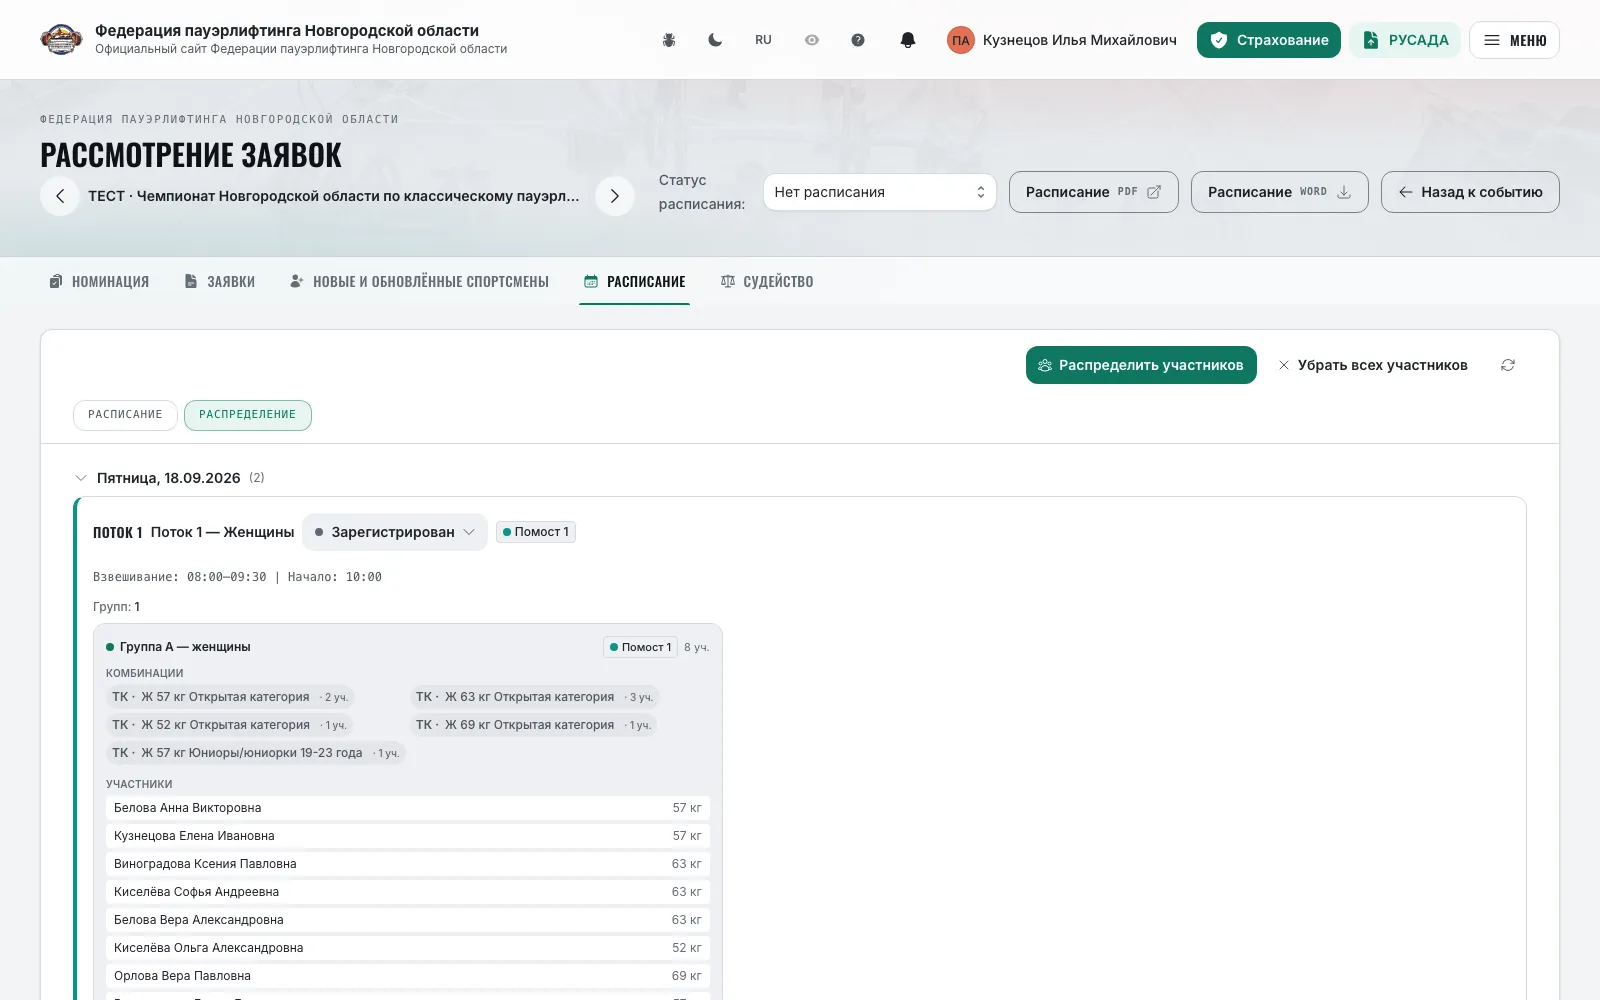
The “Distribution” tab: on the right the “Nomination pool” — “discipline + sex + age + weight” combinations with athlete counts, on the left the flow groups. Drag a combination into a group, or mark a group and add with “+” and double click.
- 7
“Distribute athletes” lays everyone out automatically by matching age, weight and discipline; “Remove all athletes” lifts the assignments, flows and groups stay.
- 8
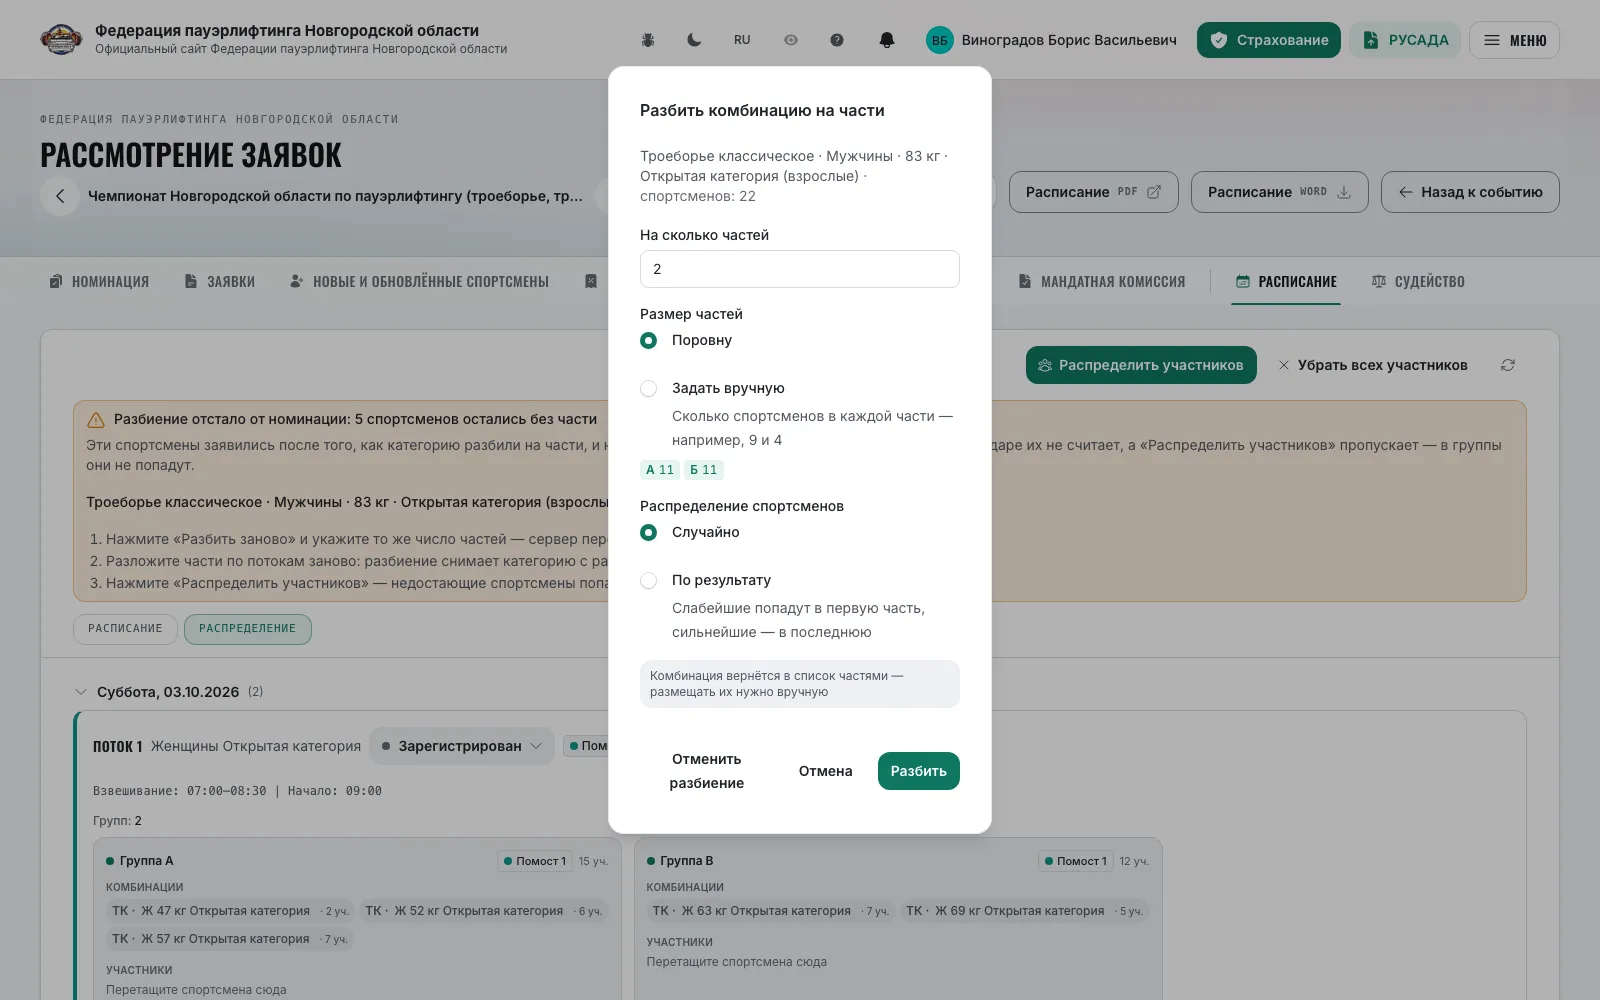
“Split into parts…” divides a large category into parts A, B, C: the number of parts, equal or custom sizes, “Random” or “By result”. “Undo split” returns the combination to the pool. If new entries arrived after the split, “The split lags behind the nomination” appears with three repair steps.
- 9
The “N athletes are not distributed into groups” warning lists who is in no group yet; in “Referee applications only” the athlete counts per category are set by hand — “Expected athletes”.
- 10
Printing: “Schedule” and “Schedule (form)” — in the print forms on the competition page.
Note: Distribution relies on the weight class from the entry. After weigh-in some athletes change class — recheck the layout before the flow starts.
Judging at the competition
OrganizerRefereeThe “Judging” tab: referee applications from teams, regions and individuals, panel assignments per flow.
- 1
Open “Entries” → the “Judging” tab (organizers also have the “Judging” link on the event card).
- 2
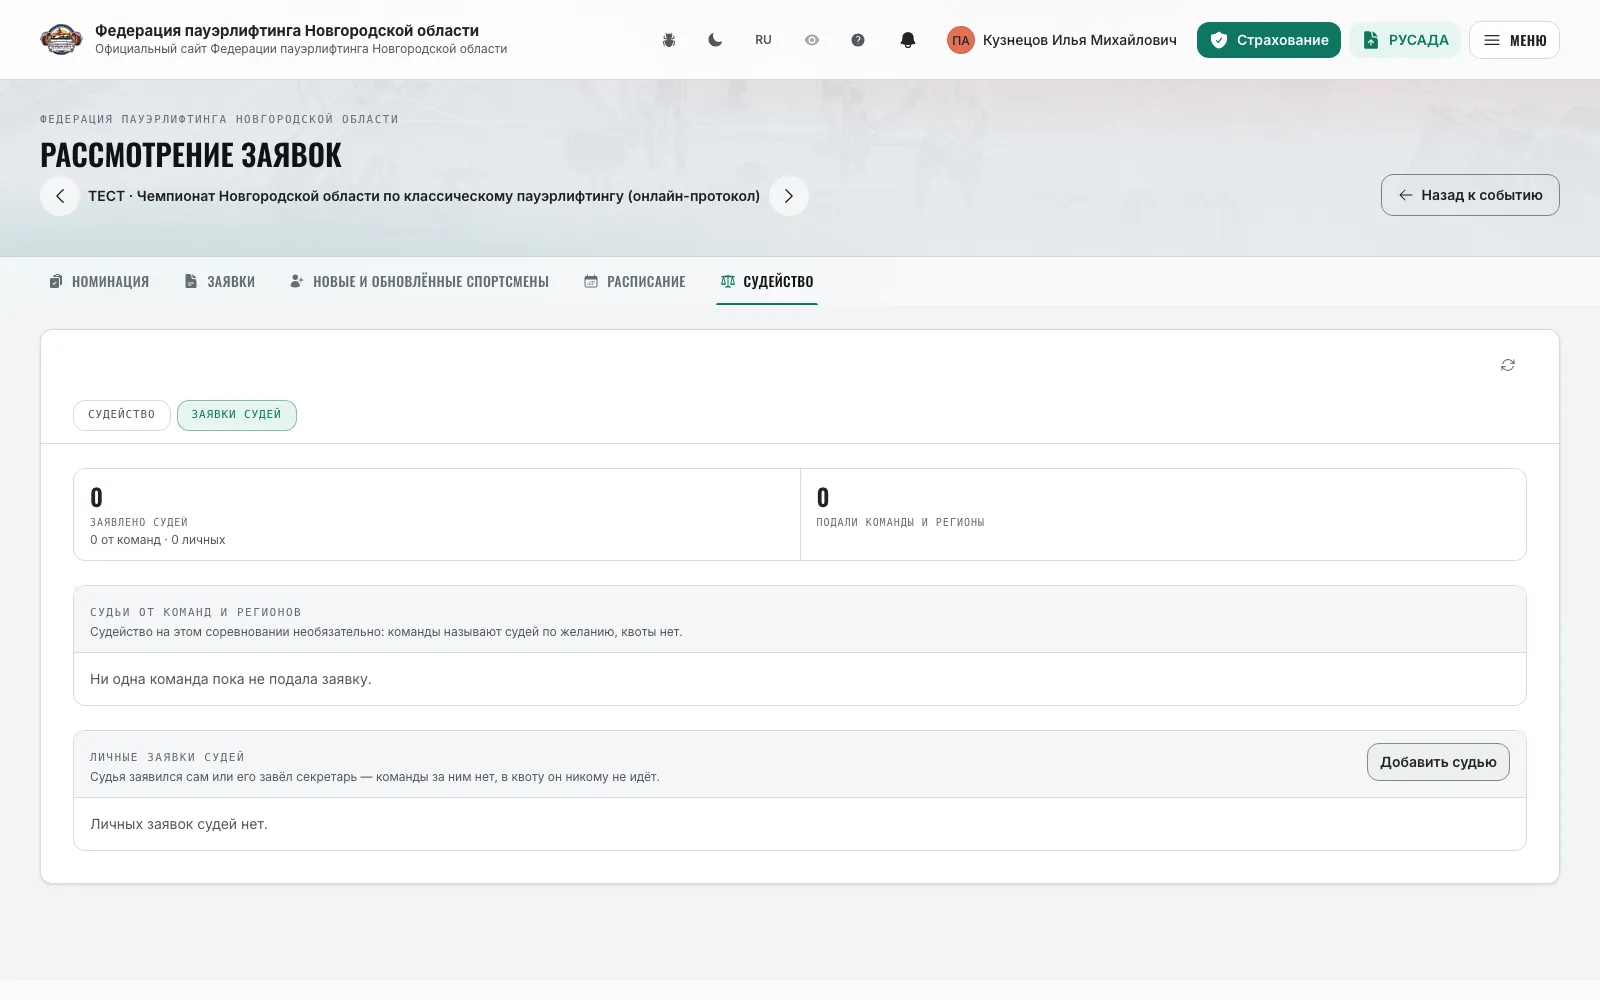
The “Referee applications” tab: the tiles “Referees entered”, “Must provide”, “Shortfall”, “Min. category”; the “Referees from teams and regions” table — how many referees a side provided and how many it must, a row expands to referees, flows and positions; below — “Personal referee applications”. “Add referee” creates a team referee or a personal application right here.
- 3
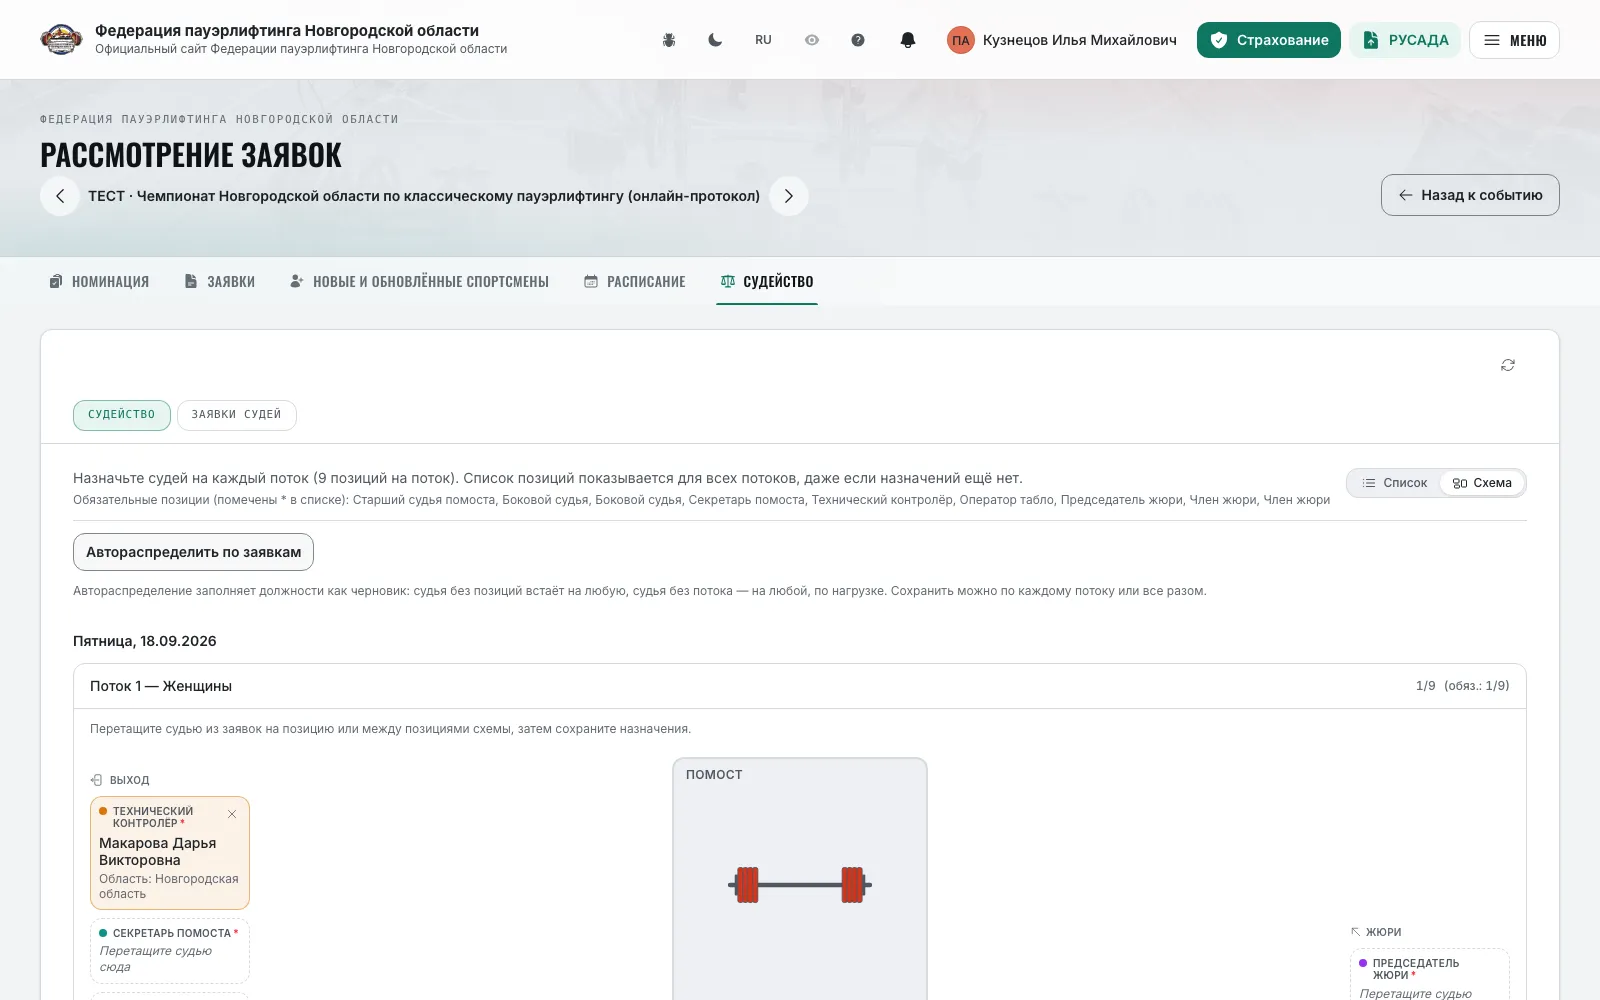
Assignments per flow: the “List” view — the flow's positions with a referee search (from 3 characters); the “Scheme” view — the platform with the “Platform referees”, “Jury”, “Secretariat”, “Technical control” zones, a referee is dragged from applications onto a position.
- 4
“Auto-assign from applications” asks the mode — “Empty only” or “Overwrite all” — and places referees as a draft: a referee without positions takes any, without a flow — any flow.
- 5
One referee cannot hold two positions in one flow — the site warns. Required positions are starred, the counter reads “assigned N of M”.
- 6
Click “Save assignments” on a flow or “Save all assignments (N)” — changes do not apply until saved.
- 7
A referee placed among the event's head officials receives rights per the federation's “Referee rights” tab; flow panels are printed with the “Judging” form.
Note: Team referee requirements — the “Athletes per refereeing” norm, minimum category and penalty — are set in the “Judging” block of the “Judging and documents” step of the event wizard.
Weigh-in
OrganizerBodyweight, document checklist, admission and cash desk — by schedule flows.
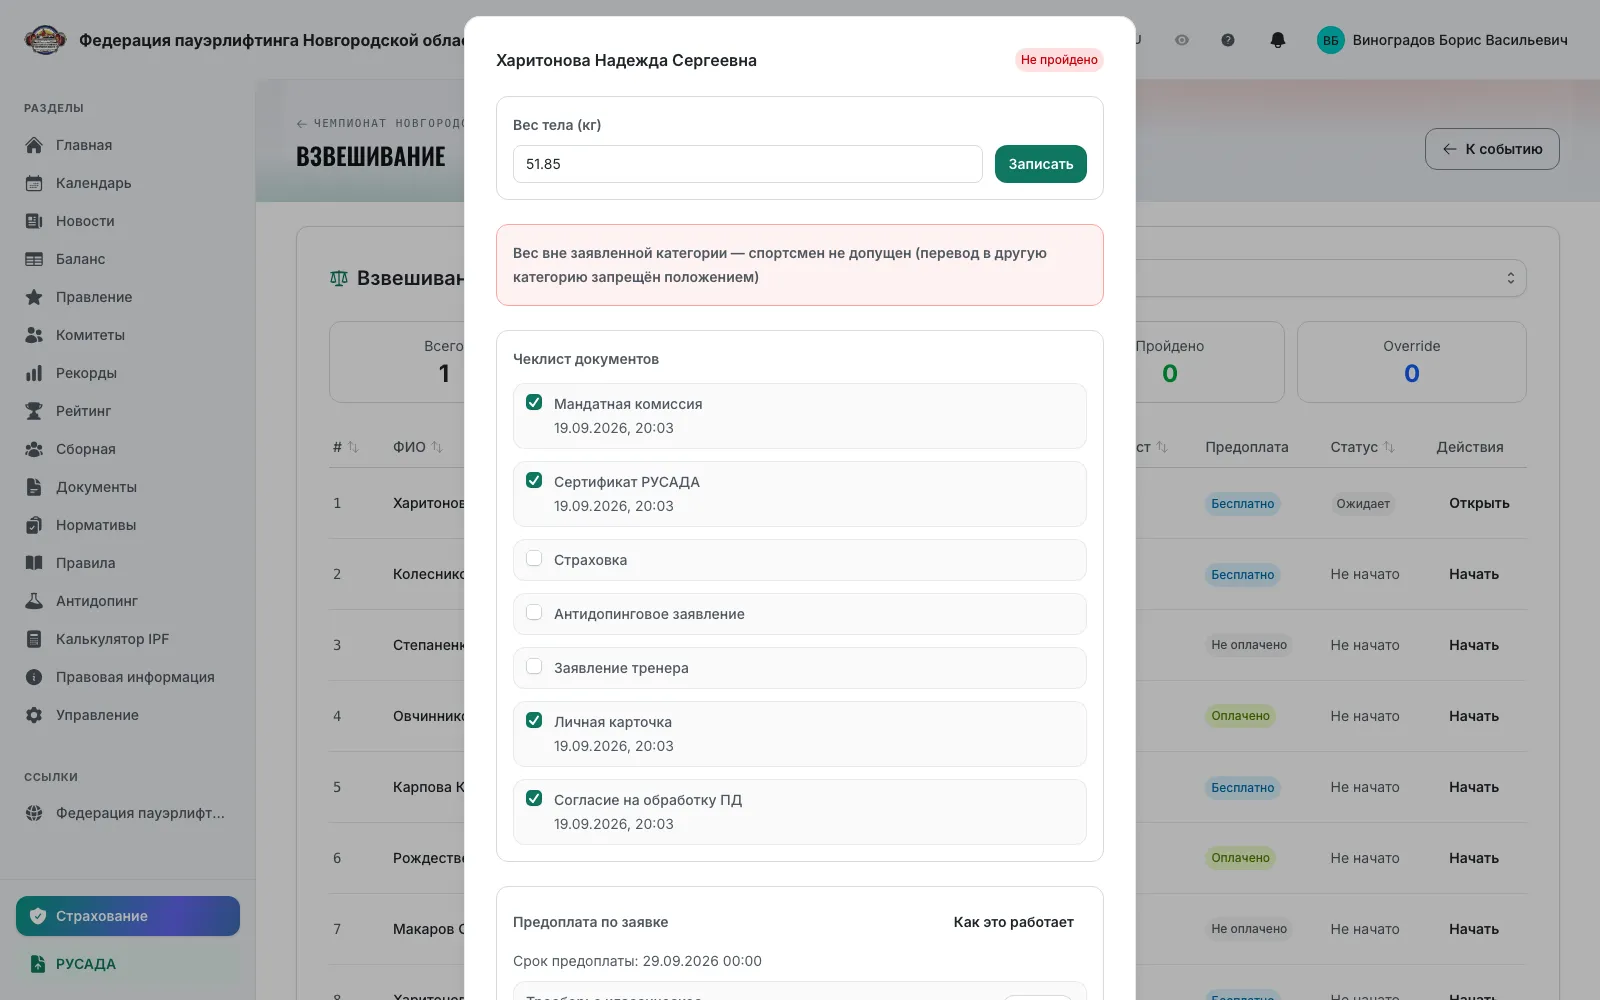
- 1
The weigh-in page opens by a direct link of the form /events/EVENT-ID/weigh-in — there is no button on the event card yet. The weigh-in right is required.
- 2
Pick a flow in “All flows” and click “Start”; a started flow shows “Open”. Tiles: “Total”, “Waiting”, “In progress”, “Passed”, “Override”.
- 3
Open the athlete's dialog: “Bodyweight (kg)” and “Record”. If the weight is outside the declared class, the site offers “Move to class …” or reports that the move is forbidden by the regulation.
- 4
“Document checklist” — RUSADA, insurance, consent, medical certificate, registration; with an incomplete checklist the chief referee may “Admit without the full checklist (override)” with a reason.
- 5
The “Prepayment” and “Fee” columns: the status of athlete × discipline pairs, the raised fee (“Penalty”: “Auto”, “Raised”, “Regular”), fee exemption.
- 6
The “Payment” block: “Expected total”, “Prepayment (confirmed)”, “Collected in cash”, “Remainder due”; “Add payment” takes cash with a receipt number — the remainder is prefilled as the amount.
Note: Amounts collected at weigh-in feed the “Finance” tab of federation management. Weigh-in in the venue is usually run in the desktop client — see the “Desktop: powerlifting” tab.
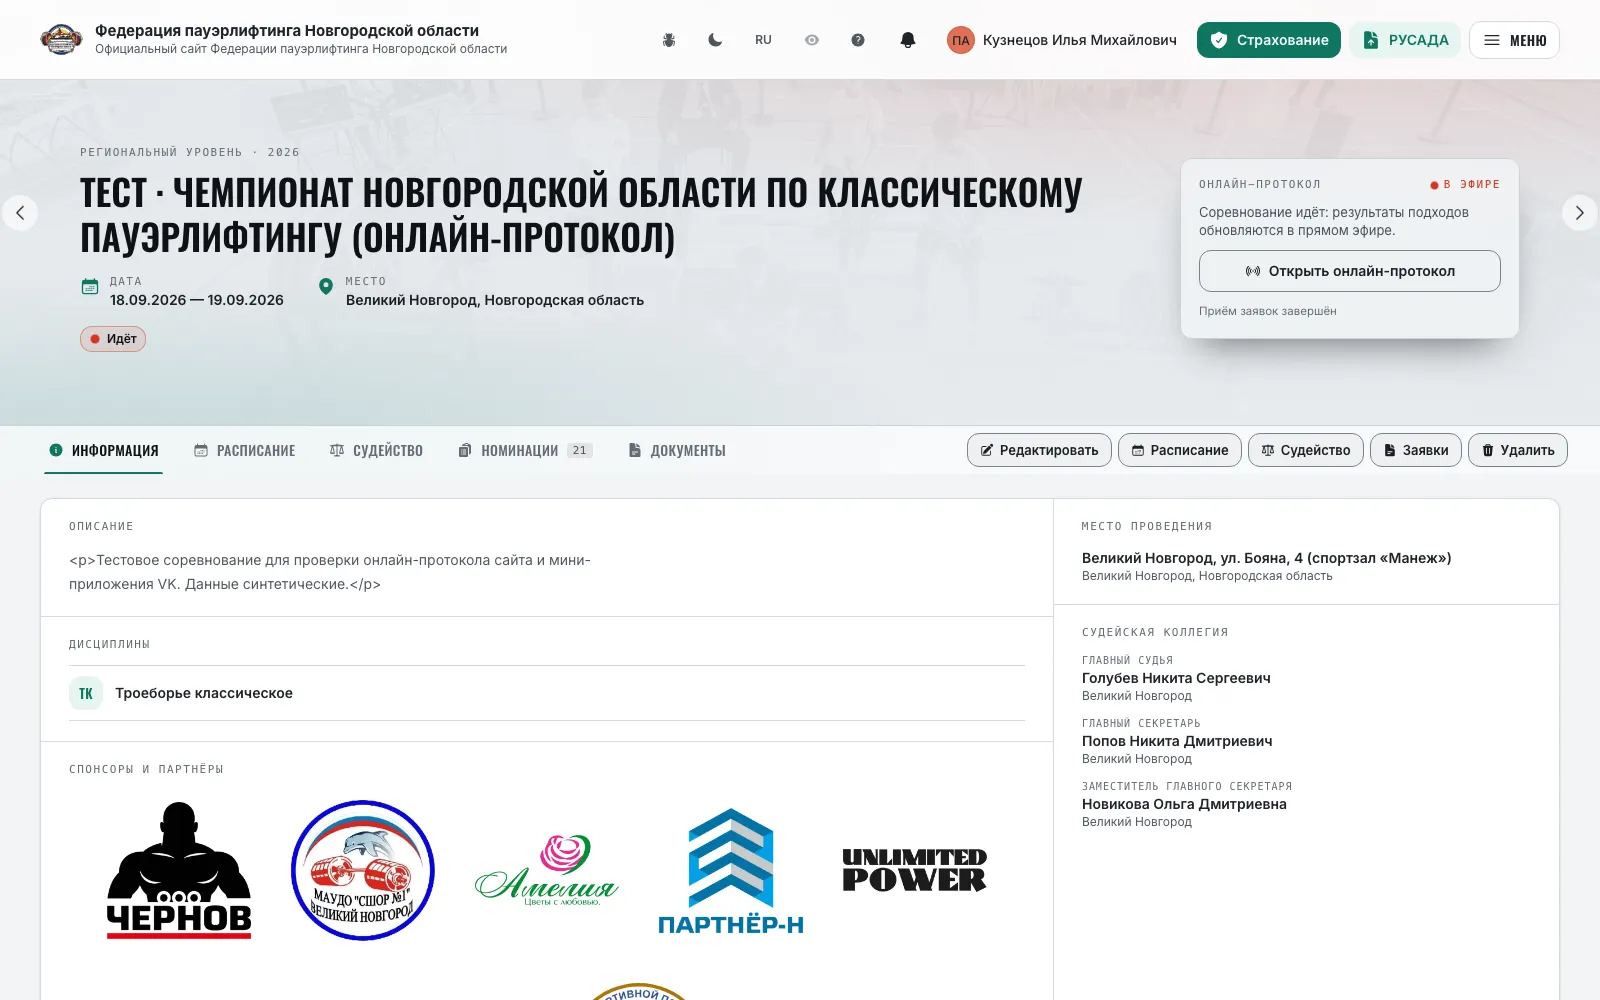
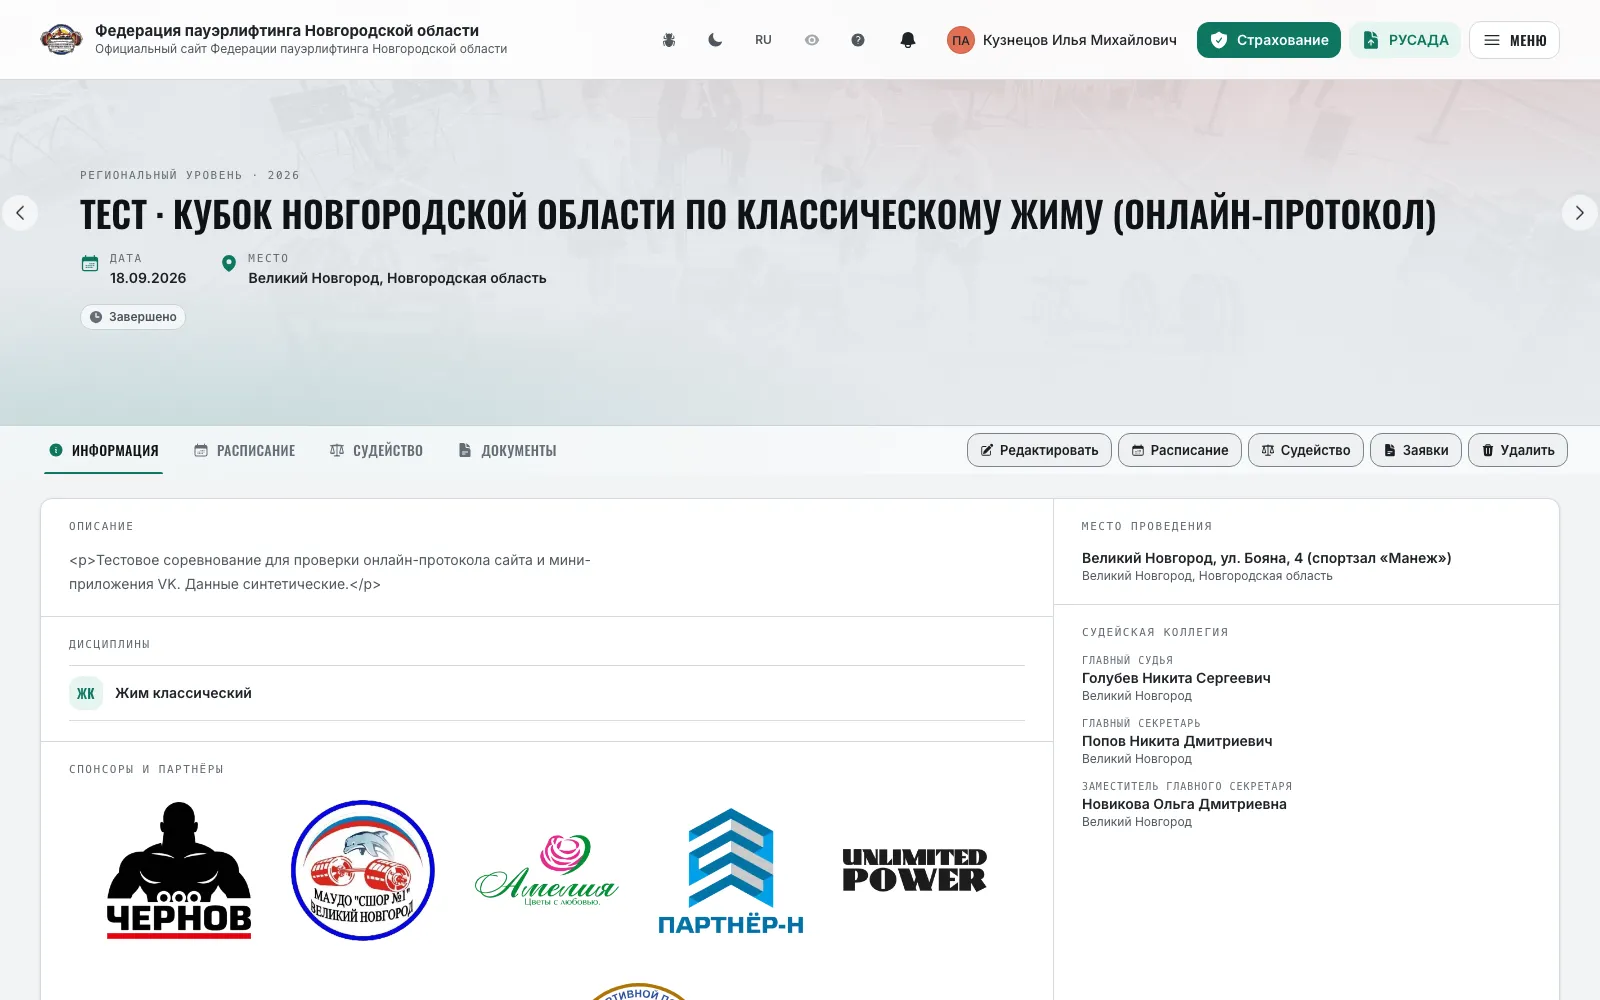
Competition page
AthleteTeam captainRefereeOrganizerFederation administratorThe competition card: a header with dates and countdown, tabs, entry terms and documents.
- 1
Open the competition from the calendar. The header shows the dates, venue, level, arrows to the previous and next competition, and for organizers “Edit”, “Entries”, “Schedule”, “Judging”.
- 2
Tabs: “Info”, “Schedule”, “Judging”, “Nominations”, “Protocol” (or “Results” for the match format), “Standings”, “Documents”. After the competition the results tab opens first.
- 3
The “Entries” panel counts down to the close of preliminary entries, then of entries and corrections; it holds “Submit entry”, “Refereeing application” or “Submit regional entry”. On a phone the entry button is pinned to the bottom of the screen.
- 4
While the competition runs, the “Online protocol” panel with the “Live” chip leads to the live protocol; afterwards — the “Results” panel with “View protocol” and “Standings”.
- 5
“Entry terms”: the entry fee by rules, late entries, payment method, prepayment and rank admission — exactly what the organizer set in the entry campaign.
- 6
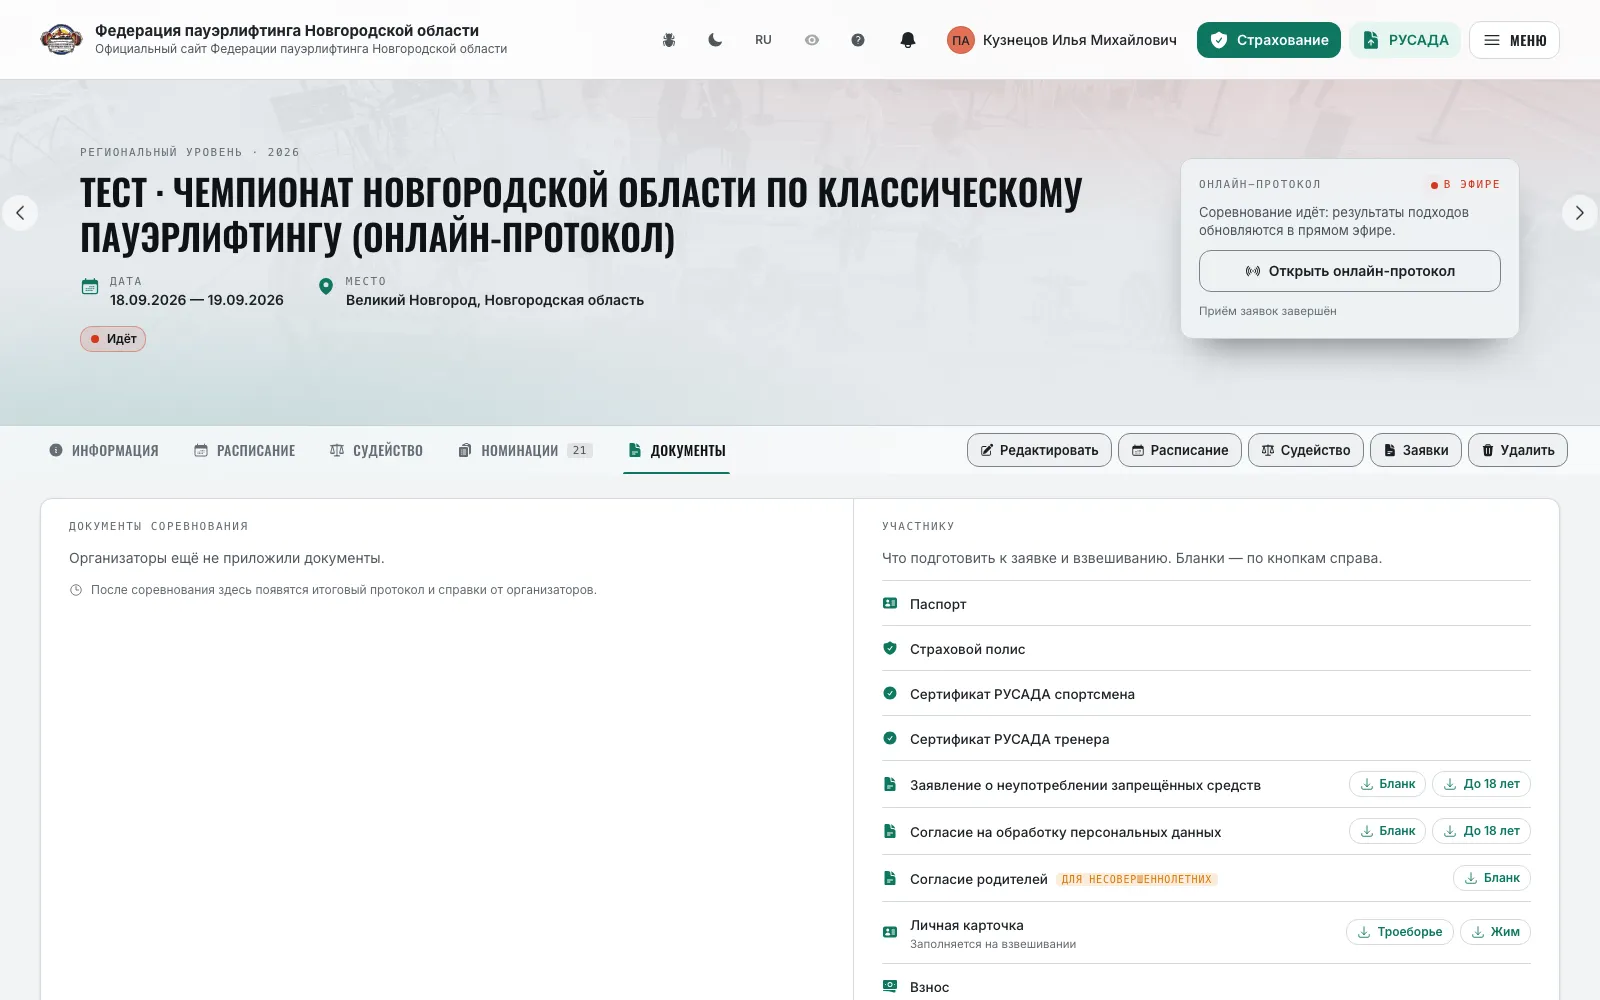
“Info”: description, head officials with contacts, regulation, venue with a route. “For the participant” — what to prepare for the entry and weigh-in, the “Under 18”, “Three-lift”, “Bench” forms and other federation forms.
- 7
“Documents”: the final protocol, certificates and poster from the organizers, and the participant forms.
Note: In the calendar every competition already carries the “Protocol”, “Nomination” and “Online protocol” links, plus the entry line with the deadline and the late-fee multiplier.
Protocol and standings
AthleteTeam captainRefereeOrganizerFederation administratorCompetition results on the “Protocol” and “Standings” tabs, attempt details, printing.
- 1
The “Protocol” tab: results by category with filters by discipline, sex, age group and weight class; the table can be zoomed.
- 2
Click an attempt cell to open “Attempt details”: referee scores, jury scores and the jury decision if it changed the result, and video replays with camera switching. The protocol hint is shown once and replays via “Show the protocol hint”.
- 3
The letter “R” next to a weight means a record on that attempt; “I” next to an athlete — an individual not scoring for a team.
- 4
The “Standings” tab: “Absolute standings” and “Team standings” with filters; a team row expands to its members, national starts add the “Region” and “Military unit” columns.
- 5
The protocol reaches the site from the desktop client after the competition or is uploaded as a “Protocol” document (see “Protocol import”); there you also find “Check for records”.
- 6
Organizers' print forms sit in the print menu (⋯) on the “Nomination”, “Schedule” and “Judging” tabs of the workspace.
Note: Attempt recordings and jury scores exist only for competitions run in the desktop client with recording enabled.
Online protocol
AthleteTeam captainRefereeOrganizerFederation administratorThe live protocol of a running competition: the attempt on the platform, referee lights, queue and place forecast.
- 1
It opens from the home page (“Platform live” → “Open online protocol”), from the calendar row's “Online protocol” or from the “Online protocol” panel on the competition page. The data is sent by the desktop client in the venue.
- 2
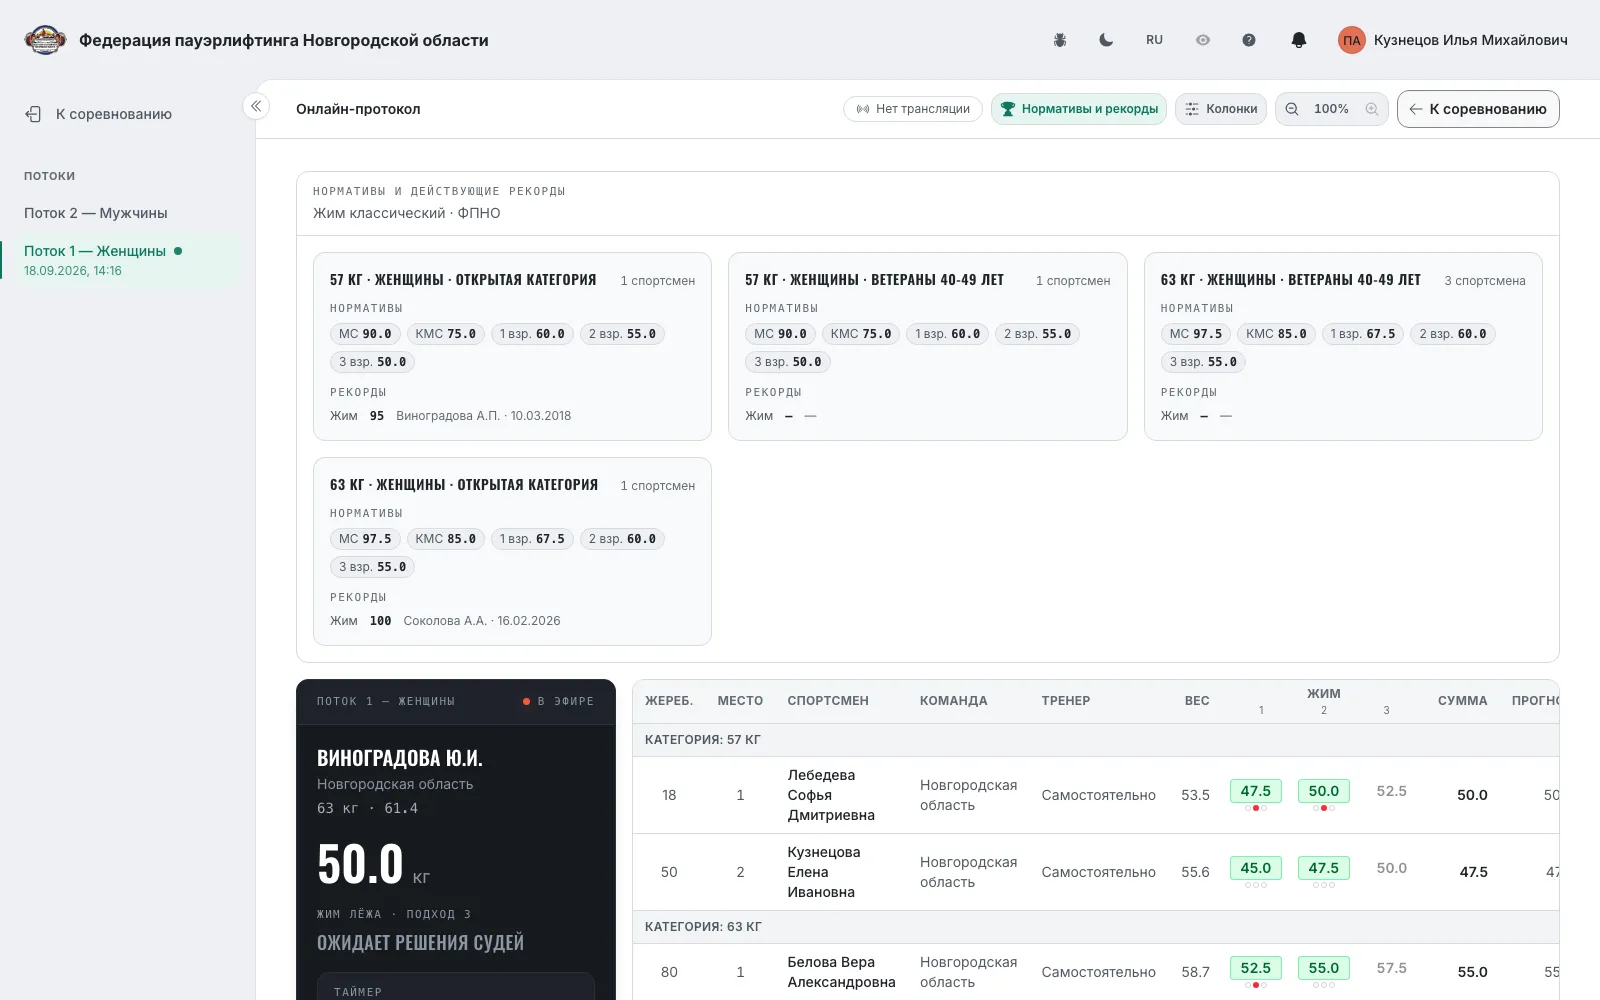
The board on top: “On the platform now” — the athlete, declared weight, timer, referee decision and “Record attempt” when the attempt goes for a record. The cell of the attempt on the platform blinks in the table.
- 3
“Flows” switch the current and past flows; the table shows attempts, total, points and the “Forecast” of the place counting declared attempts. Place changes are highlighted.
- 4
“Table settings”: which columns to show and the “Row order” — “By places” or “As on the platform”.
- 5
“Standards and records” expands the panel by the flow's categories: rank standards and current records with the “Beaten today” note.
- 6
The “Updated … ago” and “Connection lost — reconnecting…” captions show data freshness; “Share” copies the link.
- 7
The same protocol opens in the VK mini app: it starts with the list of live broadcasts filtered by level and region, and without broadcasts — the calendar of upcoming starts.
Note: “Live” goes out when the venue client has stopped sending data for more than five minutes. Full results appear on the “Protocol” tab after the upload from the client.
The “Balance” registry: athletes, coaches, referees, teams, clubs
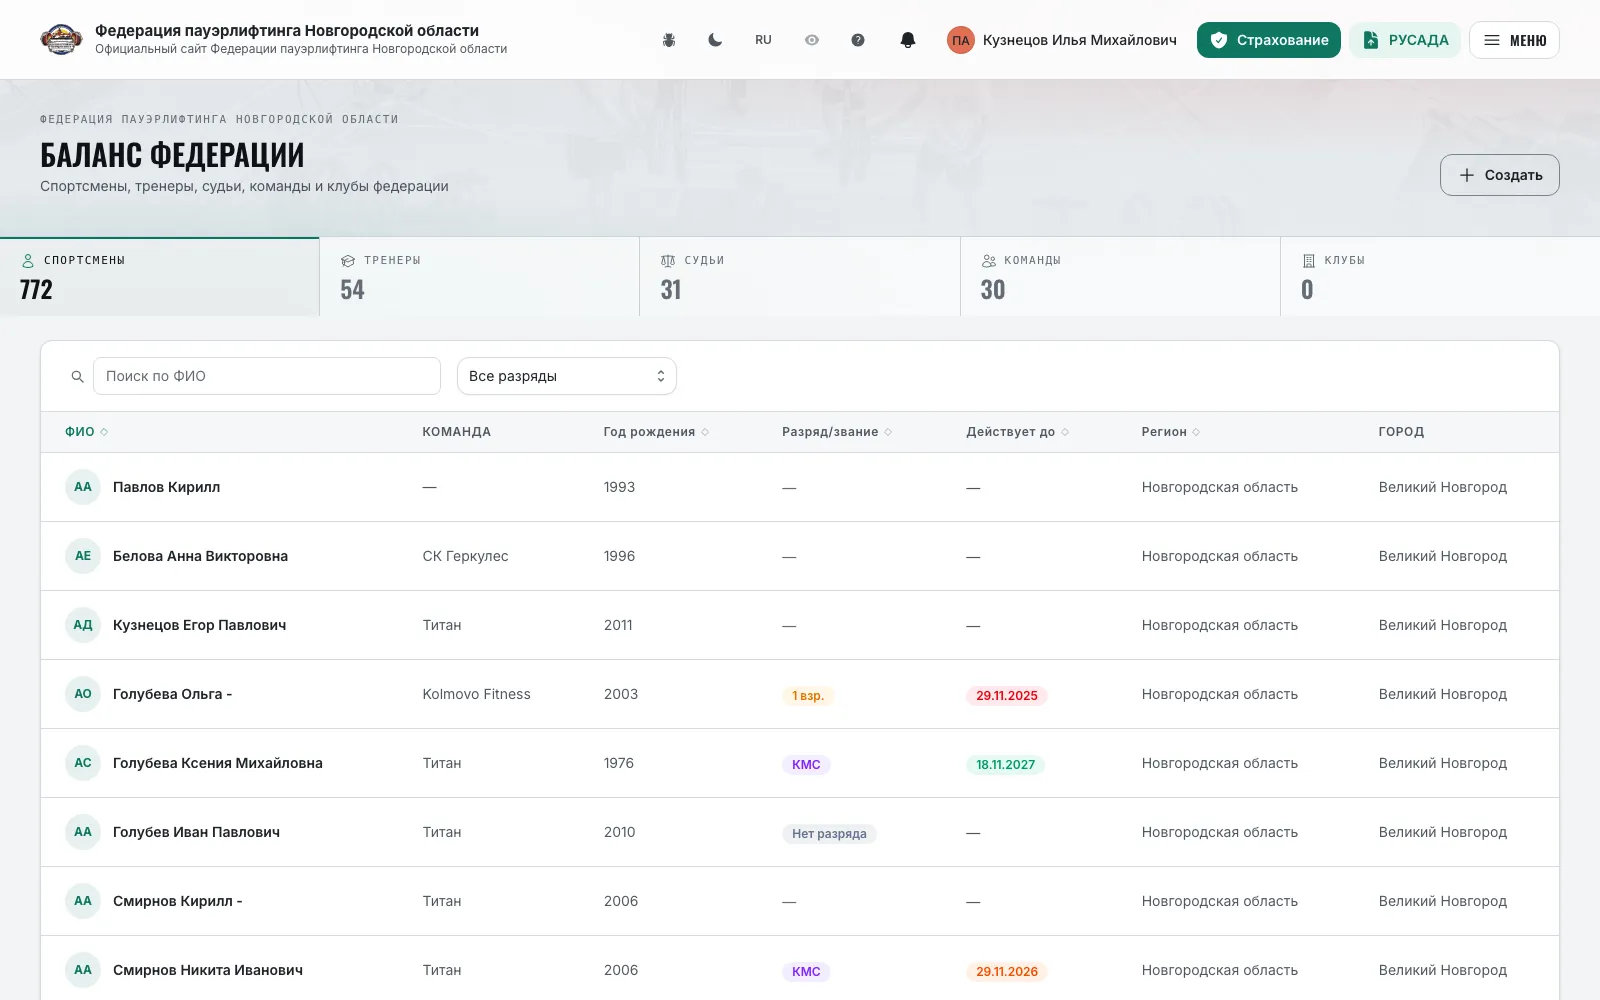
Federation administratorThe single registry of the federation's people and organizations: search, filters, card creation.
- 1
Open “Balance” in the menu. Tabs: “Athletes”, “Coaches”, “Referees”, “Teams”, “Clubs”.
- 2
Search by name or title, filters by region (on the national federation site), by rank and by referee category; column headers sort; at the bottom — “Total: N” and pages.
- 3
Click “Create” to add a record. For an athlete: surname, name, patronymic, “Previous surname”, sex, date of birth, “Region of registration”, “City of residence”, “Team”, “Coach”, “Federation passport”, photo.
- 4
“Rank / title” is set by hand only for MS and above; lower ranks are granted through “Assignment orders” and appear in the card automatically.
- 5
The “Personal-data consent received” tick is optional — the consent can be obtained later, at a competition for example.
- 6
“Edit” and “Delete” sit in the registry row for users with rights; “Delete” is irreversible.
- 7
The athlete card: competition history by protocols with an Excel export, ranks and orders, coaches, documents, disqualifications. A referee and a coach — their refereeing and coaching history.
- 8
An athlete's coaches and teams are edited in their card; duplicate cards in Latin script and different spellings are merged by the secretary through the admin panel.
Note: The registry list is open to every visitor; creating and editing require rights from the “Athletes”, “Referees and coaches” and “Teams, clubs and national team” catalogues.
Clubs and gyms
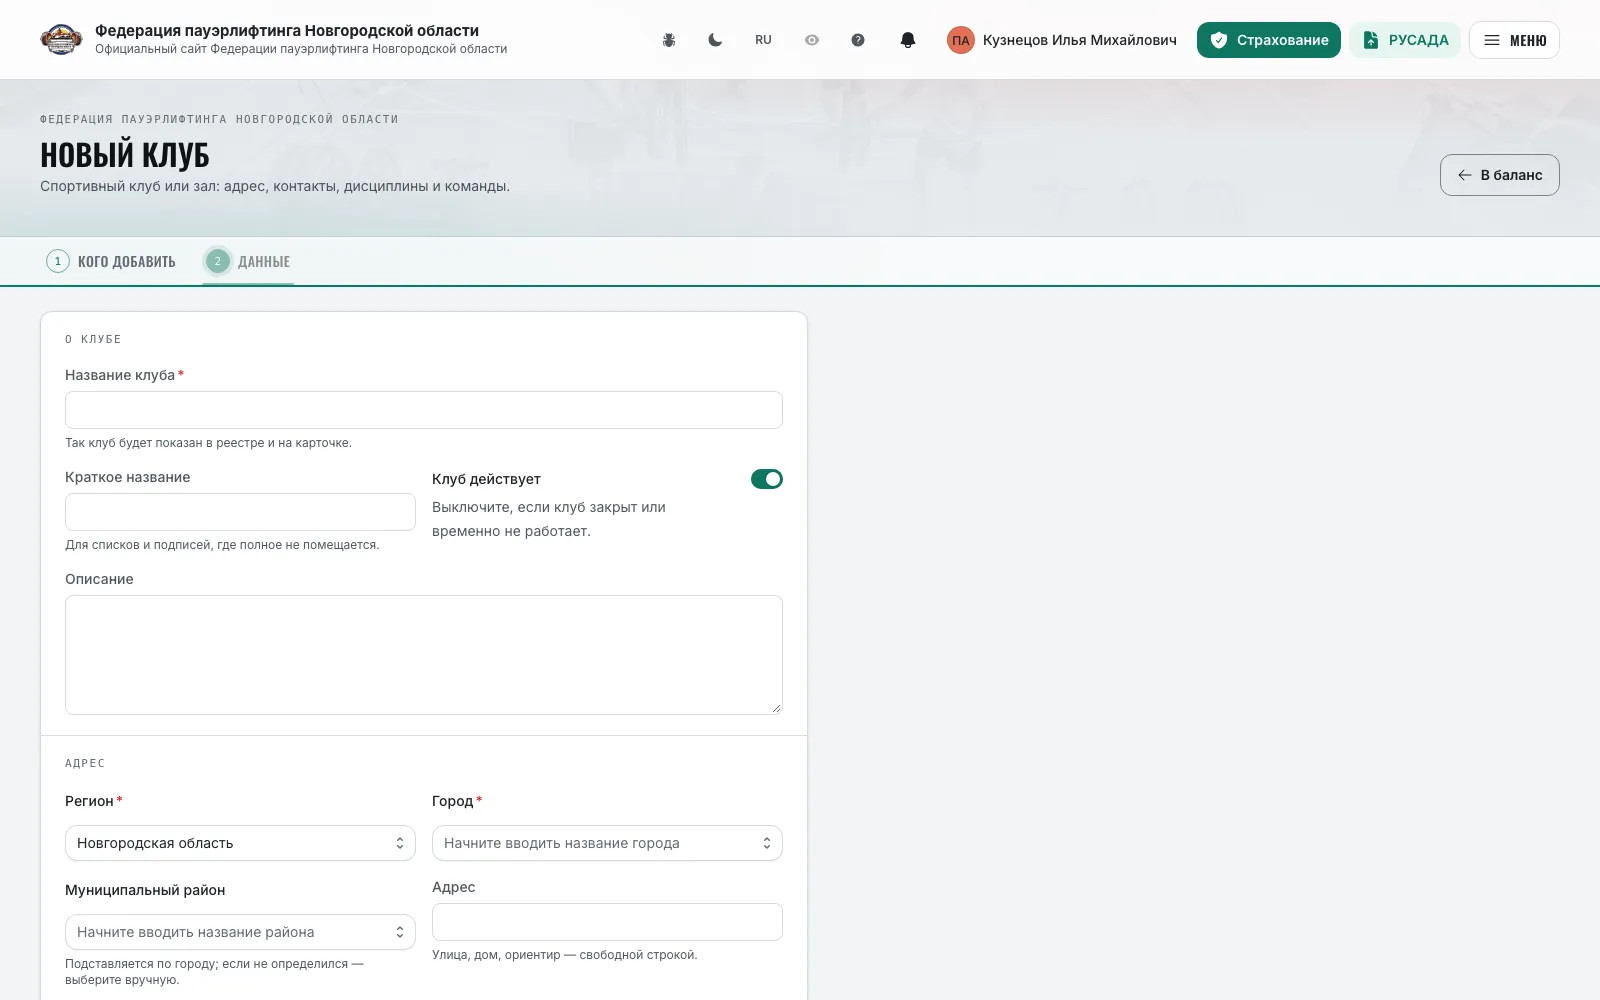
Federation administratorWhere to train: the federation's clubs with address, opening hours, price and disciplines.
- 1
Clubs are shown on the “Clubs” tab of the “Balance” registry and on the home page in “Where to train” → “Find a gym nearby”.
- 2
Click “Create” on the “Clubs” tab. Form sections: “About the club” (name, short name, description, “Club is active”), “Address” (region, city, municipal district, address), “Contacts” (phone, e-mail, website, VK, Telegram).
- 3
“Responsible person”: a federation member with an account, or just a name and phone.
- 4
“Opening hours and price”: free-text hours, the “Paid classes” toggle and “Class price”.
- 5
“Disciplines” — what the club trains; “Club teams” — a team can belong to one club only.
- 6
The club card shows the “Paid” / “Free” / “Inactive” badges, contacts and teams; “Edit” and “Delete” — for users with rights (on deletion the teams are unlinked but kept).
Note: A club does not replace a team: the team files entries and scores in team standings, the club is the training place.
Team roster
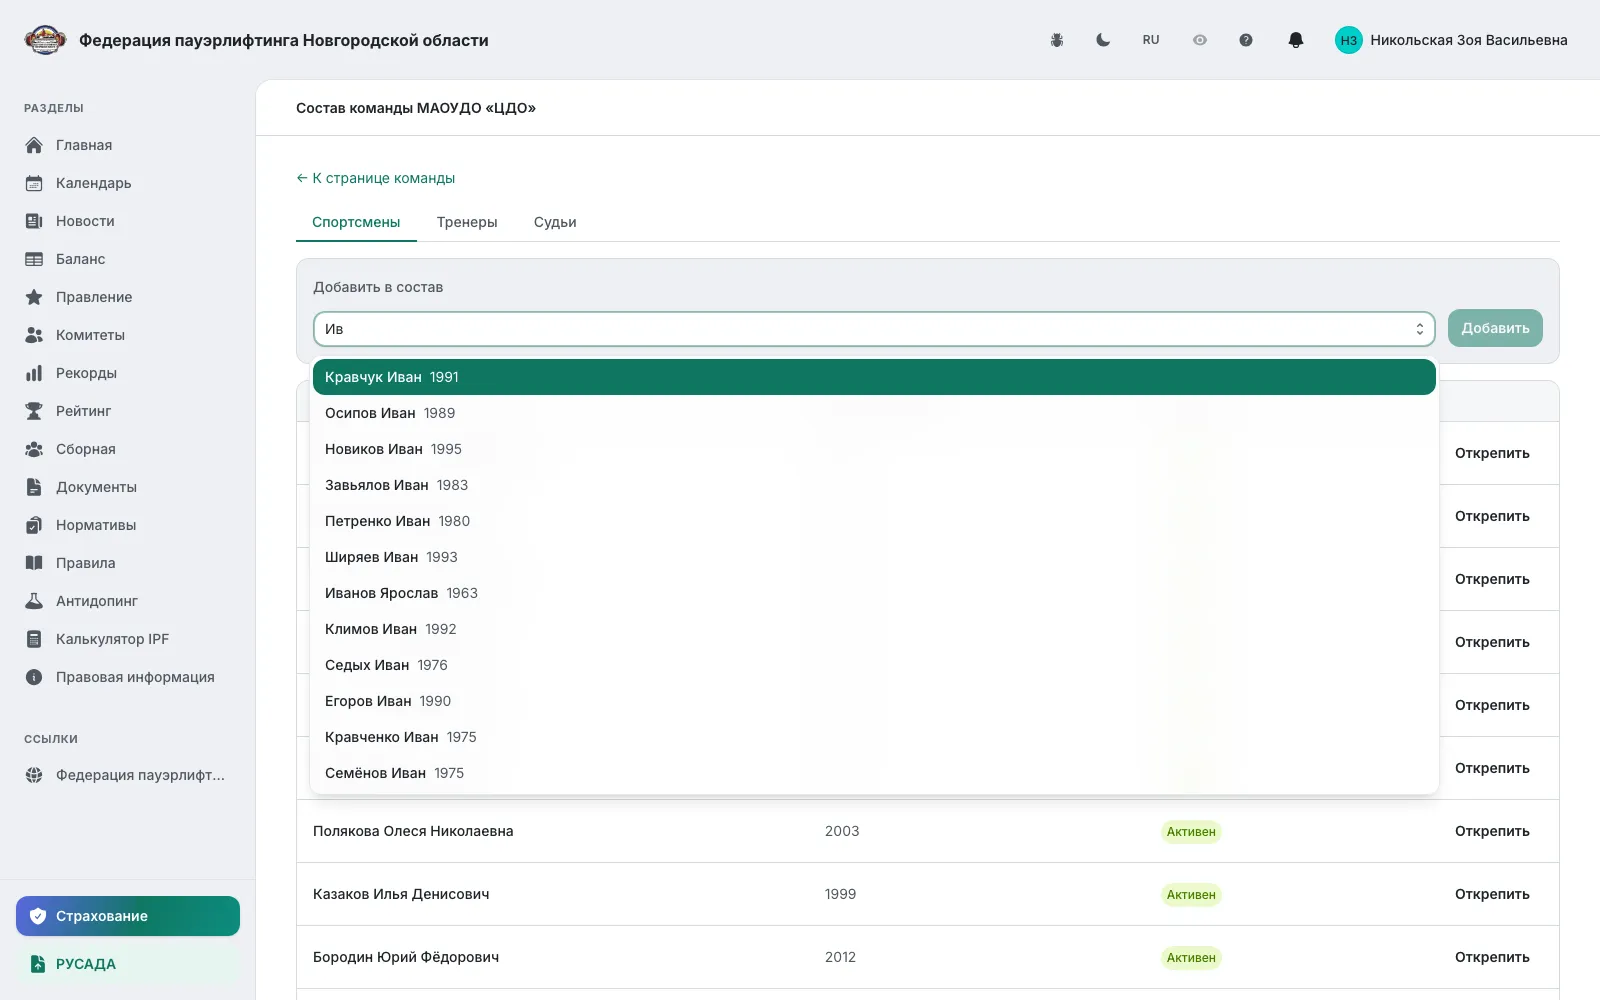
Team captainFederation administratorThe captain adds and unlinks the team's athletes, coaches and referees.
- 1
Open “My team” in the menu under your name, then “Team roster”. Tabs: “Athletes”, “Coaches”, “Referees”, and in powerlifting also “Assistants”.
- 2
“Add to roster”: find the person by surname — the search runs over the team region's registry and the site's sport — and click “Add”.
- 3
If a person is “already in team “…””, the captain of that team or the federation secretary must unlink them first.
- 4
“Unlink” removes the link both in the team roster and in the person's card.
- 5
A team entry offers roster athletes only: fill the roster before filing the entry.
Note: The federation lets captains manage rosters on the “Settings” tab → “Team captains manage their rosters”. Without it the roster is edited by the federation secretary.
Federation documents
Federation administratorRegulations, orders, protocols and forms: types, four visibility axes, files.
- 1
Open “Documents” in the menu. The list is filtered by type (resolutions, regulations, orders, protocols, standards, references, forms), by year with an “Archive”, and by search; pinned documents come first.
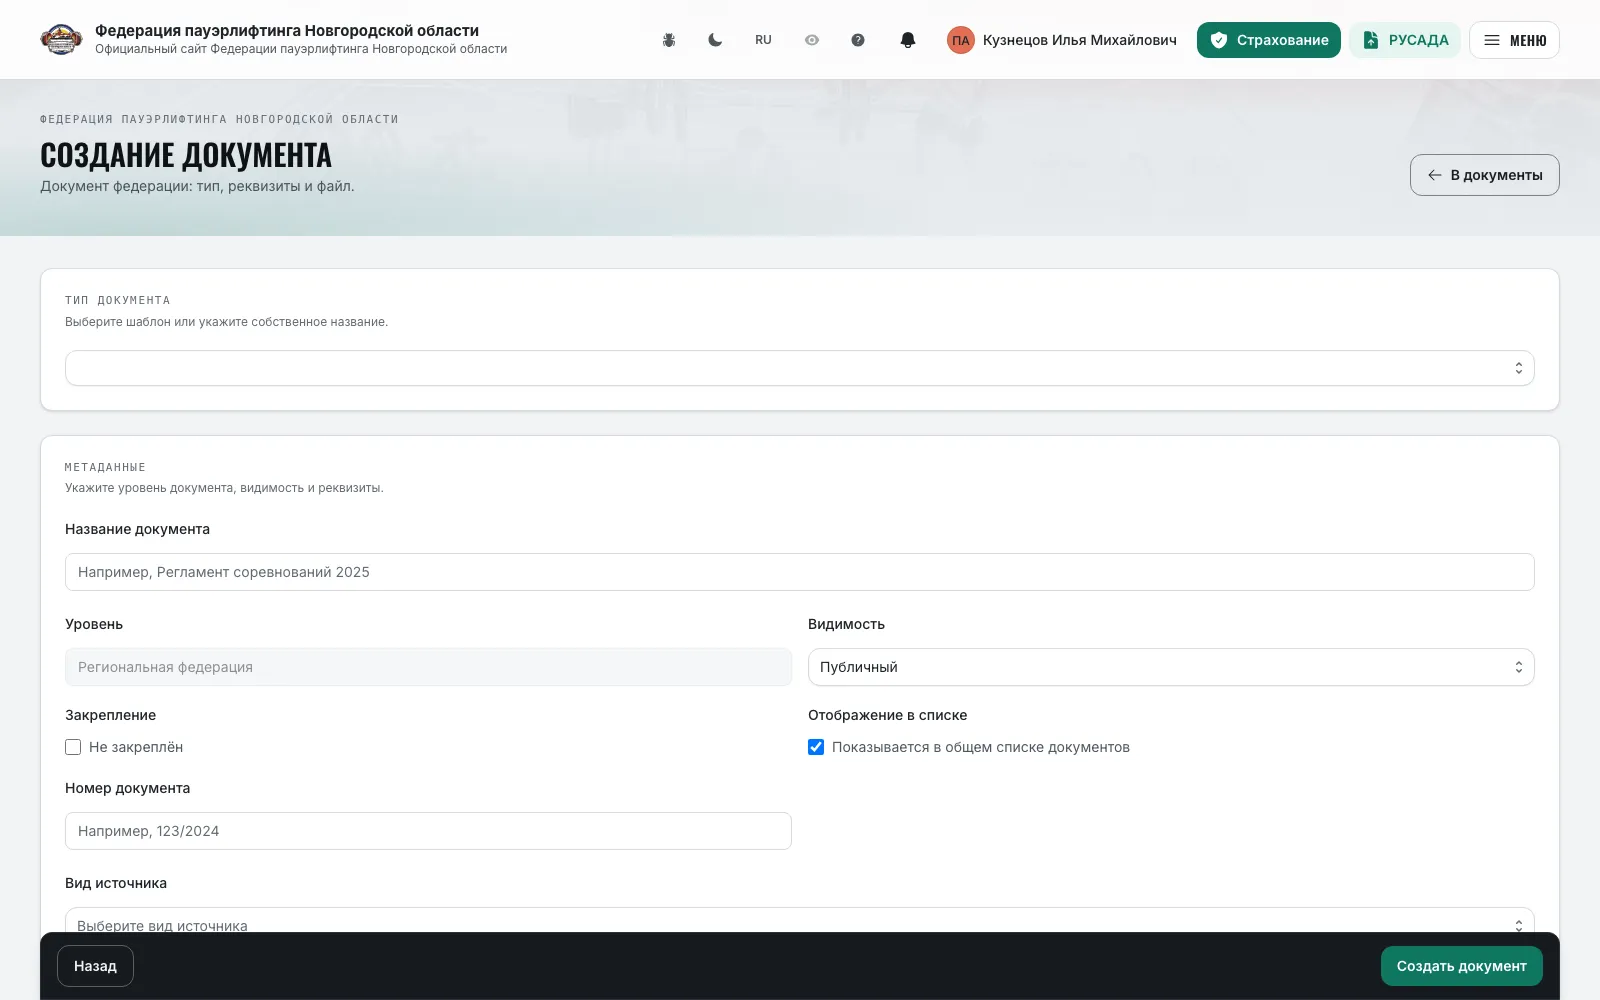
- 2
Click “Add document”. First pick the “Document type” — types are shown as tabs, some have their own steps (a protocol — import, see the separate section).
- 3
“Metadata”: “Document title”, “Level”, “Document number”, “Issuer kind” (national sports ministry, regional ministry, Federation, Region, Organization, Other) and “Issuer (organization)” from the reference, “Issue date”, “Valid from” and “Valid until”, “Comment”.
- 4
Four visibility axes: “Visibility” (public or internal), “Regional access” (shared with regional federations or own only), “Show on regional sites” and “Show in the list” (in the general list or by direct link only). “Pinning” puts the document first.
- 5
“Committee attachment” automatically files the document into the chosen committee's library — rules, national team documents and so on.
- 6
Upload the file — PDF, DOCX, XLSX or ZIP. Until a file is uploaded the document stays a draft and cannot be downloaded.
- 7
“Edit” and “Delete” sit in the document card for users with rights. Federation management → the “Documents” tab shows all documents as one table with inline editing, including those shared from the parent federation.
- 8
The “Competition form”, “Calendar draft”, “Document package” and “Rating” types are not created here — they come from their own screens: the “Forms” and “Calendar” tabs of federation management, the desktop client and the rating.
Note: Rank assignment orders are no longer created through documents — they have the “Assignment orders” section.
Protocol import
Federation administratorUploading a final protocol as a file with parsing of rows, athletes, coaches, teams and records.
- 1
Open “Documents” → “Add document” → the “Protocol” type. Wizard steps: “Parsing” → “Review” → “File and metadata”.
- 2
“Parsing data”: “Event”, “Discipline”, “Age group”, “Protocol source” (ASP, for example) and the protocol file. “Parsing options”: “Parse records”, “Parse coaches” (the COACH1, COACH2 columns), “Parse teams” (the CLUB column).
- 3
Click “Get preview”. The summary: sections, rows, athletes, coaches, referees, records, teams to create and existing ones.
- 4
“Rows table”: lot, athlete, bodyweight, class, attempts, total, points, “Achieved rank” and “Status” — “Found”, “Duplicate”, “New”, “Skip”. Cells are edited by click; duplicates get a decision “Create”, “Link” to a card or “Skip”, teams — “Link” to an existing one.
- 5
Click “Confirm and continue” — the protocol is confirmed, rows go into athlete cards, ranks are computed by standards. “Reject import” finishes without saving.
- 6
On the last step fill the document metadata, upload the protocol file itself and click “Create document”.
- 7
Merged sections and categories are fixed in the admin panel by moving rows; news about regional records is published automatically.
- 8
After the import open the document and click “Check for records” — see “Records”.
Note: Protocols of competitions run in the desktop client reach the site by upload from the client — the import is for foreign and old protocols.
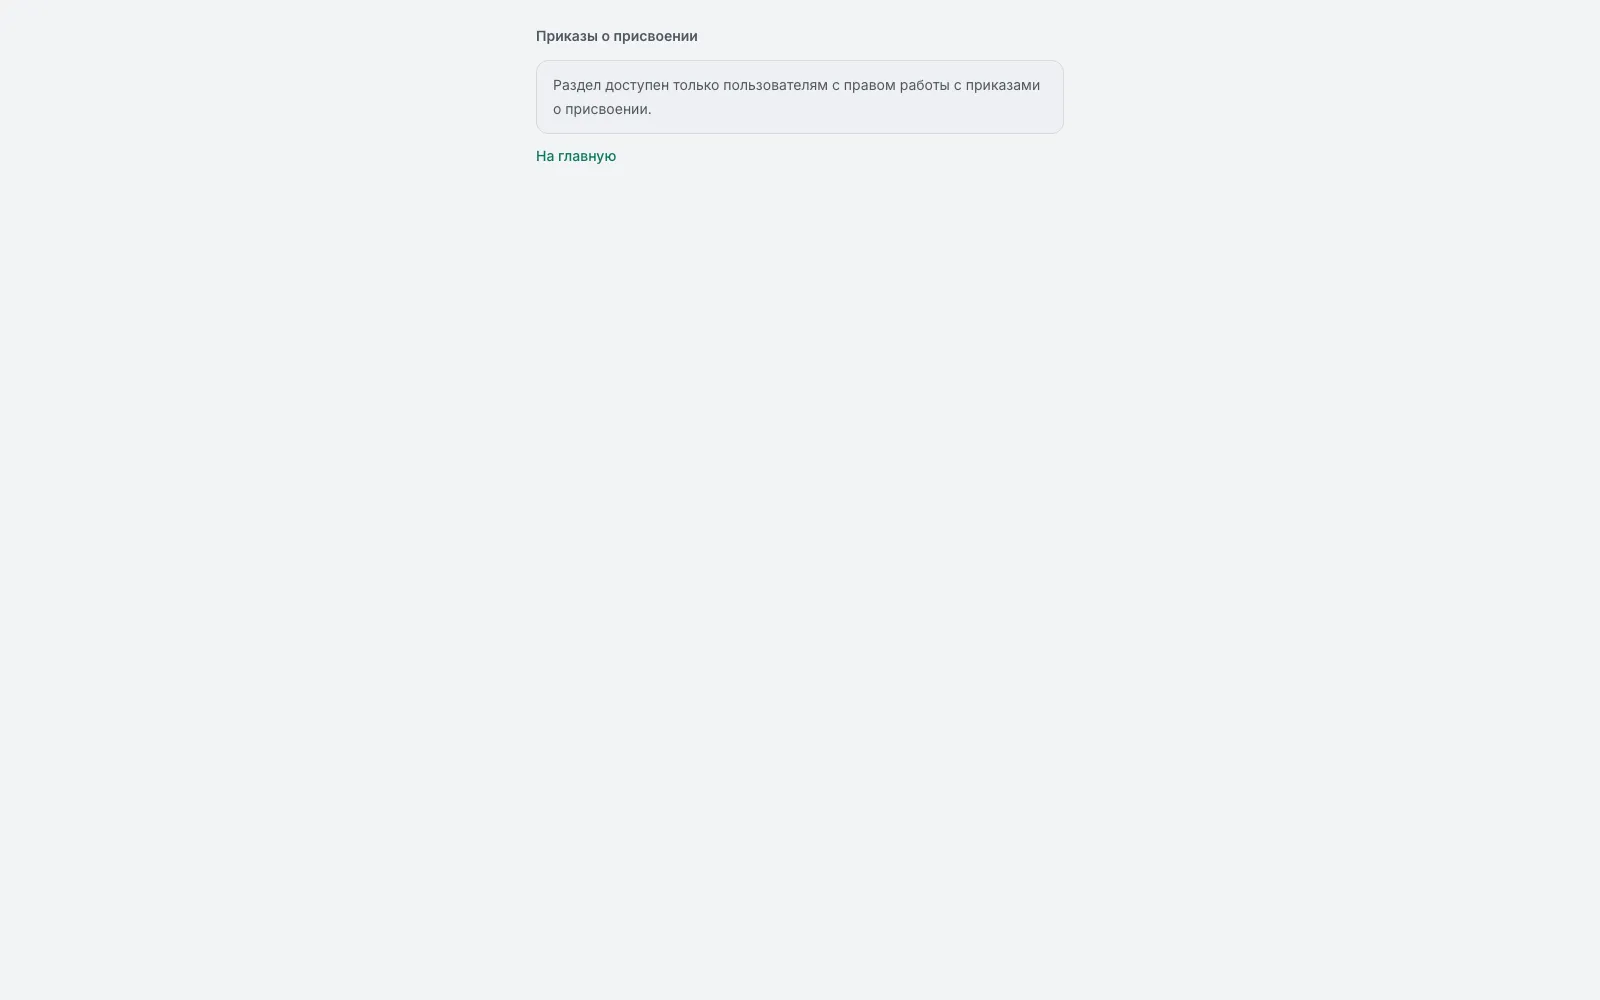
Assignment orders
Federation administratorA separate full-screen section: the order, its PDF and the rank and referee category assignments.
- 1
Open “Assignment orders” in the management menu (or the tab of the same name in federation management). On the left — the order list with a search “by number, title or organization” and a federation switch, on the right — the order card.
- 2
Click “New order”: “Order number”, “Order date”, “Title”, “Issuing organization” — the list is limited to organizations of the federation's region. A duplicate by number and date is noticed and “Create anyway” offered.
- 3
“Upload PDF” — the order file is shown right there in the viewer; without a file the order stays a draft.
- 4
“Athletes” → “Add”: find the person by name (from 5 characters), pick the “Rank” and “Valid until”. The term is prefilled by rank: the MS, MSIC and HMS titles are indefinite, youth ranks end the day before the athlete's 18th birthday.
- 5
“Referees” → “Add”: the same, with “Category”. Ranks and categories are written to the cards at once and show in the “Rank/title” column of the “Balance” registry.
- 6
“Exclude” in a row lifts the assignment — the previous rank returns from history.
- 7
“Edit” changes the order details, “Delete order” removes it with the file and lifts all assignments — irreversible.
- 8
The athlete and the federation receive notifications: “You have been granted a sports rank” and “an assignment order No. … has been uploaded”.
- 9
A referee category is granted by order only; the “Rank / title” field in the athlete card is the manual path for MS and above, it creates no order.
Note: A regional federation may grant ranks up to CMS and referee categories up to the first; MS and above are granted by the national federation. An order dated earlier than an already effective assignment is not applied.
Records
Federation administratorThe federation's record registry: public view, working table, adding, checking a protocol for records.
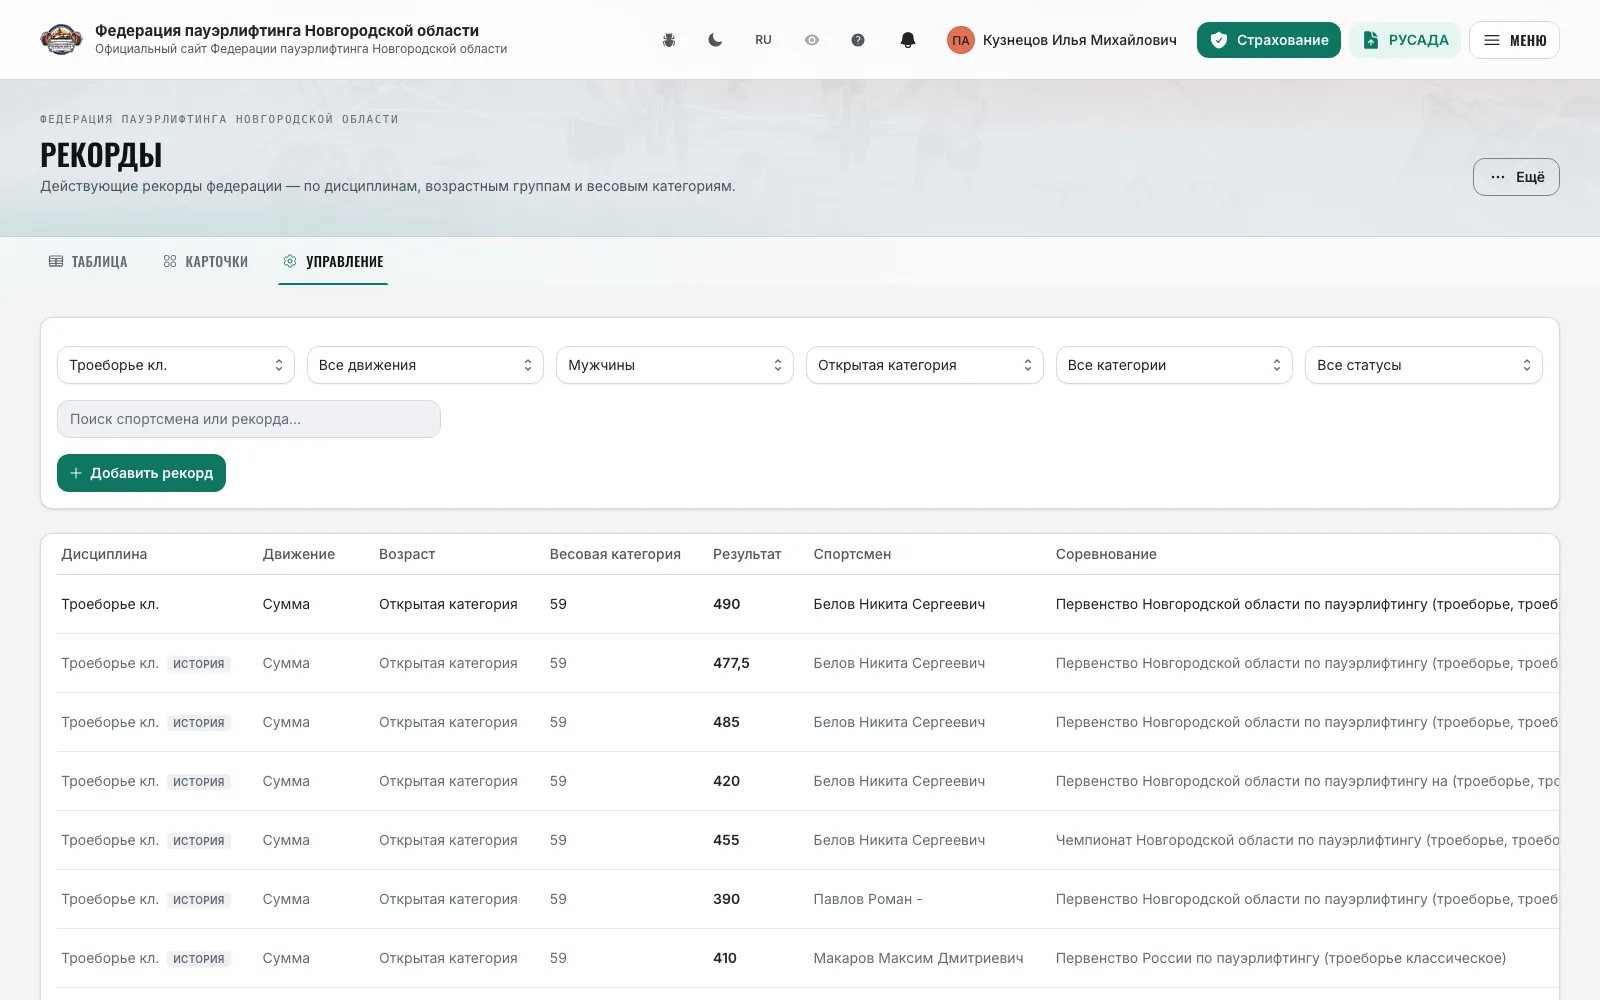
- 1
Open “Records” in the menu. The public view — cards by sex, discipline, age group and weight class; the “Table” / “Cards” switch.
- 2
Users with rights get the “Manage” view: the table shows every record with statuses “Current”, “Under verification”, “Superseded”, “Draft”, “Rejected” and “History” rows.
- 3
Filters: discipline, lift, sex, age group, weight class, status and the “Record set” — “Main”, “Students”, “Military”, “Sports schools”. The search matches the surname and the record value; “More” reveals extra actions.
- 4
“Print all records” and “Print by filter” prepare a print document.
- 5
“Add record”: a two-step wizard — “Parameters” (discipline, record type, age group, weight class, level, subtype) and “Athlete and result” (the event and athlete by a 5-character search, the result type and value). In the table the same form opens in a dialog.
- 6
“Edit” in a row opens the same form; editing exposes “Date achieved”, while the discipline, group, level and region are locked.
- 7
“Delete” unpublishes the record: it moves to “Rejected” but stays in the base and in history.
- 8
“Check for records” on an uploaded protocol's card matches its results against the current records of the chosen discipline and scope: verdicts “New record”, “Improved”, “Already registered” and the “Register records (N)” button.
- 9
The home page block “Latest records” shows the most recently verified records; the online protocol shows current records in the “Standards and records” panel.
Note: Deleting a current record does not restore the previous result — the category is left without a current record. World records are not edited on a federation site.
National team
Federation administratorThe roster by year and discipline and the selection principle — on the public page.
- 1
Open “National team” in the menu. Tabs: “Roster” with filters by year, discipline, age group and sex, “Selection principle” and the team documents.
- 2
“Add to the team”: find the athlete by surname (from 5 characters) and tick the “discipline × age group” pairs in which they are in the team for the chosen year.
- 3
“Remove from the team” lifts one pair — the roster for the other disciplines stays.
- 4
The “Selection principle” text and the roster files by year are set on the “National team” tab of federation management; an empty text hides the “Selection principle” tab on the public page.
Note: National team rights belong to the “Teams, clubs and national team” catalogue.
Federation management
Federation administratorThe “Federation management” section — twenty-one tabs: people, competitions, documents, the site showcase and service.
- 1
People: “Users” — “Create user” with a temporary password, “Accept existing”, editing, password reset, blocking and deletion; “Registrations” — the queue of registration requests (see the separate section); “Access rights” — the rights matrix by catalogue; “Referee rights” — which rights head official positions get on events.
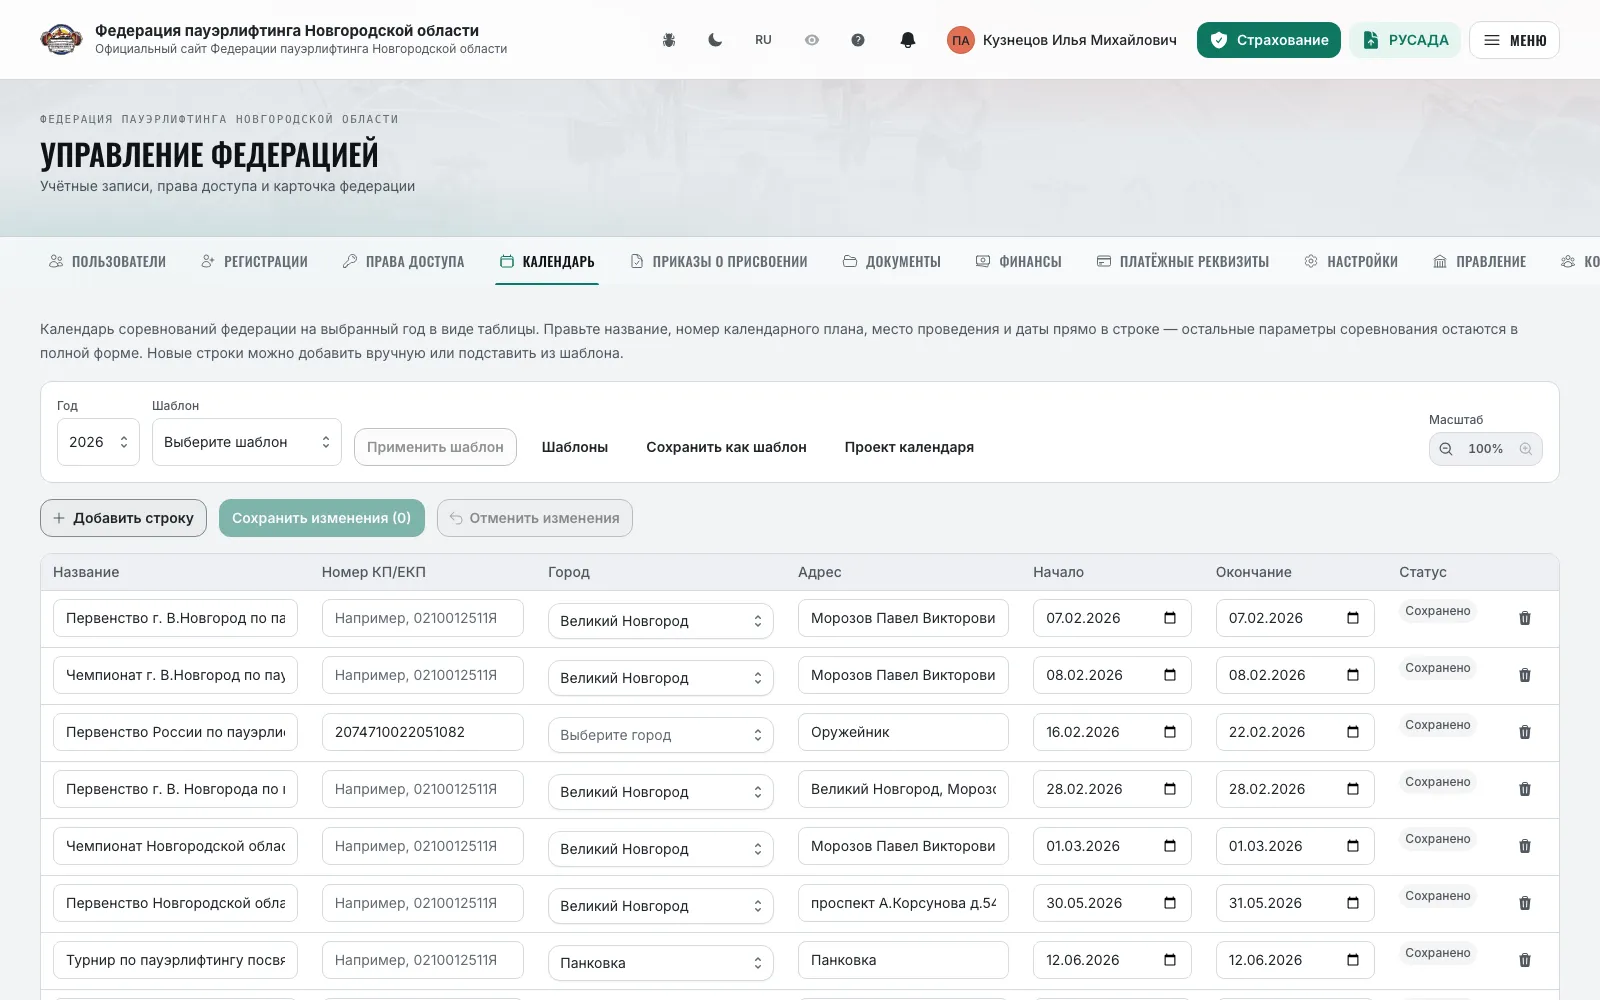
- 2
Competitions: “Calendar” — the year's competitions as a table with inline editing of the name, calendar plan number, venue and dates, calendar templates and the “Calendar draft”; “Forms” — print forms participants download from every competition page; “Finance” — fee statistics, organizers' reports and “Recalculate fees”; “Payment details” — the account or phone for online entry payment.
- 3
Documents: “Documents” — all federation documents as one table; “Assignment orders”; “Seals and signatures” — the federation seal and the president's signature (PNG with a transparent background) for generated documents; “Rules” — the sport's rules library; “Standards” — rank standards.
- 4
Site showcase: “Settings” — name, contacts, “Branding” (logos for the light and dark themes, event cover); “Board”, “Committees” (coaches' council, anti-doping commission, disciplinary and referee committees), “National team”, “Sponsors” by level, “Accreditation” — the registry of regional federations with state accreditation terms, reports and fees.
- 5
Service: “Service” — recalculation of ratings, best results, the dashboard and team data; “Apps” — desktop client builds for macOS and Windows with installation instructions.
- 6
“Settings” → “Entry deadlines”: how many days before the start entries open, new entries close and editing closes — the defaults for the federation's events.
- 7
“Settings” → “Personal entries”: whether team athletes may file personal entries; “Registration requests” — whether to accept registrations through this site; “Team rosters” — whether captains manage their rosters.
- 8
“Access rights”: each user shows how many rights are granted; rights are grouped by catalogue, a catalogue collapses. A captain needs no rights.
- 9
“Referee rights”: for each head official position tick “Entries”, “Schedule”, “Judging”; the setting applies to all events of the federation, “Reset to defaults” restores the sport's set.
- 10
“Users” → “Create user”: e-mail, name and a temporary password (at least 12 characters) to hand to the user; “Accept existing” adds an already registered user by e-mail — rights are granted separately.
Note: The “Standards”, “Referee rights” and “Apps” tabs exist only when the federation has a sport; “Accreditation” — only for the national federation. The federation's insurance terms are set in the admin panel.
Registration requests
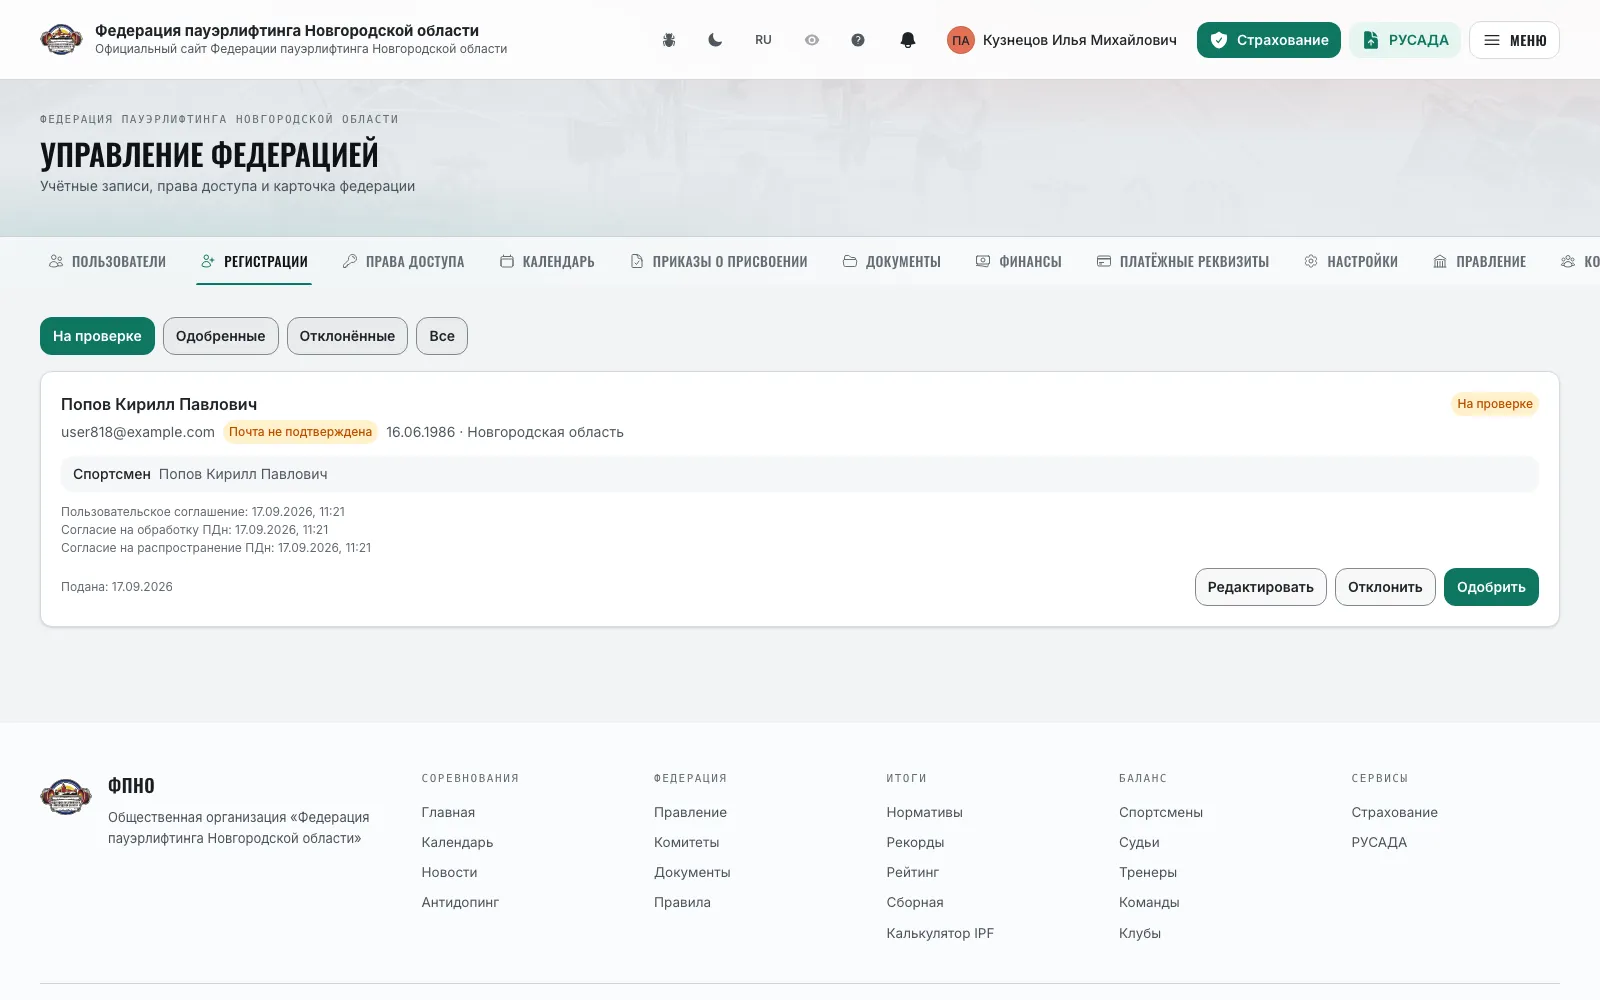
Federation administratorThe “Registrations” tab: checking new accounts, linking cards, granting rights.
- 1
Open “Federation management” → “Registrations”. The queue holds requests from your site; the national federation also sees requests of regions that have not enabled registration.
- 2
The request card shows the name, date of birth, region, ticked roles and the chosen athlete, referee or coach cards, the position in the regional federation and the applicant's comment.
- 3
Verify the cards: if the person picked someone else's or ticked “I am not in the list”, link the right one or create a new card in “Balance”.
- 4
“Approve” — the account is activated, the cards are linked, the user gets a letter; “Reject” — with a reason.
- 5
By the stated position (president, secretary, referee officer) grant rights on the “Access rights” tab — they do not appear automatically.
Note: Registration requests are enabled on the “Settings” tab → “Accept registration requests”. While it is off, the registration page says registration through this site is unavailable.
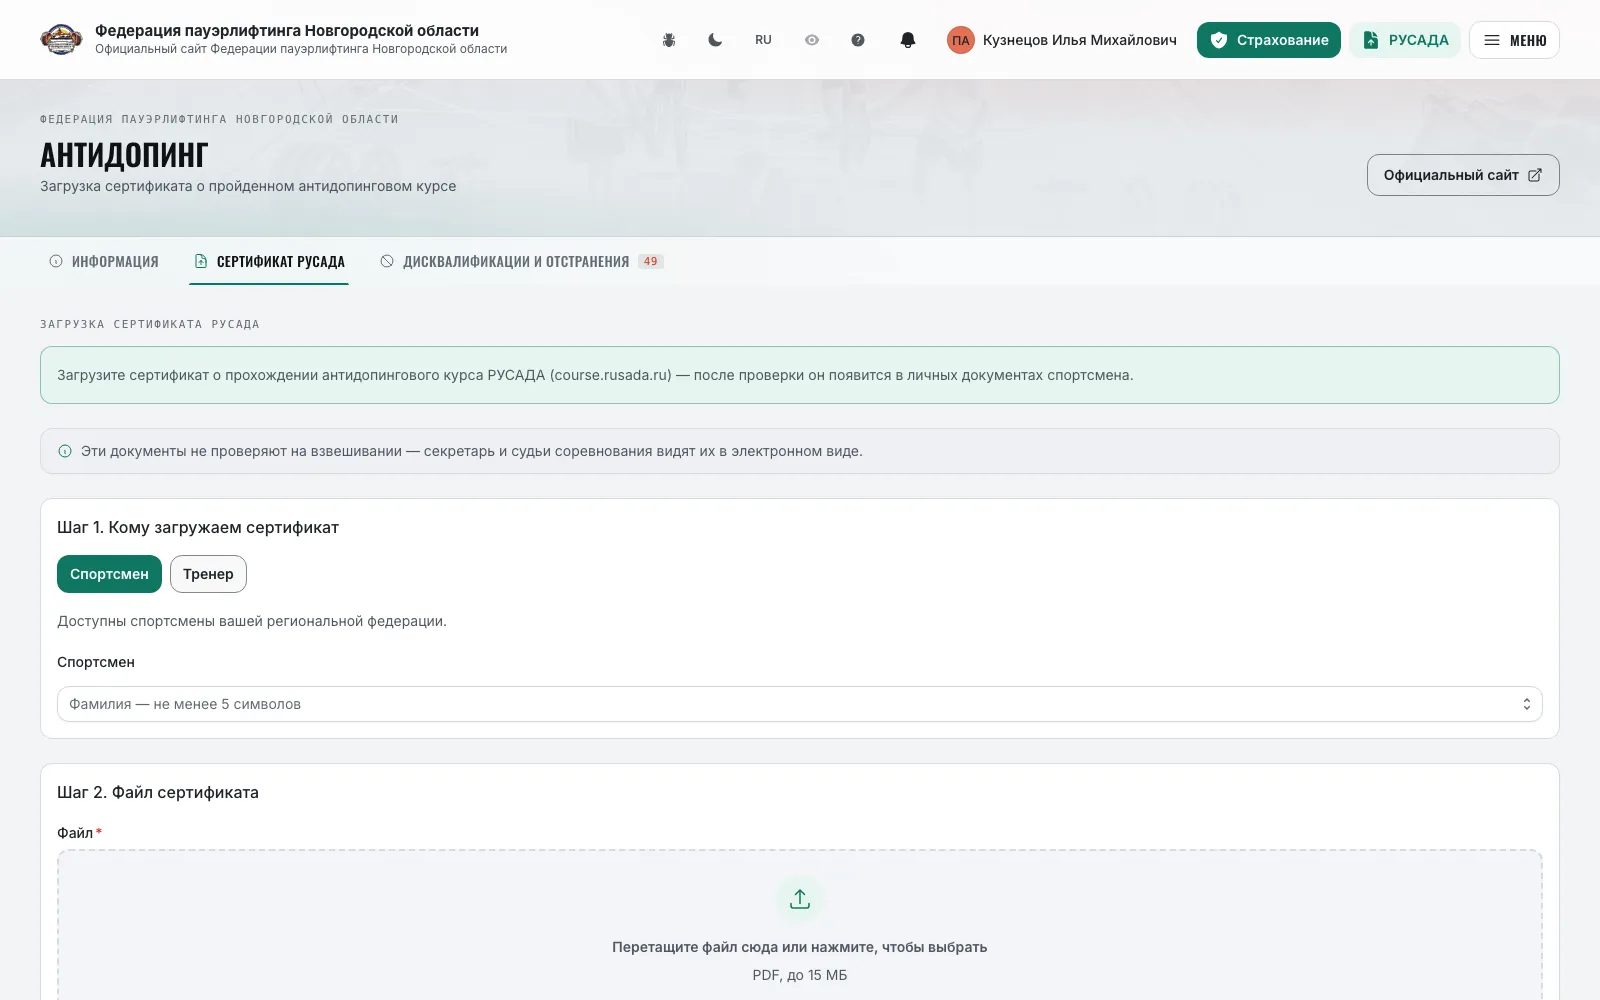
RUSADA certificate by QR code
AthleteTeam captainFederation administratorUploading the anti-doping course certificate with an automatic check on course.rusada.ru.
- 1
Open “RUSADA” in the “Services” block of the menu or “Anti-doping” → the “RUSADA certificate” tab.
- 2
“Step 1. Whose certificate”: “Athlete” or “Coach”, then find the person by surname (at least 5 characters). A regional site offers its own federation's people, the national one — the whole country.
- 3
“Step 2. Certificate file”: a PDF up to 15 MB — the original from course.rusada.ru, which carries a QR code.
- 4
Click “Upload certificate”. The site reads the QR code and verifies the certificate on course.rusada.ru — it takes up to a minute, keep the page open.
- 5
Typical errors: “No QR code found in the PDF”, “The name in the certificate does not match”, “Only certificates of the current and next year are accepted”, “A certificate for this year is already uploaded”.
- 6
The certificate appears in personal documents and as the “R” mark in entries; an athlete can upload it themselves — in the cabinet or right from the entry via the “R” mark.
Note: The “Disqualifications and suspensions” tab shows the federation's current decisions and history; the “Fine” column is visible only to staff with the fine-viewing right.
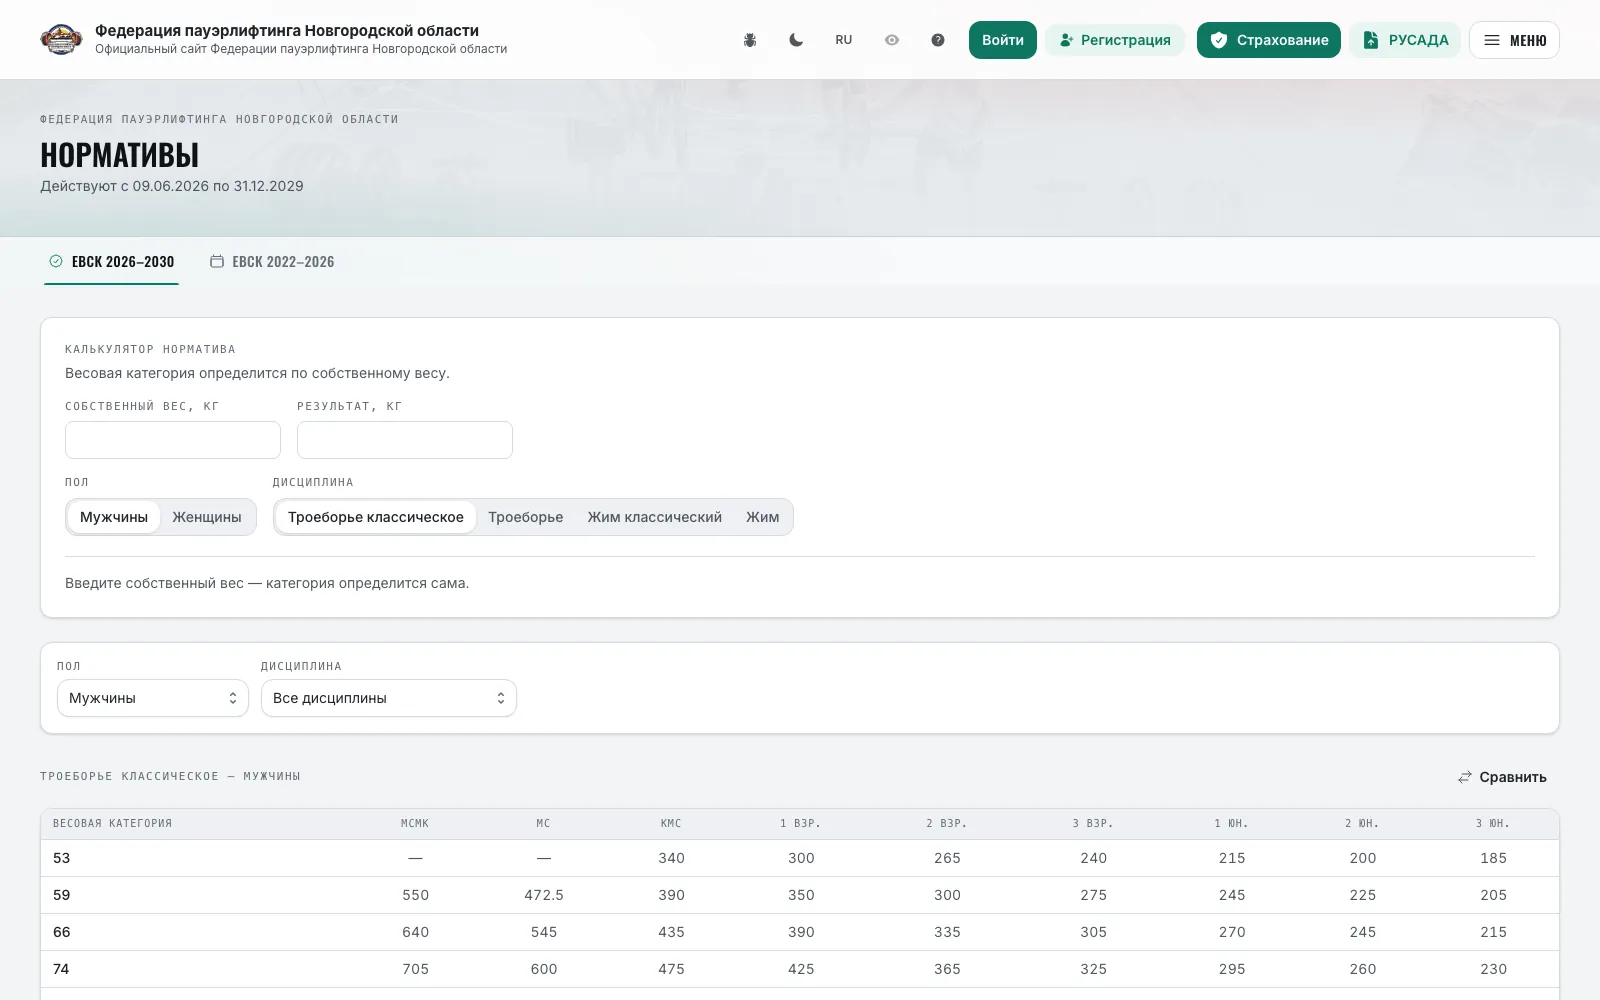
Rules, standards and anti-doping
AthleteTeam captainRefereeOrganizerFederation administratorReference sections open to every visitor of the site.
- 1
“Rules” — the sport's rules corpus by document and section, with search.
- 2
“Standards” — rank standards by discipline and weight class; “Compare with another edition” shows where standards rose or fell against the past or future version.
- 3
The “Standard calculator” above the table: enter the bodyweight and result — the site finds the class, the achieved rank and the “Next” standard; after signing in “Take my last result” is available.
- 4
“Anti-doping” — the “Information” (responsible organization, medicine check, education, news), “RUSADA certificate” and “Disqualifications and suspensions” tabs.
- 5
“IPF calculator” in the menu — IPF GL points by total, bodyweight, sex and discipline.
- 6
On the national federation site “Regions” offers the “Federation sites”, “Accreditation and fees” and “Useful links” tabs.
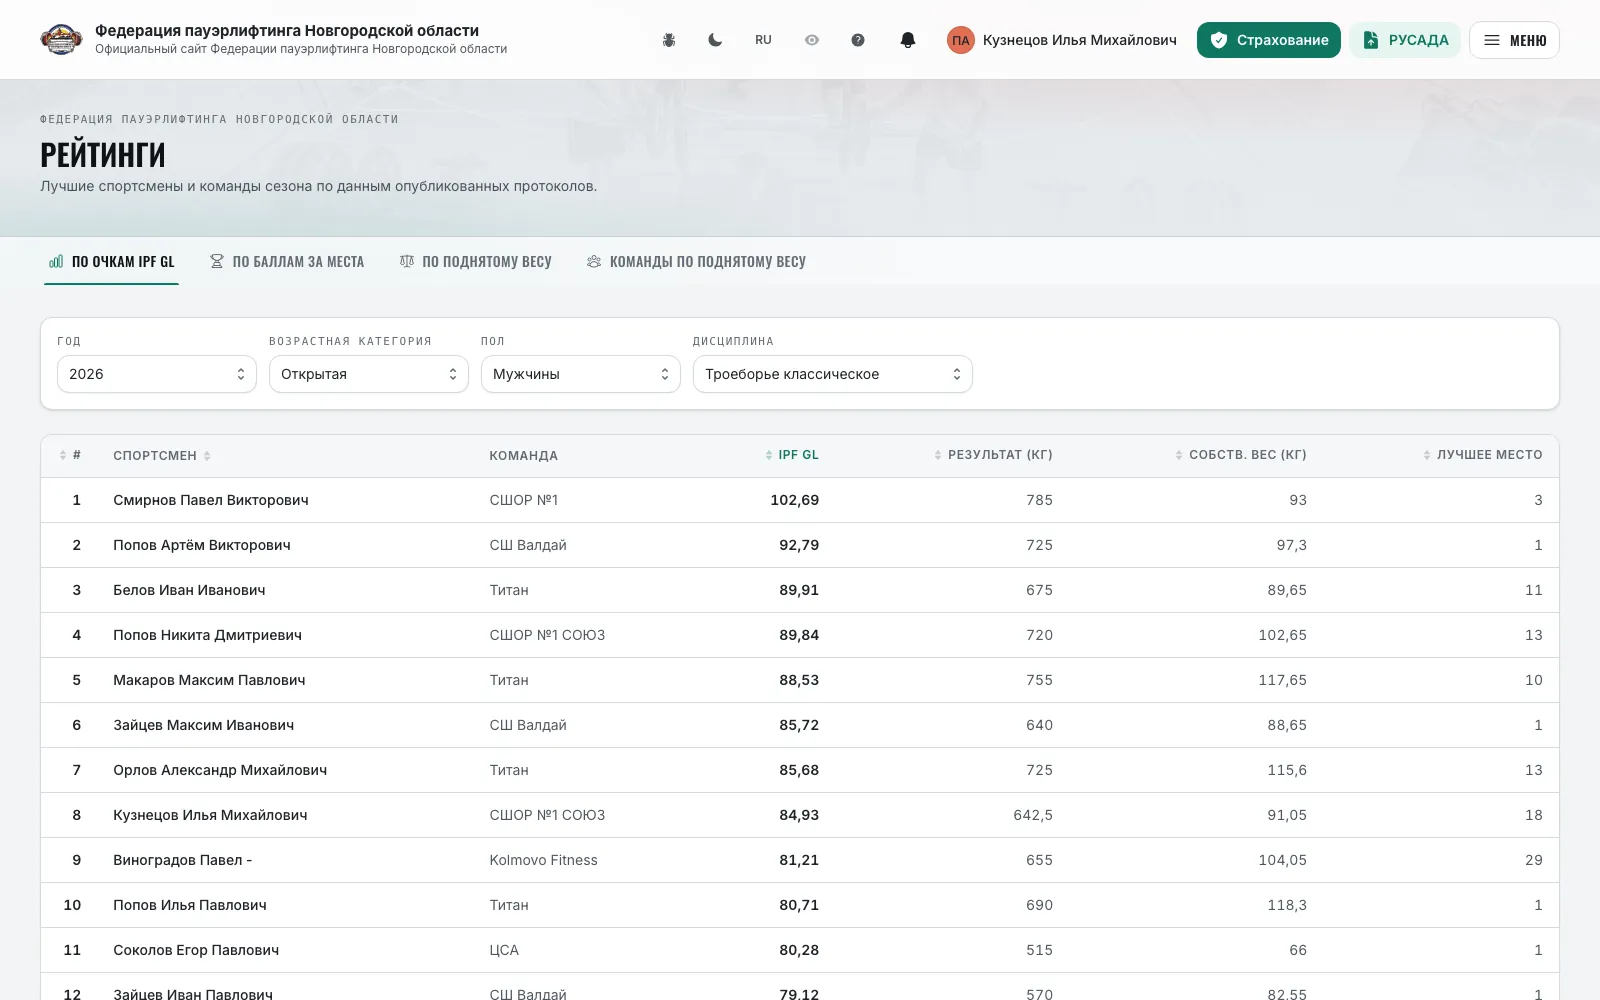
Ranking, regions, board and committees
AthleteTeam captainRefereeOrganizerFederation administratorPublic sections about the federation and its people.
- 1
“Ranking”: “By IPF GL points”, “By placement points”, “By weight lifted”, teams and regions by weight lifted; filters by year, sex, age category, discipline and lift. “Points system” explains the points by competition level, the medal legend — shape and colour.
- 2
“Regions”: regional federations, their sites and heads, the “Entry manager” with a contact, accreditation terms and fees.
- 3
“Board”: “President and board members” and “Federation members”; “Committees”: the coaches' council, anti-doping commission, disciplinary and referee committees with document libraries and “Best referee”.
- 4
Federation “News” with covers; the news body is rich text with images, published from news management.
- 5
Cards of athletes, coaches, referees, teams and clubs open from the “Balance” registry, protocols and the ranking.
- 6
The home page gathers all of it into a showcase: the next start, live broadcast, season leaders, latest records, clubs and the coverage map of regions and municipalities.
Feedback
AthleteTeam captainRefereeOrganizerFederation administratorFound a bug on the site — click the bug icon in the header.
- 1
The “Feedback” button with the bug icon sits in the header next to the theme switch; on the first visit a hint appears next to it.
- 2
Write a “Comment”: what happened and on which page. “Name” and “Region” are optional.
- 3
“Attach screenshot” — PNG, JPEG or WebP up to 5 MB.
- 4
Click “Send”. Messages land in the feedback section of the federation's admin panel.